
1
WWF Intensive homestead food production
learning manual: March 2021
Contents
1Water and soil conservation practices for smallholder farmers.............................................................3
1.1Water harvesting and conservation case study ............................................................................3
1.2Overview of WHC Methods...........................................................................................................6
1.3Catchments ................................................................................................................................. 11
1.4Topography– Aspect and slope................................................................................................. 11
Aspect..........................................................................................................................................11
Slope ...........................................................................................................................................12
2Healthy soils.........................................................................................................................................15
2.1Healthy soil is alive. .....................................................................................................................15
2.2Carbon and Soil Organic Matter - the main building block of life and soil..................................15
2.3Why soil organic matter is so important ......................................................................................16
2.4Turning air into soil ......................................................................................................................20
2.5Characteristics of healthy soil.....................................................................................................21
2.6What is soil? ................................................................................................................................23
2.7Characteristics of soil texture types ............................................................................................23
2.8How to tell your soil texture type................................................................................................. 24
2.9Soil structure ...............................................................................................................................26
2.10Identification of Soil Structure.....................................................................................................27

2
2.11Soil Degradation..........................................................................................................................28
3Turning runoff into 'run-on'...................................................................................................................30
3.1Soil fertility ...................................................................................................................................32
3.2Nitrogen .......................................................................................................................................32
3.3Phosphorous ...............................................................................................................................33
3.4Potassium ....................................................................................................................................34
3.5Other important nutrients:...........................................................................................................34
3.6Micro or trace elements (nutrients needed in smaller quantities)...............................................34
3.7Soil acidity ...................................................................................................................................35
4SOIL ENRICHING METHODS ............................................................................................................37
4.1Trench beds ................................................................................................................................37
Introduction..................................................................................................................................37
Shallow trench .............................................................................................................................40
Eco-circles ...................................................................................................................................40
4.2LIQUID MANURES ....................................................................................................................42
4.Good plants for liquid manures.......................................................................................................43
Comfrey.......................................................................................................................................43
5.How to make liquid manure from animal manure...........................................................................44
Kraal manure (cattle) ...................................................................................................................45
Chicken manure..........................................................................................................................45
Goat manure ...............................................................................................................................45
Other manures............................................................................................................................46
Urine ............................................................................................................................................46
Agroforestry Leaf tea Recipe......................................................................................................46
4.3Manure as a natural fertilizer.......................................................................................................46
5NATURAL PEST AND DISEASE CONTROL ......................................................................................48
5.1Enemies or friends......................................................................................................................48
5.2Plants...........................................................................................................................................48
5.3Diagnosing plant problems..........................................................................................................51
Ways to identify insect damage..................................................................................................51
Ways to identify disease damage...............................................................................................51
5.4Bio-Indicators..............................................................................................................................52
5.5Biological pest control .................................................................................................................53
Beneficial insects.........................................................................................................................53
Advantages of biological control................................................................................................. 53
Disadvantages of biological control............................................................................................54
Pollinators ....................................................................................................................................54
Scavengers................................................................................................................................. 54
Physical control methods ............................................................................................................55
Protective borders and barriers...................................................................................................55
Traps...........................................................................................................................................55

3
Artificial guards ............................................................................................................................56
Botanical remedies..................................................................................................................57
6MIXED CROPPING .............................................................................................................................58
6.1Inter-planting ...............................................................................................................................58
Examples of inter-cropping in a vegetable garden.....................................................................58
Some plants which grow well together:.......................................................................................59
Plants that do not grow well together:.........................................................................................60
6.2Crop rotation................................................................................................................................61
Effects of crop rotation................................................................................................................61
1 WATER AND SOIL CONSERVATION PRACTICES FOR SMALLHOLDER FARMERS.
1.1 WATER HARVESTING AND CONSERVATION CASE STUDY
The practice of rainwater harvesting for domestic use and crop production supported early civilisations
some 3000 years ago. Today, rainwater harvesting remains a highly productive and sustainable practice
which is widely used by small producers and commercial farmers alike.
What follows is a description of the well-known case of Mr Phiri Maseko, a Zimbabwean farmer whose 3
ha farm is an excellent example of rainwater harvesting and water conservation.
Poor soil conservation practices and deforestation in the upland areas of Zimbabwe have led to massive
soil erosion and land degradation. The result is that in a country where 70% of the population relies on
agriculture for a living, only 20% of the land can be used for this purpose. Many farms have become
unproductive, and those which are marginally productive cannot survive recurring drought. As a result,
many farmers have abandoned their farms, while others have been forced into subsistence farming.1
The Vishavane District in the Midlands
Province of Zimbabwe is a particularly dry
area with frequent droughts, and the
farmers who live here struggle with fragile
soils and erratic rainfall. However, on one
farm in this region, a three-hectare rural
homestead located in a hilly area outside
the small town of Zvishavane, crops grow
quickly and bountifully. Here, enough food
is produced to support a family of 15 and
to raise money for other living expenses.
This is the farm of Zepheniah “Phiri”
Maseko, a farmer who views natural
resources such as soil and water as
precious gifts to be respected and
protected, and whose innovations in soil
and water conservation have drawn
international attention and acclaim.
Figure 1.1A view from the top of the Maseko farm

4
Figure 1.3The Maseko family homestead
When Phiri first began farming he found it very difficult to grow crops
successfully, as he had few material resources and there were often
periods of drought. He decided to pay close attention to what happened
when it did rain, and through careful observation he learned how the water
flowed over and into the land. Phiri then began to experiment with ways of
capturing the water in the soil so that it could provide nourishment for his
crops and trees.
The Maseko Farm:
Phiri’s plot is situated on
the slope of a hill which
faces north-northeast,
providing good winter sun.
At the top of the hill is a
large rock outcrop (a
granite dome). This rock
outcrop posed the first
challenge for Phiri. He
observed that when heavy
rains fell, the rock caused
water to run down the hill in
channels, taking soil with it
and causing severe
erosion. Phiri also noticed
that although in this
situation very little water
was able to infiltrate the
soil, the soil remained
moist for longer in areas
just above rocks and plants
and in small depressions.
Based on these
observations, Phiri decided
to try and control the flow
of storm water off the rock.
He built some low stone
walls at random intervals
along contours below the
rock outcrop. The walls
slow down and spread out
the flow of storm water.
Patches of indigenous
vegetation which grow
along the walls also slow
the water down and draw it
into the soil.
Figure 1.2Mr Phiri
Maseko

5
Below the stone walls Phiri then dug two dams, into which the water could be directed. Phiri calls the
larger of the dams his “immigration center”. “It is here that I welcome the water to my farm and then direct
it to where it will live in the soil,” he says.3 Water in this dam seeps into the ground over a period of time,
replenishing the store of water under the ground. The dam has also become a water gauge for Phiri, who
has learned that if it fills up three times in a season, enough rainwater will have seeped into the ground to
see his farm through two years of drought.
Water overflow from the smaller dam is directed by pipe into a storage tank. This water is used to water
the homestead garden, where Phiri and his family grow an unusually wide variety of fruit and vegetables
such as pumpkins, beans, cabbage, tomatoes, garlic, peas, onions, carrots, chillies, guavas, oranges,
naartjies, lemons, paw-paws, peaches and mangos.
Phiri also built a concrete tank next to the main
house. When it rains, water runs down the roof and
along gutters into the tank, where it is stored for
drinking and household use. A granadilla creeper
was trained to grow up and over the tank to keep the
water cool. All of the water which the family uses for
washing (called greywater) is drained into an
unsealed underground tank, where it quickly seeps into the ground.
Between the family homestead and the crop area is a dirt road. To
control the water runoff from the road, Phiri dug large pits (4m long,
2m wide and 1m deep) at regular intervals just above the fields and
planted indigenous vegetation around them. When it rains the pits fill
with water, which seeps into the soil slowly, feeding the plants and
replenishing the water table. The vegetation stabilises the pits and
prevents them from collapsing.
The family grows many different crops in their
fields, including maize, sorghum, beans,
pumpkins, millet, watermelon, nuts, cassava,
peas and sweet potatoes. This diversity gives
the family food security because if some crops
fail, others will survive. Their crop diversity also
reduces the likelihood of pest attack and
prevents the soil from losing its nutrients.4 Phiri
also built three wells in the cropping area. One of
these is carefully protected so that the water can
be used for drinking. The other two are used for
irrigation and for washing clothes. A network of
pipes and canals has also been constructed so
that crops can be watered during times of drought.
At the lowest point of the farm lies a natural wetland, an area of land where the soil is saturated with
water. Here, Phiri dug two ponds. The larger pond is stocked with fish which are caught for food, while the
smaller pond catches water overflow from the larger one. Phiri planted reeds, bananas, kikuyu and
elephant grass, and sugarcane around the banks to hold the soil in place. Water from the main pond can
also be pumped out and used to water the crops.
As well as observing the ways in which water moves, Phiri also paid close attention to rainfall patterns
and has experimented with numerous other water-harvesting methods over the years. Phiri uses the soil
Figure 1.4 Rainwater is directedinto dams
Figure 1.5 Water overflow is directed into a
storage tank
Figure 1.6 Pits which store water
© Yasmina Zaidman

6
Figure 1.7 Members of the Phiri homestead standing next to their
maize crop
Figure 1.8 The water harvesting and conservation
process
as his “catchment tank” so all of his methods are designed to help water sink into the soil as quickly as
possible.
Through observation, inspiration, innovation and dedication, Phiri Maseko changed the landscape not
only of his farm, but also of his life. In 1986 he founded the Zvishavane Water Project, a Non-Government
Organisation (NGO) which was established to educate people about water harvesting and conservation
and to promote sustainable farming. Phiri spreads his knowledge and skills freely and tirelessly to
anybody who is interested in learning about water harvesting and conservation. Since 1997 more than a
thousand people from outside the region have visited the Maseko farm, and “…local visitors are so
frequent and numerous that he (Phiri) has ceased to count them.”5 In 2006, Phiri Maseko was presented
with the prestigious National Geographic Society/Buffett Award for Leadership in Conservation, to
acknowledge his outstanding work and lifetime contribution to further the understanding and practice of
conservation in his country.6
There are many different ways to conserve water by protecting and managing it efficiently. In situations
where water is used for irrigation, conservation involves getting as much water as possible to infiltrate the
soil so that the amount of water lost to evaporation or runoff (water which runs over the ground) is
minimised. One method of achieving this is to cover the soil with a mulch such as a crop residue, which
increases water infiltration and reduces evaporation.
Other examples of water conservation practices
include recycling and re-using water (e.g. using bath
water to water vegetables); irrigating crops in sensible
ways (e.g. watering less often but more thoroughly,
and not watering during the heat of the day);
eliminating water leaks (e.g. fixing leaking taps and
pipes); and growing indigenous plants which are
suited to the local climate and environment.
Based on the above definitions, as well as the
practices of people such as Phiri Maseko who harvest
and conserve water, we can say that water harvesting
and conservation involves:
1.2 OVERVIEW OF WHCMETHODS
There are many different forms of water harvesting and conservation. The methods selected for this
manual are summarised in below, along with a short description of what each method entails. Many of
these methods can be used together and complement each other well. In this manual, the methods that
have been grouped together have differences too small to detail. Alternate names have been listed.
There are also some important and useful methods noted at the end of the table. These methods, many
of which are commonly known like small earth dams, may be needed and suitable to some situations, but
design and construction are somewhat technical. Water conservation measures and water storage
structures are usually identified separately from water harvesting, although these are used as part of
water harvesting systems.
Type
Water flow when raining
Collection area
relative to growing area
© Yasmina Zaidman
Intercepting / capturing rainwater
Slowing the water down
Channelling the water to where it is
needed
Storing the water (a) directly in the soil,
or (b) in tanks or storage containers

7
Micro-catchment:
Sheet flow of water.
10 x growing area
Macro-catchment:
Channel flow of water
100 x growing area
Floodwater harvesting:
Flood events
up to 10,000 x growing area

8
Name Used in
Manual
Similar to :
Description
Main purpose or comment
Type of Water Harvesting
System
diversion
furrows
•run-on ditches
•run-on RWH
•ex-field RWH
•feeder channels
•diversion
trenches
A diversion furrowdirects rainwater
runoff from gullies, grasslands or hard
surfaces (such as paths or roads) to a
cropped area or to a storage tank. This
increases the water available to the
plant.
•used for fieldcrops and in
gardens
•additional water diverted
directly to soils and crops
•additional water stored in
underground tanks for later
watering
Macro-system (collects water
from an external catchment and
brings it to the field).
trench-beds
•deep trenching
•fertility trenches
Trench beds are 1m wide and 2 m
long. They are dug to 1m deep then
packed with dry grass/leaves, compost,
manure and soil.
•used in food-gardens
•create highly fertile soils which
can absorb and store water.
•provide an immediately usable
planting bed even on shallow
or poor soils.
•often used with diversion
furrows and mulching.
A micro-system when used
alone. But these are usually
connected to diversion furrows
which collect water from an
adjacent area and feed the
trenches.
mulching
•no other names
Mulching is the practice of spreading
organic material like compost, straw,
manure, dry leaves, grass clippings or
wood chips onto the surface of the soil.
It is usually concentrated around the
plant.
•can be used on all crops and
orchards, not pastures.
•improves plant growth
•reduces evaporation from the
soil surface
•improves soil temperature
•limits weed growth and makes
watering easier by protecting
soil.
Water conservation method

9
Name Used in
Manual
Similar to :
Description
Main purpose or comment
Type of Water Harvesting
System
stone bunds
•stone lines
•stone banks
•contour stone
bunds
Stone bunds are rows of tightly packed
stones built along contour lines
•used to improve grazing land
•slow down, filter and spread out
runoff water
•increase infiltration and reduce
soil erosion.
•sediment is slowly captured on
the upper sides and they form
natural terraces.
Macro-system: The contour
ridges collect water from
adjacent slopes.
tied ridges
•in-field RWH
•partitioned
furrows15
•cross-ridges
•furrow dikes16
Earth ridges are built along the contour
at 3m spacing. Crops are planted on
either side of the ridge. Rainfall from the
unplanted sloping basin is caught in the
furrow and ridge. Basins are created
along the contour to further pond runoff
using crossties – mounds of soil spaced
along the base of the contour.
•Used in home-gardens,
smallholder fields and when
mechanised, at a large
commercial scale.
•the system has been fine-tuned to
South African conditions and is
called “in-field RWH” in local
publications.
Micro-system when used
without other methods. Can
be used with diversion
furrows and mulching.
swales
•bunds
•contour ridges
•berm ‘n basin
•contour ditches
A swale is an earth bank constructed
along the contour with a furrow on the
up-slope side – this is filled with dry
leaves, compost and soil. The top of the
earth bank is levelled off to allow
planting. The swale intercepts runoff,
spreads it out and helps it infiltrate deep
into the ground.
•Used in home-gardens and
smallholder fields.
•widely used within permaculture
systems.
•good groundwater recharge
Micro-system, but like the
above, often used with
diversion furrows and
mulching.

10
Name Used in
Manual
Similar to :
Description
Main purpose or comment
Type of Water
Harvesting System
terraces
•benches
A terrace is a level strip of soil built
along the contour of a slope and
supported by an earth or stone bund, or
rows of old tyres filled with soil. Terraces
create flat planting areas and stabilize
slopes which would otherwise be too
steep for crop production.
•Used in home-gardens and
smallholder fields.
•mainly in steeper sloping areas,
for cropping and orchards.
Micro-system used on
steeper slopes. Diversion
furrows not used to
augment water – erosion
risk on steeper slopes.
Mulching can be used.
fertility pit
•banana circles
•circular swale
•Katumani pitting
Fertility pits enable runoff water to be
captured and conserved in 1m deep pits
that are filled with organic matter such
as compost or manure. The organic
matter increases the fertility of the soil
and minimises the loss of water from
evaporation.
•Used in home-gardens and
smallholder fields.
•often planted with wet-loving
bananas / paw paws
•often used in conjunction with
greywater.
Micro-system which
lends itself as a soak
away around buildings –
including greywater.
Katumani pitting is a
variation where multiple
fertility pits are tightly
packed across a field.
greywater
harvesting
•recycling
•re-use
Greywater harvesting is the practice of
using non-toilet wastewater produced in
a household – to water the root zone of
the soil. Examples include tower
gardens nad keyhole beds
•home-gardens
•greywater includes the water used
for bathing, washing, cleaning,
cooking and rinsing.
Water conservation
method
roofwater
harvesting
Collecting water from roofs for
household and garden use is widely
practiced across South Africa. Tanks
and containers of all types – from brick
reservoirs to makeshift drums and
buckets – are a common sight in urban
and rural areas.
•mainly used for domestic supply
•surplus used in home-gardens
•more greywater available
Macro-system – because
it is a large collection
area to storage.

11
1.3 CATCHMENTS
A water catchment is an elevated area of land from which water drains to a particular endpoint. Each
catchment is separated topographically from adjoining catchments by geographical barriers such as
ridges, hills or mountains; these barriers are called watersheds. A ridge along a mountain, for
example, creates two catchments, each of which faces a different direction. Elevated catchments
drain into lower
catchments, so a large
catchment will include
many smaller catchments
at lowerelevations.
Figure A water
catchment
No matter where you are,
the ground on which you
stand forms part of a water
catchment. The figure
below, for example, shows
an urban water catchment.
The crosses show the high and low points of the plot, while the arrows indicate the run-off water.
Figure An urban water
catchment
1.4 TOPOGRAPHY –ASPECT AND SLOPE
Aspect
The direction which a site or slope faces is called its aspect, and aspect is important to consider when
planning a vegetable garden. Plants need to receive at least 5 hours of sunlight a day, so it is
important to choose a site where plants will get maximum sunshine all day long. Beds which lie in an
east-west direction will get the full benefit of both the morning and the afternoon sun.
The following method can be used to determine the aspect of a site:

12
Figure 6.1 How to determine aspect(Method 1)
Point with your right hand to where the
sun rises (east), and with your left hand
to where it sets (west). When standing
in this position, you will be facing north,
and south will be directly behind you.
Once you know where north is, you can
determine the direction that the site
faces.
Slope
The slope of the land is the angle it forms with the plane of the horizon. Slope is important to take into
account when planning a vegetable garden as flat sites are are easy to work on and soil erosion and
water loss is minimised. Care should be taken, however, on flat sites with clayey soils as waterlogging
may become a problem.
Slope also needs to be taken into account when planning and implementing most WHC methods,
mainly to ensure that soil erosion does not occur.
Slope can be expressed in the following three ways:
Proportion–this is the ratio of a slope’s horizontal distance to its vertical distance.1 For example, a
1:4 slope rises a vertical distance of one unit for every four units it extends horizontally.
Degrees – this is a measurement used to represent the angle of a slope. Degrees can be measured
with a protractor or with survey instruments. Land that is completely flat (horizontal) is 0°, while a
vertical cliff is 90°.
90°
45°
0°

13
Percentage – the percentage of a slope can be calculated using the following formula:
Example: A slope of 1:4, where one unit equals 10 metres, has a rise of ten metres and a run of
forty metres. The percentage of the slope (S) can thus be calculated as follows:
The following slopes are expressed in proportion, degrees and by percentage.2
Marking out contour lines on a slope using a line level
Three people are needed to mark out contour lines on a slope using a line level (person A, person B
and person C).
(Not to
scale)
1,Start at the edge of the field.
Person A holds their pole in a vertical position and stands still, while person B moves up and/or down
the slope until the line level, which is read by person C, gives a level reading. Points A and B are then
marked with pegs.
2.Person A then moves to point B, and person B moves further down the field and the process
is repeated.
3.Note that when marking out contours using a line level, it is important that both poles are held
vertically, and that neither pole is placed in a depression or on top of a minor high spot such as a rock
or clump of soil.
Measuring slope using a line level
A line level is another levelling device which is also inexpensive and easy to make by hand (refer to
Section 6 for information on how to construct a line level). Three people are needed to measure the
percentage of a slope using a line level (person A, person B and person C).
10
S(%) = x 100 = 25%
40
1:1 = 45° = 100% 1:2 = 26° = 50% 1:3 = 18° = 33.3%
rise
Slope (%) = x 100
run

14
1000 mm
10 000
mm
450
mm
(Not to
scale)
Figure 6.2Using a line level to measure slope
1.Person A stands upslope of person B and adjusts the string down the
pole until the line level attached between the poles gives a level reading. This
reading is taken by Person C.
2.The percentage of the slope is then calculated using the formula:
rise
Slope(%) =x 100%
run
3.The run is the distance between the two poles, which should be 10 000 mm (10 meters).
The riseis the difference in height of the string, which is calculated by subtracting the height of the
string on pole A (e.g. 450 mm) from the height of the string on pole B (e.g. 1000 mm).
1000 –450
4.Slope(%)= x 100%
10000
= 550
x 100%
10 000
= 5.5 %
5.Note that when measuring slope using a line level it is important that both poles are held
vertically and that neither pole is placed in a depression or on top of a minor high spot such as a rock
or clump of soil.
Table for the conversion of angles and degrees of slope to percentages, with the
recommended distances between the contour lines.
Degrees
Percentage
Recommended distances between contour lines in
metres (m)
1
1.7
57.3
2
3.5
28.7
3
5.3
19.1
4
7.0
14.3
5
8.8
11.5
6
10.5
9.6
Figure 6.3A level
reading on a line level

15
7
12.3
8.2
8
14
7.2
9
16
6.4
10
17.6
5.8
11
19.4
5.2
12
21.3
4.8
13
23.1
4.5
14
25.0
4.1
15
27.0
4.0
16
28.7
3.6
17
30.6
3.4
18
32.5
3.2
19
34.4
3.1
20
36.4
3.0
21
38.4
2.8
22
40.4
2.7
23
42.5
2.6
24
44.5
2.5
25
46.6
2.4
26
48.8
2.3
27
51.0
2.2
28
53.2
2.1
29
55.4
2.1
≥30
≥57.7
2.0
2 HEALTHY SOILS
2.1 HEALTHY SOIL IS ALIVE.
Soils supply essential nutrients, water, oxygen (air) and root support to plants.
Healthy soil is living soil. It contains many living organisms. It is deep, loose, and easy to dig and full
of air and water. Healthy soil has aggregates or structures (that look like bread crumbs) that create
air pockets allowing water to infiltrateor move deep into the soil. Healthy soils act as giant moisture
holding sponges, which is very important in times of drought and flooding.
Healthy soils are naturally fertile and able to supply sufficient amounts of nutrients to plants. To do
this the soil needs a continuous supply and build-up of organic matter. Soil health and it’s fertility have
a direct influence on the nutrient content of food crops.
We are what we eat. Healthy soils lead to healthy plants and healthy people
2.2 CARBON AND SOIL ORGANIC MATTER - THE MAIN BUILDING BLOCK OF LIFE AND SOIL
A key element of all living things, carbon, is constantly cycling through nature as either a liquid a solid
or a gas. Soil carbon is sometimes also called organic matter. Because carbon is the main building
block of all organic molecules, the amount in a soil is strongly related to the total amount of all the
organic matter— the living organisms plus fresh residues plus well decomposed residues.

16
Figure 1: The Carbon cycle (From:
https://commons.wikimedia.org/wiki/File:Carbon_cycle.jpg#/media/File:Carbon_cycle.jpg)
This diagram of the carbon cycle shows the movement of carbon between land, air and oceans in
billions of tons of carbon per year. Yellow numbers are natural flows, red are human contributions and
white numbers indicate stored carbon, usually in liquid or sold form.
More than 90% of the world’s carbon is found in the deep ocean. ON land, around 805 of carbon is in
the soil.
An excess of carbon dioxide (CO2) in the earth’s atmosphere is warming the planet and increasing
the size, number and intensity of extreme weather events. Some of this excess CO2 is dissolving into
the world’s oceans causing them to become acidic.
2.3 WHY SOIL ORGANIC MATTER IS SO IMPORTANT
Organic matter has an overwhelming effect on almost all soil properties, although it is generally
present in relatively small amounts. A typical agricultural soil has 1% to 6% organic matter. It consists
of three distinctly different parts—living organisms, fresh residues, and well decomposed residues.
These three parts of soil organic matter have been described as the living, the dead, and the very
dead.

17
SOM composition; Carbon = 42%, Oxygen = 42%, Hydrogen = 8%, Ash = 8%, Macronutrients (N, P,
K, S, Ca, Mg),Micronutrients (Fe, Mn, B, Zn, Cu, Cl, Co, Mo, Ni)
Figure 3: Functions of SOM
The living part of soil organic matter
includes a wide variety of
microorganisms, such as bacteria,
viruses, fungi, protozoa, and algae. It
also includes plant roots, insects,
earthworms, and larger animals, such
as moles and rabbits, that spend some
of their time in the soil. The living
portion represents about 15% of the
total soil organic matter.
These different types of organisms:
•Help to control insect
pests, weeds and plant
diseases
•Form beneficial symbiotic
relationships with plant
roots
•Recycle plant nutrients from soil organic matter and minerals back to roots and
•Improve soil structure.
.
Figure 4: Micro-organisms and small living creatures in the soil (From: Life in the Soil –
www.wunderground.com)
In a teaspoon of healthy soil there are more microbes than there are people on earth.

18
Microorganisms, earthworms, and insects feed on plant residues and manures for energy and
nutrition, and in the process they mix organic matter into the mineral soil. In addition, they recycle
plant nutrients. Sticky substances on the skin of earthworms and other substances produced by fungi
help bind particles together. This helps to stabilize the soil aggregates, clumps of particles that make
up good soil structure. Organisms such as earthworms and some fungi also help to stabilize the soil’s
structure (for example, by producing channels that allow water to infiltrate) and, thereby, improve soil
water status and aeration. Plant
roots also interact in significant
ways with the various
microorganisms and animals living
in the soil.
Figure 5: A healthy soil has lots of
organic matter, earthworms and
other tiny animals in it.
The fresh residues, or “dead”
organic matter, consist of recently
deceased microorganisms, insects,
earthworms, old plant roots, crop
residues, and recently added manures. This part of soil organic matter is the active, or easily
decomposed fraction and is the main supply of food for soil organisms As these organic materials are
decomposed by the “living,” they release many of the nutrients needed by plants and they also create
humus. Organic chemical compounds produced during the decomposition of fresh residues also
help to bind soil particles together and give the soil good structure.
The well-decomposed organic material in soil, the “very dead,” is called humus. Micro-orangisms
turn the simple sugars or liquid carbon exuded from plant roots into humus. These simple carbon
compounds are joined together into more complex and stable molecules. The formation of stable
humusrequires a large number of different kinds of soil microbes, including mycorrhizal fungi,
nitrogen fixing bacteria and phosphorus solubilising bacteria, all of which obtain their energy from
plant sugars (liquid carbon).
The types of fungi that survive in conventionally managed agricultural soils are mostly decomposers;
they obtain energy from decaying organic matter
such as crop residues. Generally, these kinds of
fungi have relatively small hyphal networks. They
are important for soil fertility and soil structure, but
play only a minor role in carbon storage.
: One principle of nature is that the more
biodiversity there is in a system, the healthier and
more resilient it is
Right: Mycorrhizal fungi grow very closely
associated with plant roots and create networks of
filaments (hyphae) within the soil
(From: http://www.heartspring.net/mycorrhizal_fungi_benefits.html)
Mycorrhizal fungi differ from decomposer fungi in that they get their energy in a liquid form, as
solublecarbon directly from actively growing plants. There are many different types of mycorrhizal
fungi. Mycorrhizal fungi access and transport water - plus nutrients such as phosphorus, nitrogen and
zinc - in exchange for carbon from plants.
Some of this soluble carbon is also channelled into soil aggregates via the hyphae of mycorrhizal
fungi and can undergo humification, a process in which simple sugars are made up into highly

19
complex carbon polymers. The soil conditions required for humification are reduced in the presence
of herbicides, fungicides, pesticides, phosphate and nitrogen fertilizers - and enhanced in the
presence of root exudates and humic substances such as those derived from compost.
Humus holds on to some essential nutrients, storing them for slow release to plants. Humus also can
surround certain potentially harmful chemicals and prevent them from causing damage to plants.
Because it is so stable and complex, the average age of humus in soils is usually more than 1,000
years. The already well-decomposed humus is not a food for organisms, but it’s very small size and
chemical properties make it an important part of the soil.
Good amounts of soil humus can reduce drainage and compaction problems that occur in clay soils
and improve water retention in sandy soils by enhancing soil aggregation.
Figure 6: Adding organic matter results in many changes in the soil. (From Building soils for better
crops, 2009)
ORGANIC MATTER INCREASES THE AVAILABILITY OF NUTRIENTS . . .
Directly
•As organic matter is decomposed, nutrients are converted into forms that plants can use directly.
•Cation Exchange Capacityis produced during the decomposition process, increasing the soil’s ability to
retain calcium, potassium, magnesium, and ammonium.
•Organic molecules are produced that hold and protect a number of micronutrients, such as zinc and
iron.
Indirectly
•Substances produced by microorganisms promote better root growth and healthier roots, and with a
larger and healthier root system plants are able to take in nutrients more easily.
•Organic matter contributes to greater amounts of water retention following rains because it improves soil
structure and thereby improves water-holding capacity. This results in better plant growth and health and
allows more movement of mobile nutrients (such as nitrates) to the root.

20
2.4 TURNING AIR INTO SOIL
The process whereby carbon dioxide is converted to soil humus has been occurring for millions of
years. Rebuilding carbon-rich topsoil is a practical and good option for productively removing billions
of tonnes of excess carbon dioxide from the air. When soils gain in carbon, they also improve in
structure, water-holding capacity and nutrient availability.
The formation of healthy soilrequires photosynthesis to capture carbon dioxide in green leaves.
Plants use energy from the sun, carbon dioxide from the air and water and minerals from the soil to
make up their food. Food is usually made in the green parts (often the plants leaves).The process of
making food using chlorophyll and sunlight is called photosynthesis. When plants photosynthesize
and make carbohydrates in their chloroplasts, they use some of those compounds for their cells and
structure, and some they burn for their life energy.
But they “leak” or exude a significant amount of these
compounds as “liquid carbon” into the soil. Microbes
use this energy to create complex stable forms of soil
organic matter, or humus.
One of the more remarkable things that soil scientists
are learning about plants and soil organisms is that
they seem to have co-evolved in a mutually beneficial
relationship. As we have learned more about soil
biochemistry we have discovered that, through root
exudates, plants are able to control their local
environment – to regulate the local soil
microorganisms, to cope with being eaten by
animals, to bring distant nutrients closer, to alter the
chemical and physical properties of nearby soil, and
to inhibit the growth of competing plants.
Figure 7: Photosynthesis (from:
mages.wisegeek.com/photosynthesis-process-
diagram.jpg)
Between 20-40% of the sugars produced by plants
are exuded through their roots to the rizosphere.
The zone of soil around the roots (the rhizosphere) provides an ideal habitat and good supplies of
energy-rich organic matter. In return, microbes around the root release nutrients and plant-growth
promoting compounds, while at the same time providing a level of suppression against plant
pathogens. As microbial activity increases, the conversion of soil organic matter to humus increases
which also results in carbon sequestration. The formation of gum and polysaccharides by microbes
and earthworms promotes the formation of stable soil aggregates and increases the ability of the soil
to retain plant-available water and nutrients.
Everything goes round and round in a continuous cycle

21
Figure 8: The Nutrient cycle> All the goodness (nutrients) from fruits, leaves, branches, whole plants,
animal manure and dead animals decompose and go back into the soil. The nutrients are taken up by
plants in the soil, with the help of microbes and in this way are recycled (used again and again). The
life of a plant is therefore a cycle and nothing is ever wasted.
(From:http://www.sswm.info/category/concept/nutrient-cycle)
2.5 CHARACTERISTICS OF HEALTHY SOIL
The complex interaction between the physical, chemical and biological properties of the soil has a
major influence on soil fertility
and health.
Figure 9: Soil Health depends
on physical, chemical and
biological characteristics
Although creating a healthy soil is
mostly a biological process, it is
influenced by the interactions that
occur between the physical,
chemical and biological
components of the soil. Biological
activity is driven by temperature,
and requires appropriate levels of air, water and suitable nutrition. The physical properties of the soil
will affect air and water exchange, which will influence biological processes such as respiration. This

22
in turn will influence the ability of soil organisms to decompose organic matter and release nutrients
for uptake by plants. The activity and diversity of soil organisms is also influenced by soil chemistry
e.g. pH. The growing plant, and more specifically the activity of roots and material released from roots
(exudates etc), also plays a significant part in maintaining microbial activity.
Physical components
The physical properties of soil are determined by the balance between sand, silt and clay particles,
which determines soil texture. These particles combine with various forms of organic matter to form
soil aggregates. The size and distribution of these aggregates through the soil profile determines soil
structure, which influences soil stability, erosion risk, ease of cultivation and compaction. Soil
structure directly affects the movement of air and water through the soil profile, which in turn affects
biological activity, root development, crop establishment and tolerance to environmental stress.
Chemical components
The mineral content of the underlying soil parent material has a major influence on soil chemical
properties of the soil. Of particular importance from a soil health perspective is the impact that soil
chemistry has on the development of plant-microbe interactions. For example, soils that are based on
limestone have a tendency to be rich in calcium, andto also be also alkaline, which can restrict the
uptake of nutrients such as phosphorus and manganese.
This in turn can reduce root mass and root exudate production, restricting both microbial activity and
plant response to microbial growth promotion. Soil pH influences microbial populations, encouraging
bacteria to dominate alkaline soils and fungi to dominate acidic soils. A better balance of bacteria and
fungi can be found at more neutral soil pH values. Bacteria require simple sources of soluble organic
matter and have high multiplication rates, while fungi can utilise more complex insoluble forms of
organic matter and have relatively low multiplication rates.
Biological components
During its conversion from plant and animal residues to humus, soil organic matter has a direct impact
on soil health. Un-decomposed organic material provides a food source for macro-organisms such as
earthworms.
Earthworms mix partially decomposed organic matter with soil minerals as the material passes
through the gut, creating channels for air and water movement as they go.
Microbes thrive in the earthworm
casts, completing the conversion of
organic matter to plant-available
nutrients and humus. This humus
can bind sand, silt and clay into
stable soil aggregates, while at the
same time providing exchange sites
for nutrients and improving water
retention. This results in increased
soil fertility and yield potential.
Figure10; An earthworm in a clod of
soil showing the soil channels,
earthworm casts and soil
aggregates. (From H.Smith, 2015)

23
2.6 WHAT IS SOIL?
Soil contains abundant plant and animal life, as
discussed above. There are four main components of
soil: mineral matter, organic matter, air and water.Soil
minerals are made through the breaking up of the basic
elements or minerals of the earth. These are initially
found in the form of rocks or ‘parent material’. Over a
very long time, these rocks are broken down into small
particles through rain, wind, sun and soil organisms and
mixed with air and water. This becomes soil that can
support plants and micro-organisms to grow. Like people,
plants cannot live and grow without water, air and food.
Figure 11:: A typcial soil profile (From: FARMESA2003. A
study guide for FFS. Soil and water conservation.)
Parent material breaking down to form 1 cm of soil can
take between 200-1 000 years
The mineral matter (45%) is made of sand, silt and clay
size particles—the basic texture of the soil. The soil
water (25%) contains dissolved minerals and is the main
source of water and nutrients for plants. The air (25%) in
the soil is needed for plant roots and soil microorganisms to obtain oxygen. Organic matter (5%)
includes plant and animal materials in various stages of decomposition and is discussed above.
2.7 CHARACTERISTICS OF SOIL TEXTURE TYPES
Sandy soil
Good things about this type of soil
Bad things about this type of soil
It is easy to dig and work with
It warms up quickly in spring after winter
It is good for root crops
Water and air can get into the soil easily
It gets dry quickly
It does not keep much fertility
It does not hold water well
Loam soil (Mixture of sand and clay)
Good things about this type of soil
Bad things about this type of soil
Holds water well
Best for root growth
Contains organic matter, like …..
This soil can be hard when dry
Clay soil
Good things about this type of soil
Bad things about this type of soil
Holds water well and for a long time
Holds fertility well and for a long time
Hard to work; heavy
Slow to warm up in spring
Sticky when wet
Hard when dry

24
2.8 HOW TO TELL YOUR SOIL TEXTURE TYPE
You can tell how much sand, silt or clay (commonly called texture) is in your soil by how it feels. Wet
some soil and roll it into a ball between your hands. Then roll this little ball into a sausage
Below is a table that describes how you can tell what type of soil you have.
Table 1 : Different soil texture types
oSand makes the soil loose.
oSilt is very fine sand. It holds water and plant food better than rough sand, but it is easily
washed out of the soil.
oClay is the sticky part of the soil that holds it together. It holds water like a sponge.
The best soils according to texture class are called loams and they are an equal mixture of sand, silt
and clay.

25
It is important to know which soil type you have. Crumbly and loose soil holds the most water and the
most air, which is what plants need to grow. To make your soil more crumbly (whether it is sandy,
loam or clay) you need to keep adding lots of manure, compost and mulch. Never walk on the planted
areas, especially if they are wet.
All types of soil need organic matter to increase their fertility, or plant food. Sandy soil needs to be
given organic matter to increase its ability to hold water and plant food or nutrients. Clay soil needs to
be given organic matter to increase its ability to hold air in the soil and to release the plant foods that
are there.
Another method of identifying the proportion of soil participles in a soil is to conduct a “bottle test”.
To do this, take a bottle and fill a third of it with soil. Pour water into the bottle until it is almost full,
place a lid on and shake it vigorously for a few minutes
in order to separate the soil particles. Leave the bottle to
settle, and note what happens over the next few hours.
You will see that the substances settle in layers, the
heaviest at the bottom and the lightest on top.
The layer of water above the settled material remains
cloudy for a long time because it contains clay particles
which are so small that they stay suspended in the
water. Substances which are lighter than water (organic
matter like leaves, seeds, spores, and insect and
animal waste) float on the surface.
Heavy particles such as gravel, pebbles and sand fall
quickly to the bottom of the bottle.
The finer elements then accumulate – first the silt,
followed by humus and then the fine and very fine clay.
These layers vary in colour and consistency.
Below: Using the bottle test to estimate the proportion of soil components in a sample
Right: Bottle test showing proportion of soil
separates (From: WHC Manual, WRC, 2010)

26
2.9 SOIL STRUCTURE
Soil structure describes the grouping or arrangement of primary particles (sand, silt, clay and organic
matter) into larger, secondary particles called aggregates. It is the shape that soil takes, determined
by the way in which individual soil particles clump or bind together.
Aggregates are the fundamental unit of soil function and play a role similar to that of root nodules in
legumes, creating a protected space. The aggregate is helped to form by hyphae of mycorrhizal fungi
that create a “sticky-string bag” that envelops and entangles soil particles. Liquid carbon exudates
from plant roots and fungi enable the production of glues and gums to form the aggregate walls.
Inside those walls a lot of biological activity takes place, again fuelled by the carbon exudates. Most
aggregates are connected to plant roots, often fine feeder roots, or to mycorrhizal fungal networks too
small to be seen. The moisture content inside an aggregate is higher than outside, and there is lower
oxygen pressure inside. These are important properties enabling nitrogen-fixation and other
biochemical activities to take place.
Soil structure affects the movement of water and air in the soil, as well as root penetration and
biological activity. For example, a dense
structure greatly reduces the amount of air and
water that can move freely through the soil and
it is difficult for roots to penetrate such soil.
Right: The dispersed soil participles are
clumped together into aggregates
http://www.soilandhealth.org/01aglibrary/010117attrasoilmanual/Soilmgt3.gif
Micro-organisms play an important role in soil aggregate formation and structure. Soil aggregates
protect the soil against wind and water erosion.
Figure 12: Soil aggregates are groups of soil particles that are glued together by microbial and fungal
by products. Very small aggregates group together to form larger aggregates.

27
Figure 13: Roots, fungal
hyphae, and their secretions
stabilize soil aggregates and
promote good soil structure,
thus preventing compaction.
2.10 IDENTIFICATION OF SOIL STRUCTURE
The structure of the surface layer of the soil is usually weak to strongly granular or blocky, but a
degraded surface layer can be crusted, platy, or structure-less (massive or single grained). This is
important as soil crusting reduces water and air infiltration, destroys soil life and increases run-off and
erosion.
Figure 14: The
different
structures that
soil can take
http://ecomerge.blogspot.com/2010/05/what-soil-aggregates-are-and-how-its.html
The more soil organic matter (SOM) there is in the soil, the more macro-aggregates can form and the
better the soil structure becomes.

28
Left: The difference in colour and structure caused in a soil by increasing the soil organic matter. And
cover crops growing through a thick layer of organic matter.
http://thegrowingclub.com/2015/02/article-moving-beyond-drought-in-mind-
space/,https://iowaenvironmentalfocus.files.wordpress.com/2014/12/15127396042_c1b408b873_k.jpg
2.11 SOIL DEGRADATION
Degradation most commonly occurs when erosion and decreased soil organic matter levels initiate a
downward spiral resulting in poor crop production. Soils become compact, making it hard for water to
infiltrate and roots to develop properly. Erosion continuesand nutrients decline to levels too low for
good crop growth.
Tillage or ploughing usually starts this degradation process. Fields that have been ploughed a lot tend
to crust, seal and compact more than non-till fields with lots of crop residues and a living plant cover
with active roots and fungi. Tillage also reduces infiltration and the water holding capacity of the soil
due to poor structure and thereby increases water run-off and erosion.
Figure 15: Changes in soil surface and water-flow pattern when seals and crusts develop
It can also reduce the germination of seeds and root growth. It makes the soil a lot more prone to
wind erosion when it is dry.
Right: A dust storm on the farms around
Bloemfontein in the Free State in October
2014.(From: GSA, 2015)

29
Right: Soil crusting caused by ploughing and
breakdown of soil structure (From:
http://cropwatch.unl.edu/archive/-
/asset_publisher/VHeSpfv0Agju/content/should-
you-apply-uan-and-residual-herbicides-in-a-tank-
mix-on-emerged-corn-
Figure 16: The downward spiral of soil health due to
intensive tillage or continuous ploughing

30
3 TURNING RUNOFF INTO 'RUN-ON'
This innovative technology is based on the work and experimentation of MaTshepo Khumbane, who
has a beautiful working system at her present homestead near Cullinan. The remnants of a similar
system in her former homestead plot near Tzaneen of some 20 years ago, still nourishes the fruit
trees there, even though the present owners are unaware that there is a system at all! This system is
the product of years of experimentation with practises in rainwater harvesting and storage.
MaTshepo's run-on system has been studied and documented, so that it could be used as an
innovation that could be introduced to other householders in their circumstances.
Compare this photo to the diagram overleaf.
Run-on is ‘automatic irrigation when it rains.’ The soil in the garden is shaped to catch rainwater
runoff, slow it down and lead it gently to where it is needed. The water dams up in pathways between
deep-trenched planting beds, giving it time to seep into the planting soil. The layout allows excess
water to escape before it can erode the planting beds or the pathways themselves. Such excess
water can either run further down-slope to a storage structure (tank or dam) for future use, or be
released into the veld to continue on its natural course downstream to the river.
Interestingly, the run-on system works with water flows above and below ground.
In its simplest form, the run-on system concentrates surface runoff from adjacent areas into the root
zone of the planting beds. This in itself dramatically increases the effectiveness of rainfall – even in
high rainfall areas, where a large percentage of rainfall may run off unutilised once the top soil layers
are wet.
MaTshepo’s run-on &
trench bed garden
1
2
3
7
5
4
10
2

31
Further, as people’s understanding deepens on what happens to water below the soil surface in their
own conditions, they can start manipulating these flows –with cut-off trenches and by creating
strategically placed impermeable layers in their deep-trenched beds
A A trench (the top ditch) is dug across the runoff slope of the land to catch rainwater.
Below the top ditch, the vegetable beds are dug 1m deep and filled with organic matter —
grass, leaves, manure, and ash —and mixed well with topsoil. These trench beds are fertile
and absorb and retain moisture.
The trench beds are edged with ridges. Some are re-enforced with stone to stop the soil
washing away and to reduce evaporation.
Between the trench beds a network of depressions (rainwater flow paths) connect the top
ditch to a second one at the bottom edge of the garden. The rainwater flows and pools in
these channels/depressions during rain.
These rainwater flow paths are also the footpaths to access the trench beds.
In the rainwater flow paths the gradient is flat so that the water has more time to soak into the
trench beds.
If it rains too much, the bottom ditch is breached to avoid flooding of the trench beds.
A water catchment area: concrete paving around the house is lipped and slopes down to
pipes which lead to further ditches and deep trenches downhill of the house.
Lower down a 2 x1m hole (open pond) catches and stores more run-off.
Fruit trees are planted along the lower edge of a ditch so that their deep roots can benefit
from the extra soaking.
2
3
4
5
6
7
8
9
10
1
32
3.1 SOIL FERTILITY
All living things are composed of the basic elements of the earth. Plants consist mainly of hydrogen,
oxygen, carbon, nitrogen, phosphorus, potassium and smaller quantities of magnesium, sulphur and
calcium as well as many other elements in very small amounts (these are called trace elements).
Plants need three main kinds of nutrients:
Nitrogen (N)– for healthy leaf and stem growth;
Phosphorus (P)– for healthy roots and fruit formation;
Potassium (K)– for general health and healthy flowers and fruit.
The capital letters in brackets (N, P, and K) are called the chemical symbols. If you buy fertilizer or
other chemicals, they may use these letters instead of writing out the name in full.
All three of these foods are found in good compost or manure. You can also increase the amount of
these foods in the soil by mulching with leguminous leaves like beans, peas, pigeon peas and Acacia
(thorn tree leaves) or comfrey, using liquid manures, earthworm castings and effective micro-
organisms. You will need to make the earthworm castings and effective microorganism brews and
add them to your soil.These are different ways of improving fertility that you will need to be shown.
3.2 NITROGEN
1.How do you know if your soil needs more nitrogen?
You will know your plants need nitrogen when the leaves are turning
yellowish, instead of a strong bright green.
2.How can you add nitrogen to your soil?
This element is found in most manures (cattle, sheep, pig, goat,
chicken and rabbit). There is more nitrogen in chicken and goat
manure. These must be dried before being used in the garden.
Otherwise they can be too strong and ‘burn’ the plants.
3.Nitrogen is also found in legumes
These are plants that form nodules or little knots on their
roots. These nodules ‘fix’ nitrogen from the air, so that the
plant can take it up through its roots. There are
microorganisms (bacteria) in the roots that help to ‘fix’ the
nitrogen. After the roots of the plant die the nitrogen is
released into the soil and can be used by surrounding
plants.
Examples of legumes that we often grow:
Ground nuts, peas, cowpeas, beans (including
soya beans)
Nodules on the roots that fix
nitrogen
The bacteria in the root knots binds free nitrogen from air
in the soil and release nitrogen after the plant dies
33
There are less common crops and also many long living plants and small
trees that also fix nitrogen. Some examples are chickpeas, mung beans,
lentils, pigeon peas and tree lucerne.
Some legumes are grown only as green manures, and are not used for food.
These include lucerne, clover, hairy vetch and lupins. These give a lot more
nitrogen to the soil than our food plants, because we dig them into the soil
when they are still green. This is why we call them green manures. We can
also plant our food crops in between these legumes.
3.3 PHOSPHOROUS
1.How do you know if your soil needs more phosphorous?
You will know your plants need more phosphorous when they do not grow fast, as they should. The
leaves may also start to show unusual red or pinkish colours, especially around the edges. If your
plants are small and will not grow, even when compost is added, then you almost certainly have a
severe phosphorous deficiency. This can also be caused by acidity in the soil.
2.How can you add phosphorous to your soil?
Many soils are poor in phosphorous. It is also a bit difficult to add phosphorous to the soil in an
organic way, as most of the sources of phosphorous are tricky to work with. They include urine,
bones, hair, feathers and blood. Usually ,we add these as ingredients to compost
Natural rock phosphate can be added directly to the soil. This is also not easily available. Another
good source of phosphorous is bone meal. You can usually buy this from an agricultural supply store
– but it is not cheap.
One other way of adding phosphorous is to place bones in a fire, for a few hours. You can then grind
them into a powder more easily. This powder can be spread on your garden beds or your compost
heap.
The manure from animals grazing in areas where there is not much phosphorous will also have little
phosphorous. You may need to bring in phosphorous in the form of chemical fertilizer. The usual
source is called Superphosphate. Another chemical fertilizer known as DAP (Di-ammonium
Phosphate) can also be used.
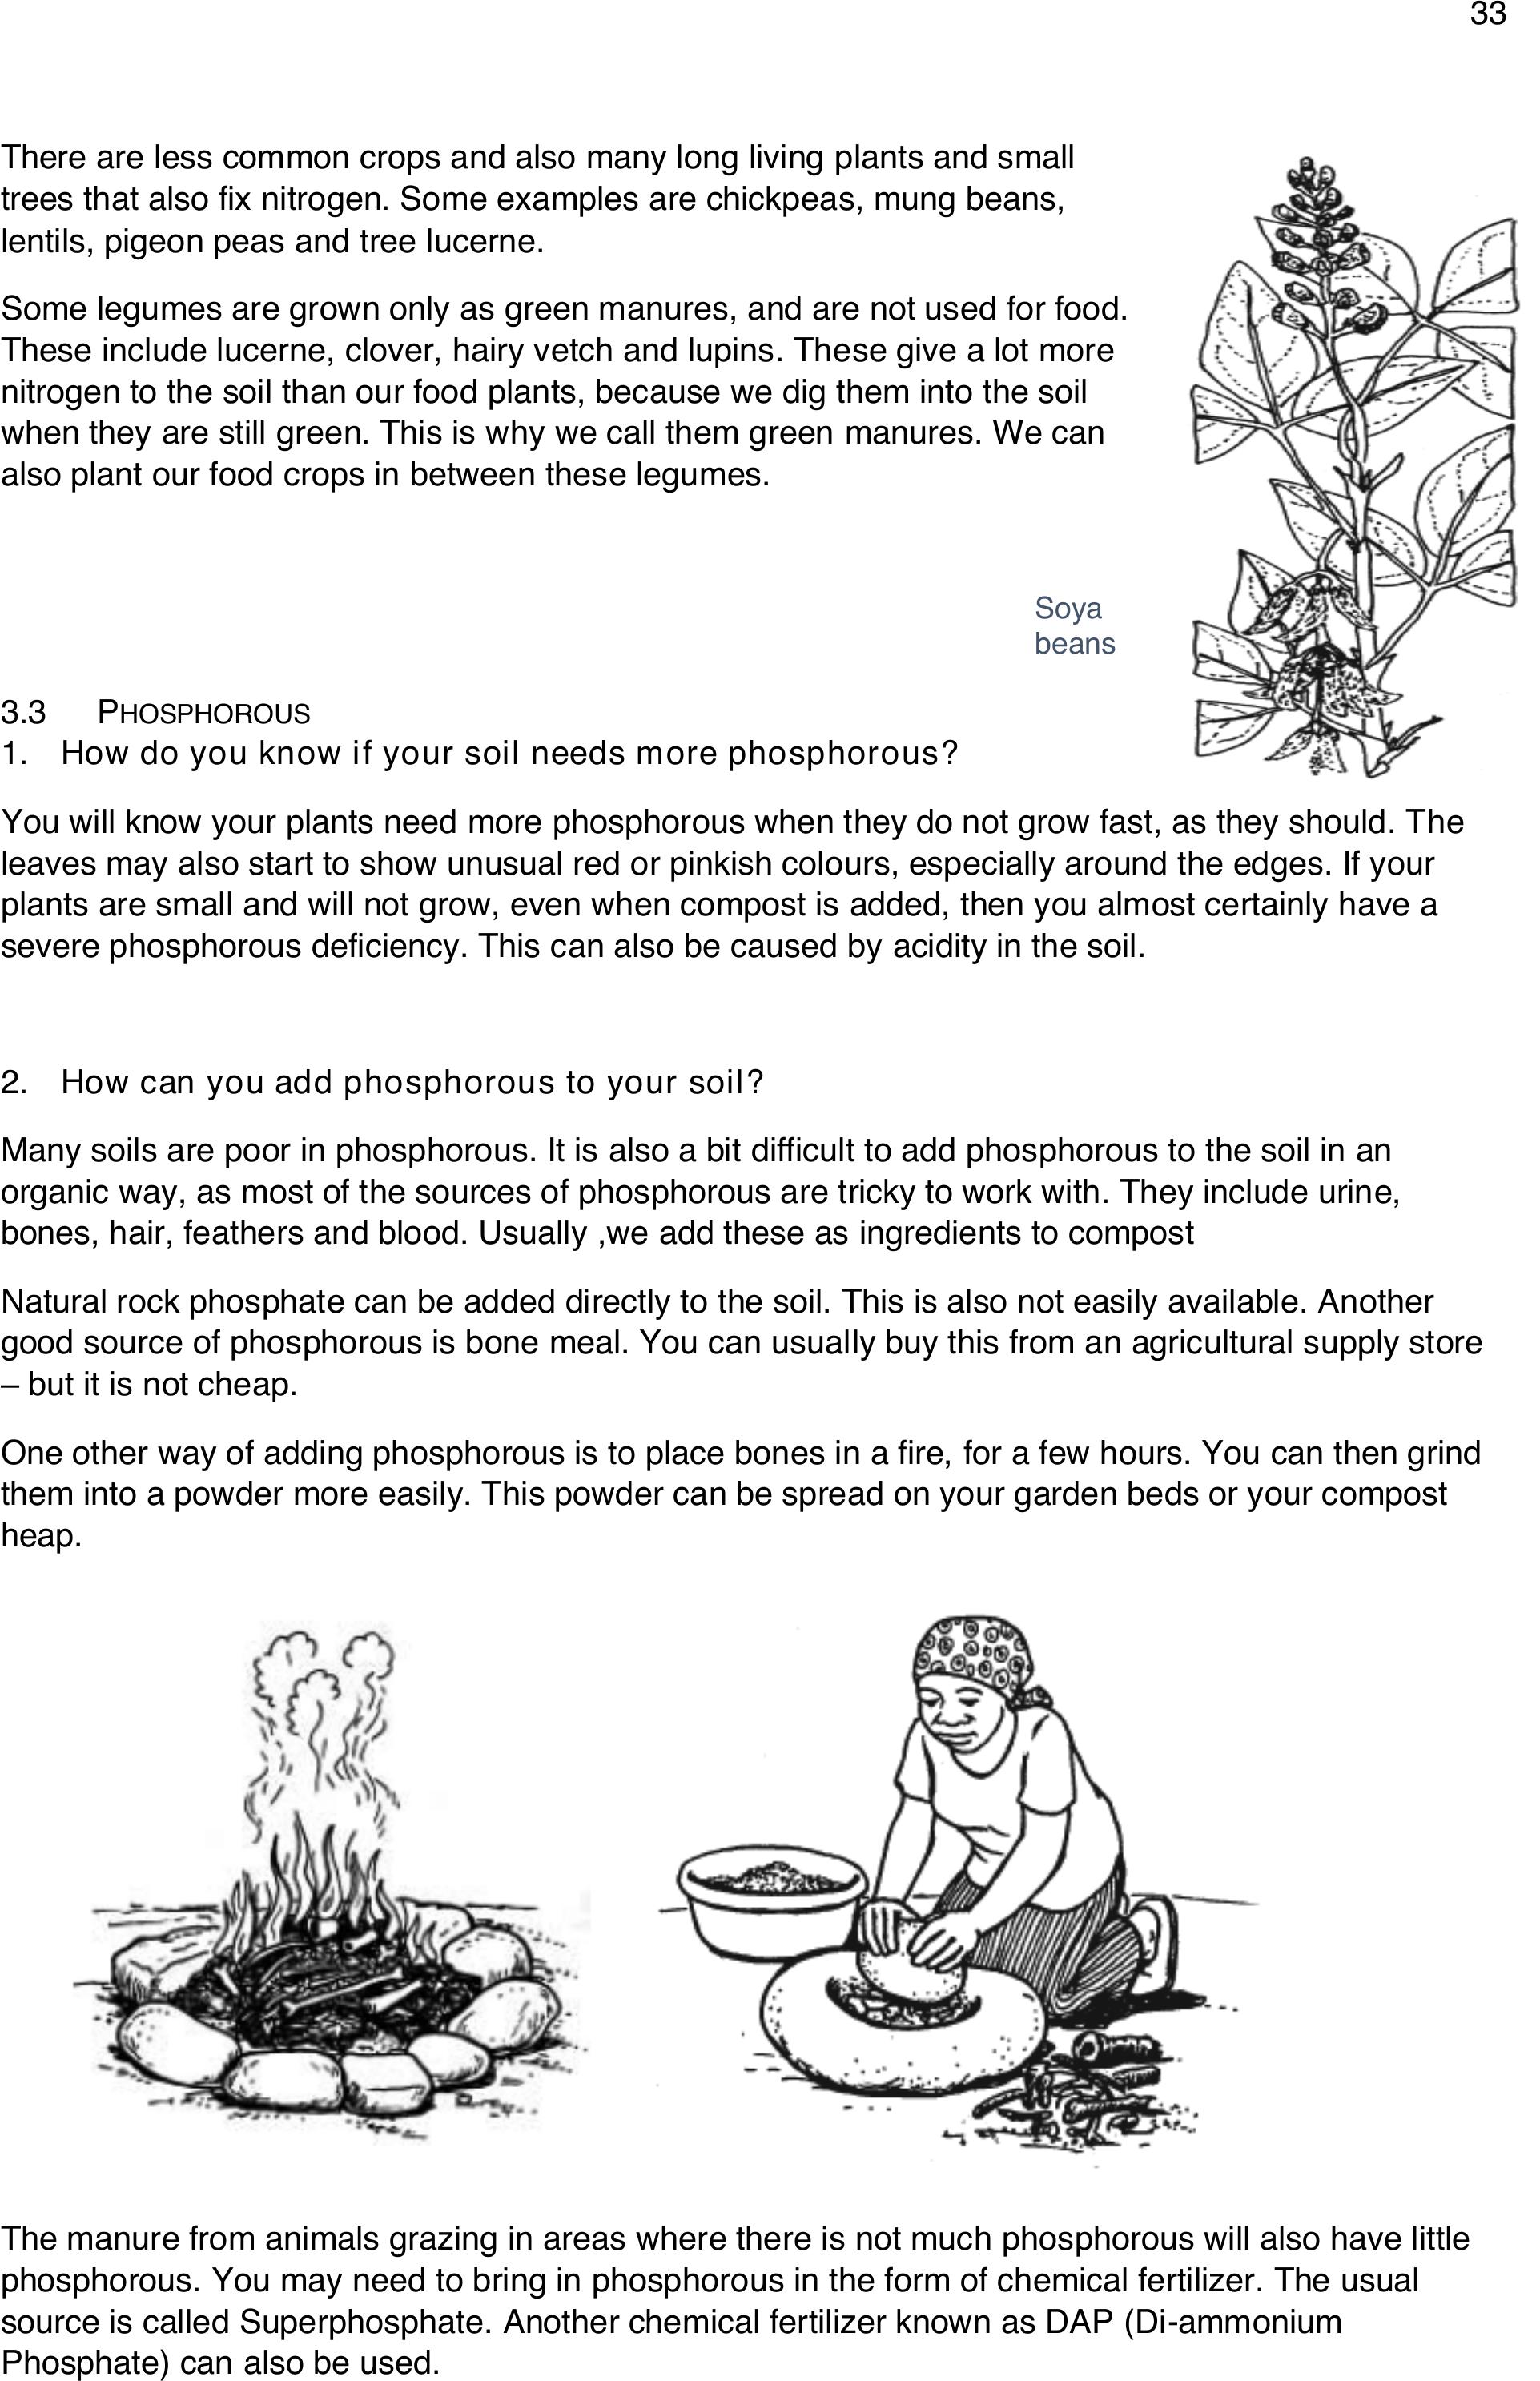
Soya
beans

34
3.4 POTASSIUM
1.How do you know if your soil needs more potassium?
You will know your plants need potassium when the plants become brittle and the leaf edges become
brown and dry. When fruit do not form properly, you should also suspect a lack of potassium. Other
signs can be hard to distinguish. One of these is a yellowing around the veins of the leaves. This
could also be caused by diseases – so it is difficult to know.
2.How can you add potassium to your soil?
Good sources of potassium are chicken manure and
fresh woodash. Never use ash from coal, as this is
very poisonous to the soil and plants. Another good
source of potassium is a plant known as comfrey. This
plant has large hairy leaves and grows in wet shady
places. The leaves contain a lot of potassium. These
can be used to mulch your vegetable beds and also to
make liquid feeds for your plants (We will look at liquid
feeds later in this section).
The other elements or minerals needed in smaller
quantities, such as Magnesium, Zinc and Iron, are
found in most manure and in compost.
Comfrey is also a good medicine. A tea made from the leaves is good for high blood pressure and
arthritis.
3.5 OTHER IMPORTANT NUTRIENTS:
Calcium (Ca) Promotes plant life and strong plant tissue, promotes early root formation and seedling
growth, aids in the uptake of nutrients, balances pH
Magnesium (Mg) Essential for the formation of Chlorophyll and formation of sugars, a carrier of
phosphate and starches through the plant, promotes the formation of fats and oils, vital for healthy
growth.
Sulphur (S) Increases root development, helps maintain the dark green colour, stimulates seed
production, necessary for protein production, flavor and odour in many fruits and vegetables.
3.6 MICRO OR TRACE ELEMENTS (NUTRIENTS NEEDED IN SMALLER QUANTITIES)
Iron (Fe) Is an oxygen carrier, enhances chlorophyll formation, metabolizes RNA, enhances green
color of produce
Boron (Bo) Promotes early root formation and growth, improves health and sturdiness, increases
yield and improves quality of fruits and vegetables.
Zinc (Zn) Essential for enzymatic reactions in cells and promotes plant growth.
Copper (Cu) Is needed for Chlorophyll production, catalyzes several plant reactions and necessary
for making protein.
Manganese (Mn) Activates many metabolic reactions, increases absorption of calcium, magnesium
and phosphorus, speeds germination and plant maturity.
From: Useful Plants for Land
Design, Pelum
Comfrey

35
Molybdenum (Mo) Enhances absorption of nitrogen by plants
Chlorine (Cl) Involved in photosynthesis and chlorophyll production, stimulates enzyme activity, helps
control water loss and moisture stress.
Cobalt (C) Is needed in nodules of legumes for nitrogen fixing bacteria
Sodium (Na) Helps in water regulation and photosynthesis
These nutrients are important to plants for health and survival. They are equally important to animals
and human health. This is because we get our nutrients from plants who take up essential nutrients
from the soil. If our soil is healthy our plants benefit by being healthy and we in turn benefit from the
variety of nutrients available.
3.7 SOIL ACIDITY
1.What is soil acidity?
Soil acidity is can influence plant growth and limit crop yield. Minerals or nutrients needed by plants to
grow are dissolved in the water inside the soil. This is a bit like salt or sugar dissolved in a glass of
water.
Soil acidity is when the soil is sour. It is a bit like a glass of water that has vinegar dissolved in it. In
places where it rains a lot, some of the minerals can be washed out of the soil. The soil then becomes
acidic. The use of chemical fertilizers over a long period of time, can also make the soil acidic.
If there is too much acid in the soil, some minerals or plant food will dissolve too quickly and the
plants cannot use them. Other minerals will not dissolve at all, so again, the plants cannot use them.
Phosphorus is one of the minerals that cannot be used by plants when the soil is acidic –even if it is
in the soil.
What causes of acidity?
Acidic parent rock material, high rainfall and leaching elements like calcium (Ca), magnesium (Mg),
and phosphorous (K), decay of organic matter leading to release of organic acids into the soil,
harvesting high yields (therefore removing plenty of Ca, Mg and K from the soil), widespread use of
nitrogen (N) fertilizers.
2.How do you know if your soil is acidic?
You will know your soil is acidic if you provide compost or manure and water for your plants, but they
do not grow. The plants remain small and stunted. This is a common problem.
3.How will you solve the problem of acidity?
The only practical way of dealing with soil acidity is to add lime to the soil. Lime can be bought and is
a white powder, or grey granules.
It needs to be dug into your soil, at least as deep as the roots of the crop you are growing. For
vegetables this is between 30 - 60 cm. This is the width of 1 or 2 spades. You will need to add 1 kg of
lime for every square metre of soil. 1 Kilogram of lime is a spade full. It needs to be heaped high.

36
For field crops like maize and sorghum that have deep roots this is from 60 cm to 1 meter deep. 1
meter is the length of a spade.
Usually Lime is added 2 or 3 months before planting, as it is slow acting in the soil. If you add Lime at
the same time as you are planting your crop, you will only see the main effect of the Lime in the next
season.
4.Advantages and disadvantages of Liming
Other (easily available) ways of naturally improving soil quality and balancing pH: bone meal, dried
and crushed egg shells, finely crushed sea shells
Advantages
Disadvantages
It is easy to apply, stays in the soil for a
few years, combats soil acidity by
reducing metals’ toxicity, makes P more
soluble and microbes more active,
supplies Ca, Mg to plants, improves soil
structure and water infiltration (reduces
energy needed by roots to penetrate the
soil), improves harvest
It is not easy to determine soil pH,
might not be easy to get, costs
money,
30 cm
Two meters
One meter

37
4 SOILENRICHINGMETHODS
4.1 TRENCH BEDS
Introduction
A trench bed is a way to increase soil fertility and water holding in your beds and garden. It is an
intensive way of providing good soil for vegetables production on a small scale. It involves digging a
hole and filling it with organic matter, so that your bed can be fertile for a long time (around 5 years).
You will need:
A spade, water, tins, old bones, plastic (if your soils are sandy),
dried grass, wood ash, manure and organic matter.
4.The method
1. Dig a hole 60cm or deeper. It is usually about 1m wide (to
provide easy access, without having to step on the bed) and can
be as long as one likes.
2. Separate the topsoil and subsoil in piles while you are digging.
If your sub-soil is very in fertile it is not used in the trench.
Spread this soil around the garden to help channel water
towards your bed.
3. Place a layer of tins or branches at the bottom of the trench to
help with aeration and also with supply of some nutrients.
The tins need to be squashed before putting them in the
hole. Make a layer of tins about 3 tins deep. If there are
no tins use thin branches instead.
4. Fill the trench with a range of organic materials and
topsoil.
- First add dry grass or weeds (about 10 cm deep)
- Then add manure (about 2 cm deep)
Mandla (in Phuthadjithaba) is digging his trench
bed and placing the topsoil on one pile
(darker soil with more organic matter) and the
subsoil on another (usually lighter soil with
little or no organic matter).
Layer of tins at bottom of trench

38
- Add also some wood ash (a thin layer, less than
1cm deep).
- Then add a layer of sop soil (about 5cm deep)
Mix these layers with a fork. Stamp them down by
walking on them. WATER the mixture well! Then
start the process again.
You can also add other organic matter like green
and dry weeds and vegetable peelings, card board,
paper and bones.
5. Continue to place the organic materials into the
trench until it has reached ground level again.
6. Now build up the trench bed to about 10-15cm above
soil level. Use a good mixture of topsoil and manure and
or compost.
The organic material in the trench needs to decompose
for about 2-3 months before planting.
7. The other option is to use your trench bed as a seed
bed. In this way, when your seedlings are ready to be
transplanted, the trench bed will be ready to be planted.
Growing seedlings from seed needs a well
prepared bed. The roots of the small plants do not
go down too deep. The materials in the trench can
decompose while the seedlings grow on top.
Above, Carrot and onions seeds are being planted
in a seed bed in Potshini. This trench has just
been prepared.
Note; Fine soil is being used to cover the seeds in
the rows. This is because the seeds are small and
in this way they can germinate better.
A trench bed in Potshini being filled and mixed. Here
the top soil is being added back into the trench Notice
the yellow subsoil on the one side. It is not being used.
A trench bed in Phutaditjhaba being filled, mixed
and stamped down. Notice the mixture of manure,
grass and soil.

39
Left: In this picture carrot seeds were planted in the smaller trench
bed in the far corner. There are also two tubs of seedlings being
produced. In the foreground is a recently completed trench bed
into which bought cabbage seedlings have been planted. Again
these grew well and did not show any negative effects from the
decomposing material in the trench.
Right: In this picture a number of
trench beds have been prepared
in a garden in Potshini. The owner
has used two of his trenches as
seed beds. They are covered with
grass to hold the moisture in the
soil while the seeds are germinating. This grass will be removed when
the seeds come up.
The middle bed is shaped like a horse shoe. This is a nice design that
makes it easy to reach all sides of the bed. It also allows run-off water
to run into the middle of the shoe and soak into your bed. Here the
owner has planted swiss chard seedlings. They grew well; despite our
fears that the decomposition of the organic matter in the trench bed
may interfere with their growth
8. It is very important that the trenches are watered well while they are being made and afterwards.
The organic material in the trench cannot decompose if it is dry.
Different ways of watering are possible; as long as a lot of water is given!
Advantages and disadvantages of trench beds
In this picture, drip irrigation is going to be used to water a trench bed.
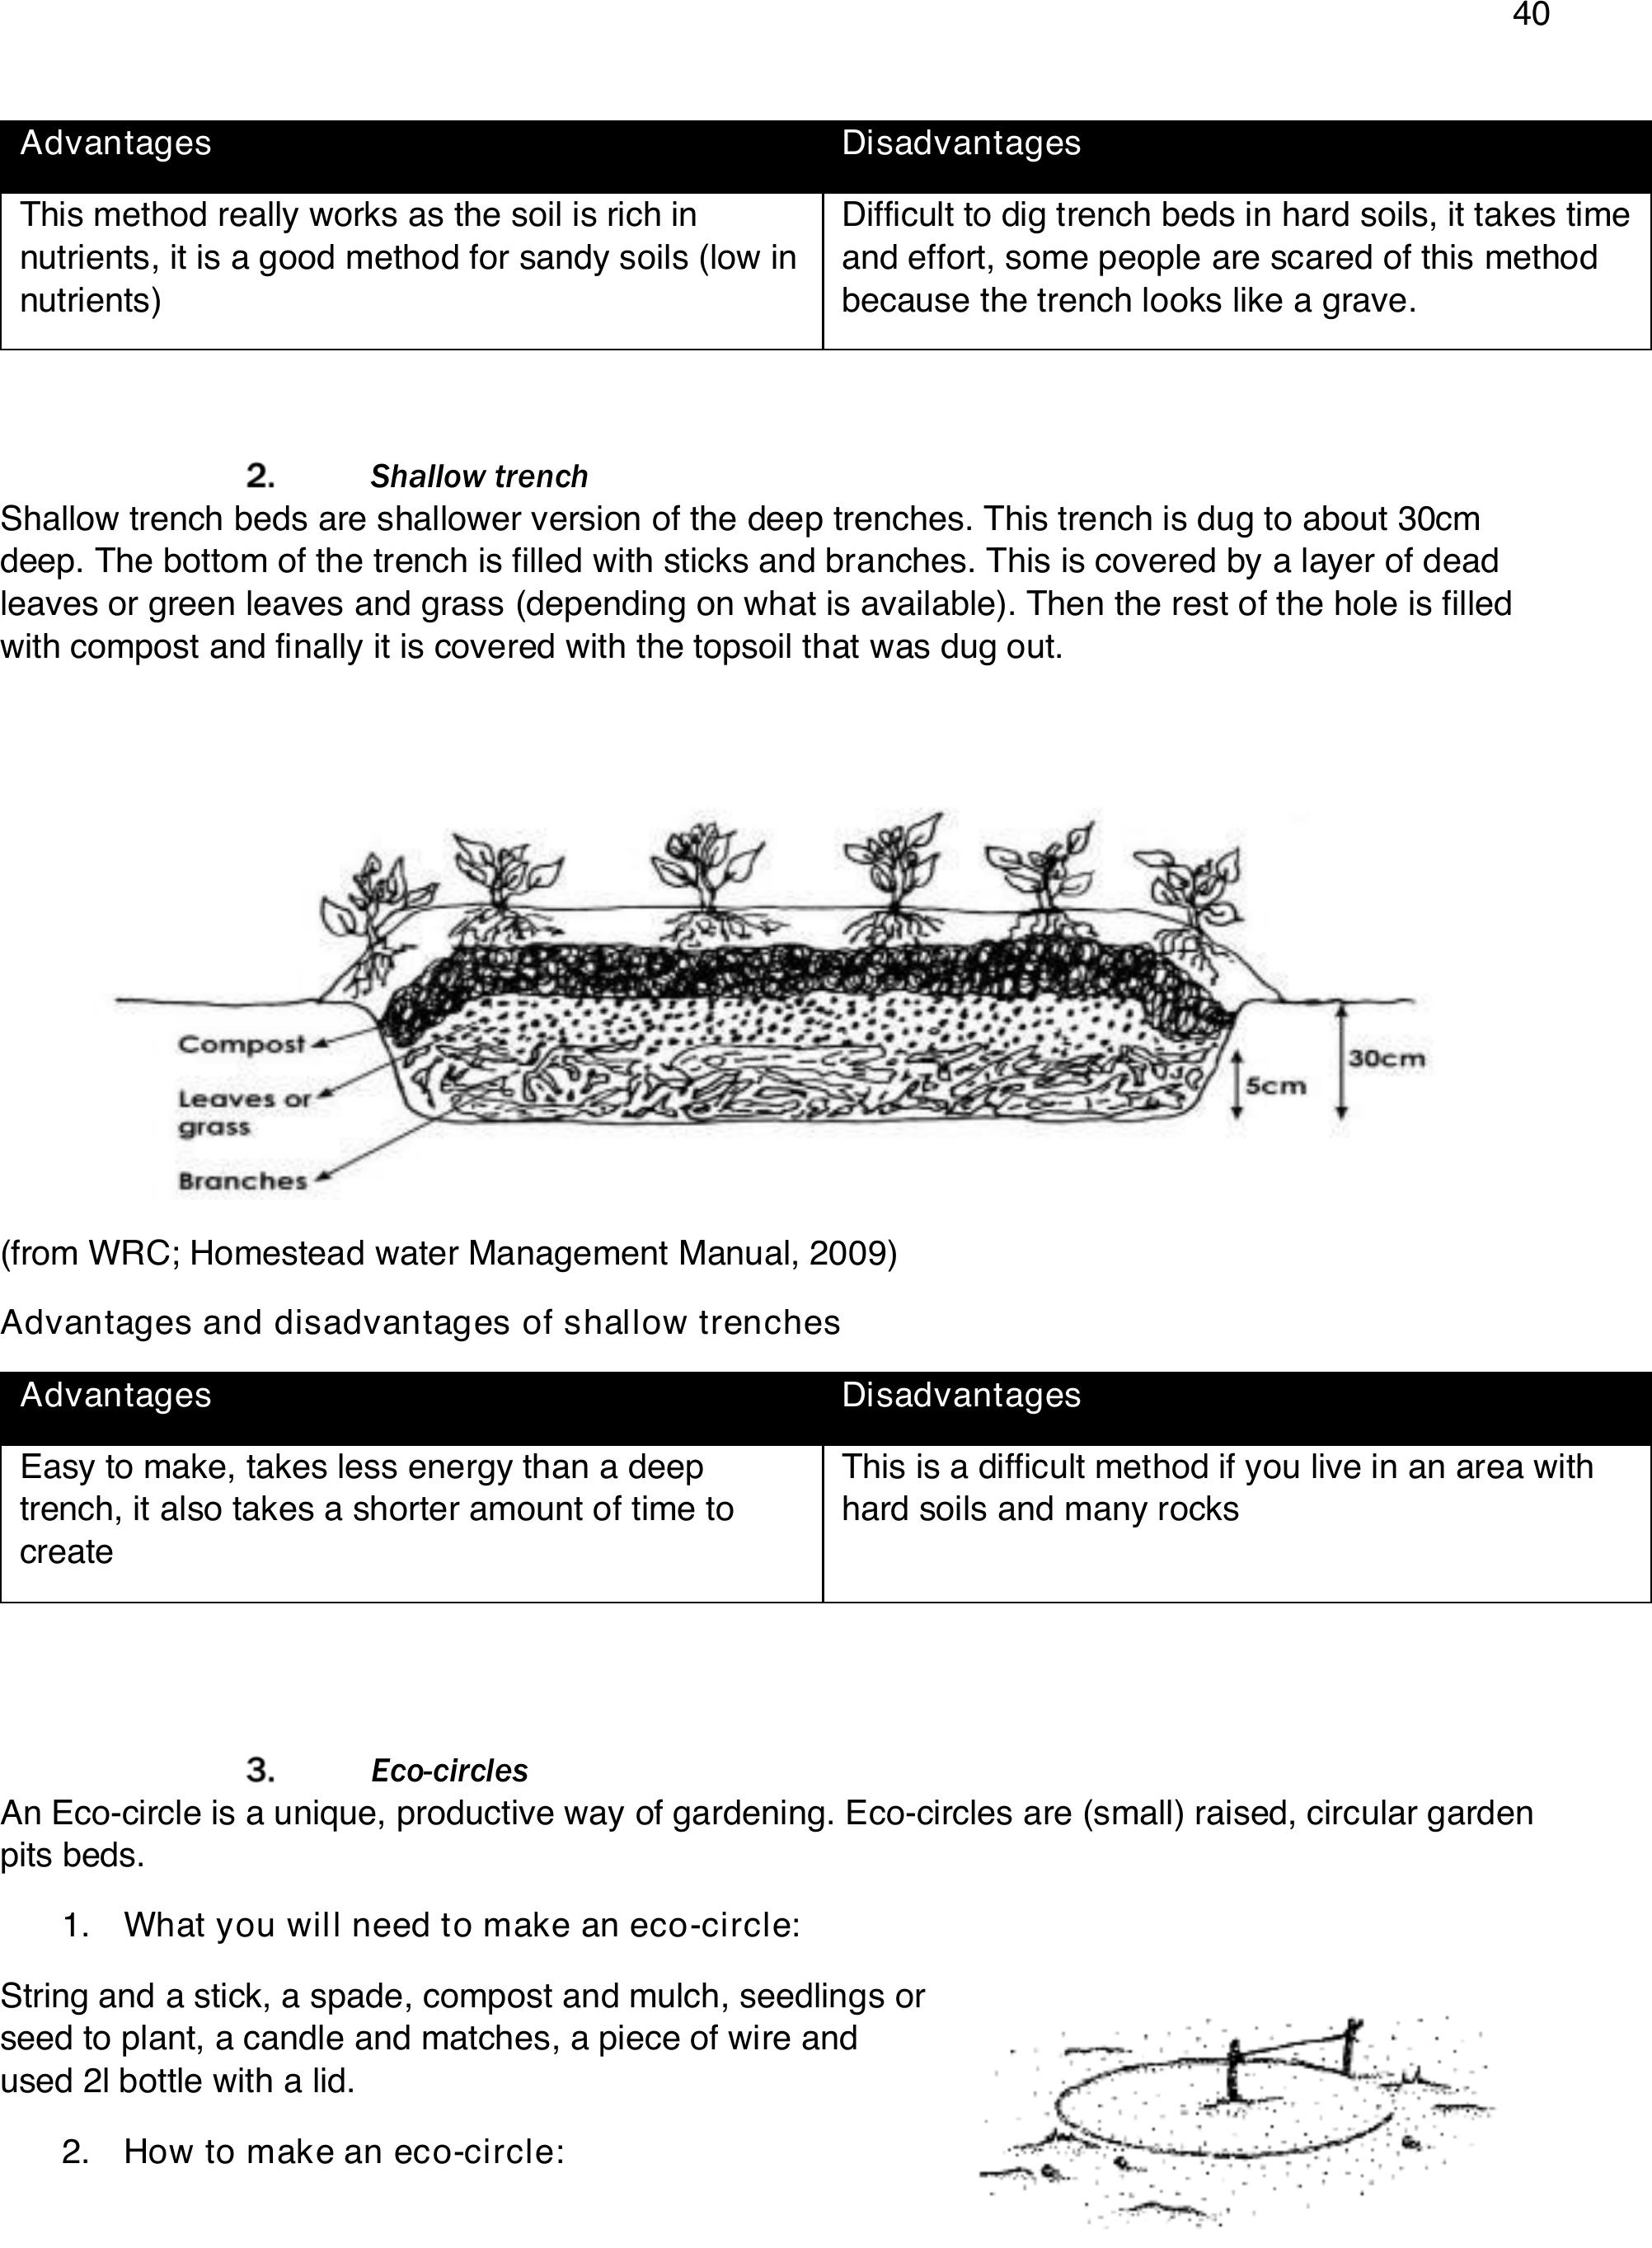
40
Shallow trench
Shallow trench beds are shallower version of the deep trenches. This trench is dug to about 30cm
deep. The bottom of the trench is filled with sticks and branches. This is covered by a layer of dead
leaves or green leaves and grass (depending on what is available). Then the rest of the hole is filled
with compost and finally it is covered with the topsoil that was dug out.
(from WRC; Homestead water Management Manual, 2009)
Advantages and disadvantages of shallow trenches
Advantages
Disadvantages
Easy to make, takes less energy than a deep
trench, it also takes a shorter amount of time to
create
This is a difficult method if you live in an area with
hard soils and many rocks
Eco-circles
An Eco-circle is a unique, productive way of gardening. Eco-circles are (small) raised, circular garden
pits beds.
1.What you will need to make an eco-circle:
String and a stick, a spade, compost and mulch, seedlings or
seed to plant, a candle and matches, a piece of wire and
used 2l bottle with a lid.
2.How to make an eco-circle:
Advantages
Disadvantages
This method really works as the soil is rich in
nutrients, it is a good method for sandy soils (low in
nutrients)
Difficult to dig trench beds in hard soils, it takes time
and effort, some people are scared of this method
because the trench looks like a grave.
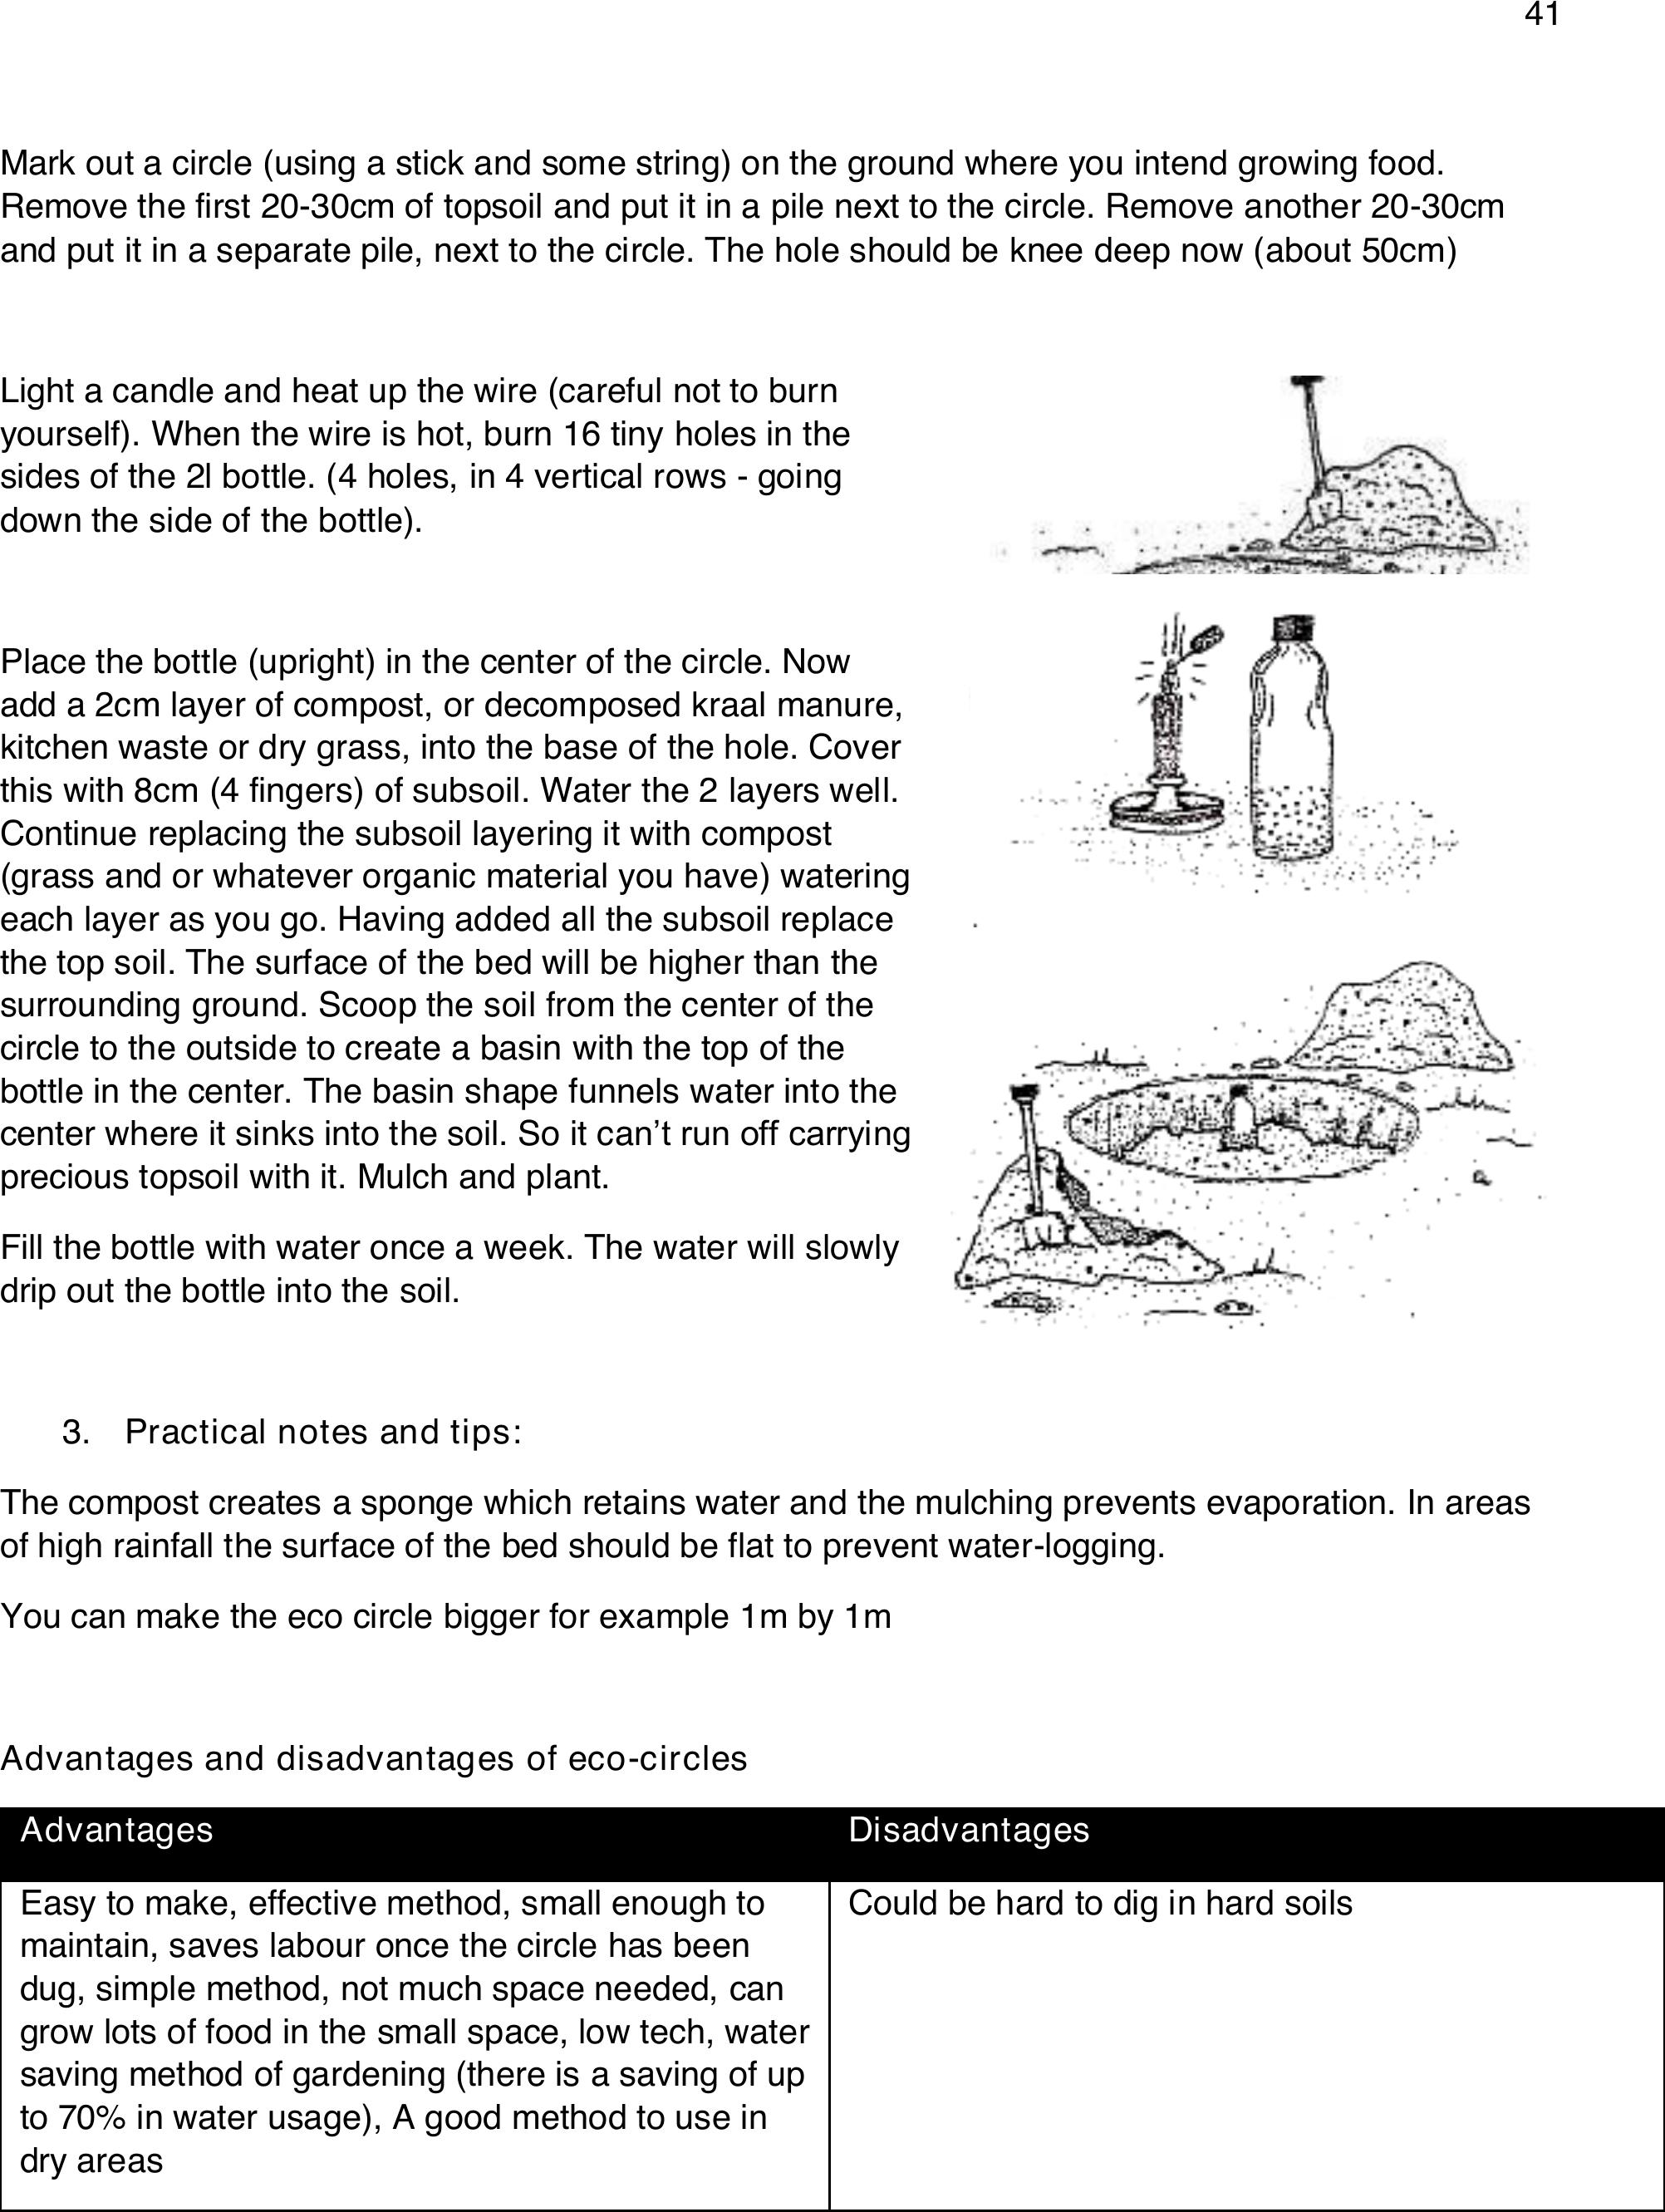
41
Mark out a circle (using a stick and some string) on the ground where you intend growing food.
Remove the first 20-30cm of topsoil and put it in a pile next to the circle. Remove another 20-30cm
and put it in a separate pile, next to the circle. The hole should be knee deep now (about 50cm)
Light a candle and heat up the wire (careful not to burn
yourself). When the wire is hot, burn 16 tiny holes in the
sides of the 2l bottle. (4 holes, in 4 vertical rows - going
down the side of the bottle).
Place the bottle (upright) in the center of the circle. Now
add a 2cm layer of compost, or decomposed kraal manure,
kitchen waste or dry grass, into the base of the hole. Cover
this with 8cm (4 fingers) of subsoil. Water the 2 layers well.
Continue replacing the subsoil layering it with compost
(grass and or whatever organic material you have) watering
each layer as you go. Having added all the subsoil replace
the top soil. The surface of the bed will be higher than the
surrounding ground. Scoop the soil from the center of the
circle to the outside to create a basin with the top of the
bottle in the center. The basin shape funnels water into the
center where it sinks into the soil. So it can’t run off carrying
precious topsoil with it. Mulch and plant.
Fill the bottle with water once a week. The water will slowly
drip out the bottle into the soil.
3.Practical notes and tips:
The compost creates a sponge which retains water and the mulching prevents evaporation. In areas
of high rainfall the surface of the bed should be flat to prevent water-logging.
You can make the eco circle bigger for example 1m by 1m
Advantages and disadvantages of eco-circles
Advantages
Disadvantages
Easy to make, effective method, small enough to
maintain, saves labour once the circle has been
dug, simple method, not much space needed, can
grow lots of food in the small space, low tech, water
saving method of gardening (there is a saving of up
to 70% in water usage), A good method to use in
dry areas
Could be hard to dig in hard soils
42
4.2 LIQUIDMANURES
1.Brews for plant nutrition
One way of improving plant nutrition is to make liquid teas or brews that will add fertility to the soil. In
this method nutrients (from plant matter or animal dung) are leached out (drawn out) into water and
applied to the soil. This should be used as an additional soil fertility technique rather than the only
one. Brews provide extra nutrients in case of small deficiencies, but cannot rectify major nutrient
deficiencies.
Liquid manures/brews/ teas are a simple way of giving your plants a boost. The aim is to provide
plants with natural plant foods quickly during their growing season. It is useful for heavy feeders like
cabbages and to give seedlings a boost.
2.How to make liquid manures from plants
A good plant for liquid manure is comfrey. Most soft green leaves and stems can also be used and
weeds are ideal. Avoid plants which are very strong smelling. Plants are made of different quantities
of nutrients and take up different nutrients from the soil. It is best to use a range of plant materials to
make your liquid. Make sure you only use healthy plants.
Make sure your container is clean before you use it. Collect the plant material and fill up the container.
You must keep on adding material to the container every week.
Place a rock on top of the plant material in the container and put the lid on. Do not add water. The
plant material will make its own liquid. If you are only using weeds, and no comfrey or banana stems,
you may need to add a little water, to just cover the compressed plant material.
Place it in a sunny position and two weeks later check to see if the leaves have turned black. If you tilt
the container you should find a black juice. This is the concentrated plant liquid manure.
This liquid is very strong and should be diluted as follows:
Seedlings: 1 tin of liquid manure for every 4 tins of water.
Bigger plants: 1 tin of liquid manure to 2 tins water. If you make the mixture too strong it can
burn the leaves of plants.
Every two weeks pour the mixture on the soil around your plants, after you have watered them. You
should pour at least one tin of this diluted mixture around each seedling or plant. The tin should be the
size of a big jam tin.
3.How to make a foliar spray
This is brew made from a mixture of plant and animal material. It is used by spraying onto the leaves
of plants from where it is absorbed. This brew contains antibiotics, microbes and plant hormones as
well as plant nutrients (potassium, phosphate and trace elements). (from :EMBRAPA; Brazilian
Agriculture Research Institute)
Place the following ingredients in a container with a lid:
30kg of fresh cow manure
50-60liters of water
5litres of milk (without salt)
5liters of sugar cane juice/ 15kg of chopped sugar cane/2kg of brown sugar (personal
variation)
4kg of wood ash (not coal ash!!)

43
4kg crushed bones or bone meal (fish bones are ideal if available. If possible do not use
chicken bones) (We use bone meal bought from a gardening shop)
3-5x 20l buckets of chopped weeds
2-3kg of agricultural lime/ crushed eggshells
Leave this mixture for 10-15 days. Dilute 2-10litres of this mixture in 100 liters of water.
This spray is highly effective. It is possible to keep the brew going for a period of time, by adding more
weeds and manure and fermenting the mixture again for about 10 days.
Advantages and disadvantages of foliar sprays
Advantages
Disadvantages
Foliar sprays are very effective and act quickly
in the plants.
If diluted properly, these foliar sprays do not
harm plants
Foliar sprays increase disease resistance in
crops
Foliar sprays provide a quick and cheap plant
booster food
Plant hormones and antibiotics are also
supplied through the fermentation process in
the making of foliar sprays
Some inputs for foliar sprays need to be
bought; such as agricultural lime and potentially
wood ash, sugar and milk
This mixture is exceptionally smelly while it is
fermenting
Foliar sprays can “burn” plants if they are too
strong
4.GOOD PLANTS FOR LIQUID MANURES
Comfrey
This plant has large hairy leaves and grows in wet shady places. The leaves contain a lot of
potassium. These can be used to mulch your vegetable beds and also to make liquid feeds for your
plants Comfrey is also a good spinach and medicine. A tea made from the leaves is good for high
blood pressure and arthritis.
ComfreyFrom: Useful Plants for Land
Design,Pelum
A brew made from comfrey leaves can be diluted
as mentioned above and sprayed on plant leaves
to protect against downy and powdery mildew.
Mildews are a problem mainly on cucurbits,
pumpkins and peas.
A brew made from comfrey and stinging nettle can
be sprayed on plants to protect against early and
late blight, which attacks tomatoes and potatoes.
In these cases, the brews are sprayed onto the
leaves of the plants.

44
1.Stinging nettle
This is one of the best plants you can use in plant brews. It contains a wide variety of nutrients and
trace elements and is a well-balanced plant food. It is best to collect these plants in the natural forests
where they occur and plant a few in your garden. They do not survive frost, but otherwise grow
almost anywhere.
2.Banana stems
These are chopped up and placed in the container with other plants and leaves. The stems have a
high concentration of potassium and water and make a good liquid base for the brew.
3.Weeds
Black Jack, Amaranths, Chickweed, Galant Soldier. All fast growing weeds, with soft dark green
leaves are good. Avoid using grasses and sedges.
Advantages and disadvantages of plant brews
Advantages
Disadvantages
Plant brews are easy to prepare and use
If diluted these brews do not harm plants
Plant brews increase disease resistance in crops
Plant brews provide a quick and cheap plant booster food.
Plant brews provide mainly potassium, phosphorus and trace
elements.
Nitrogen can be provided if the brew is used early in the
fermentation cycle (after 1 week) and care is taken to avoid it’s
evaporation by keeping the containers closed and cool
Plants drink their nutrients so nutrients immediately available,
easy quick method.
These teas are excellent to use on newly transplanted
seedlings to help them recover from transplanting shock.
Useful method for rainy season when there is lots of leaching.
You can prepare fertilizer teas from animal manure, plant trees
from parts of plants.
Resources such as containers with
lids are required
Plant brews can burn plants if they
are too strong
Effects of the brews on plant
growth are only visible after 3-5
days.
It is not possible to know exactly
which nutrients these brews
contain.
Some people do not like the smell
of these brews, which can smell
very rotten
Nitrogen is volatile and is lost from
the brews quite early in the
fermentation cycle
5.HOW TO MAKE LIQUID MANURE FROM ANIMAL MANURE
Manure can be used from chickens, rabbits, cows, goats and sheep. A mixture of manures is best.
Put your fresh manure mixture into an orange packet and tie the top of the bag.
Put the bag in the container and attach it to a stick or a rope. Then fill the container with water. For
every 1kilogram of manure you will need 5 liters of water. This means an orange sack full of manure
in a large bucket (50l), or half the bag in a normal sized household bucket (20l). This is a way of
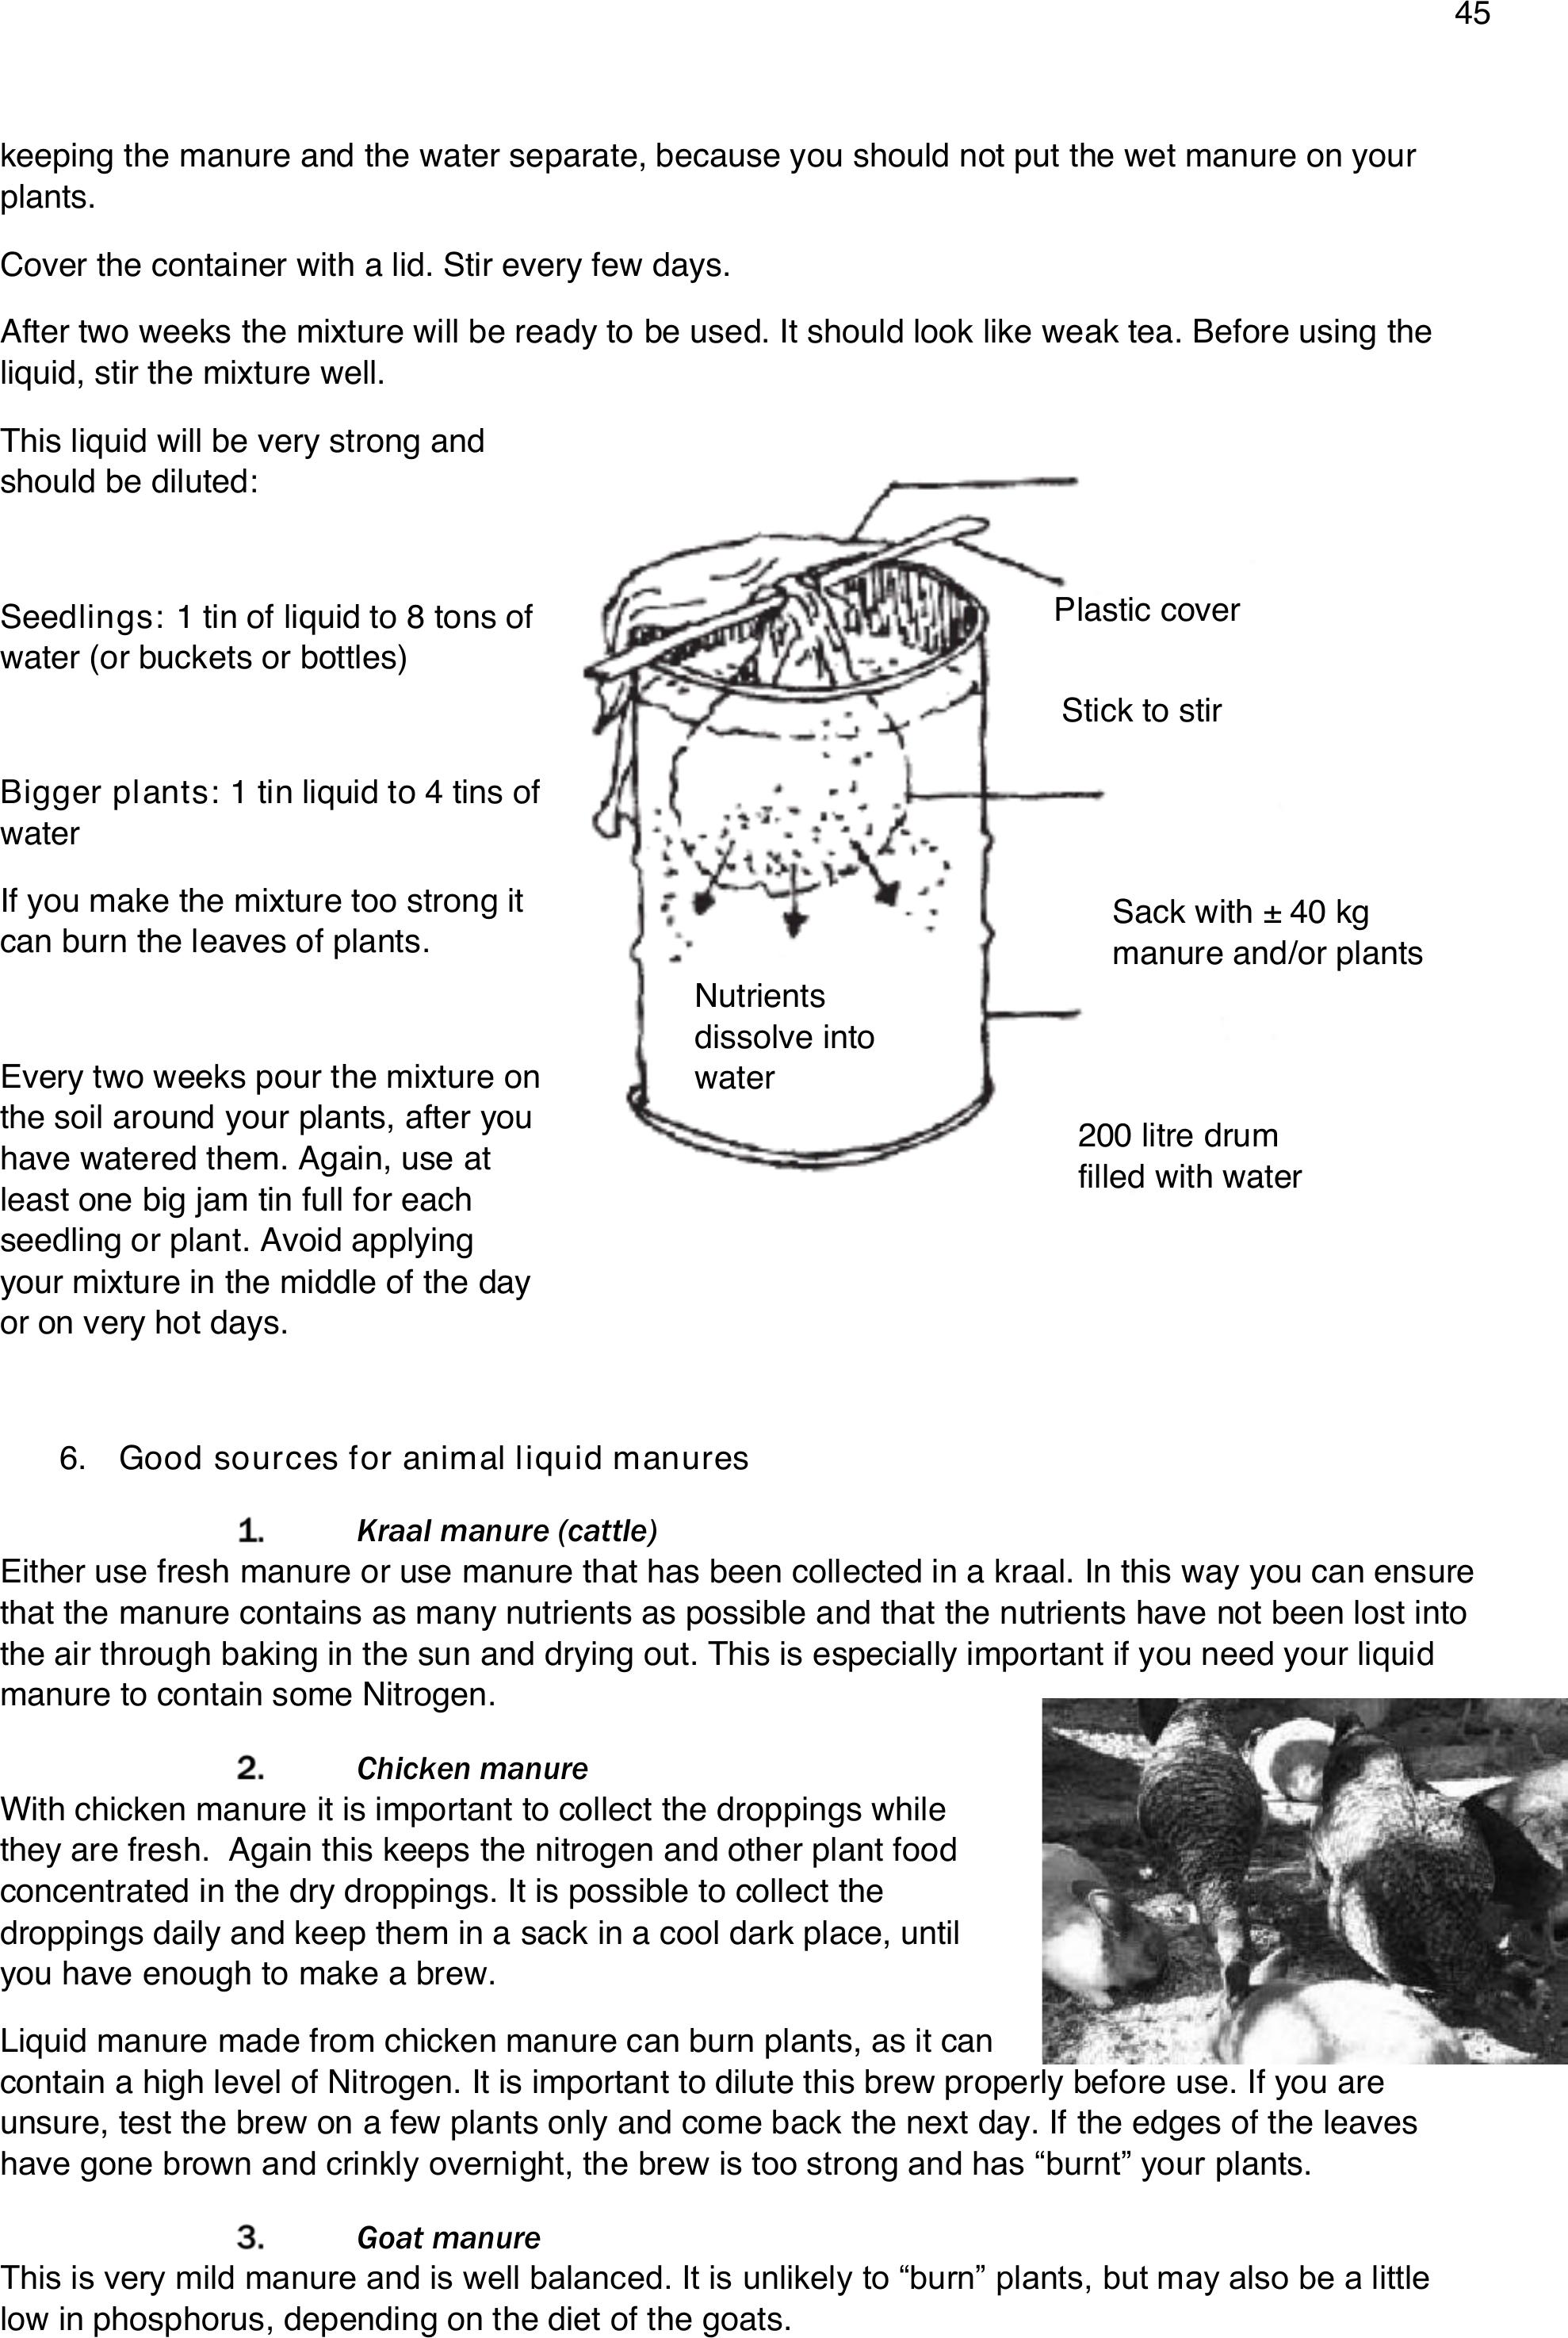
45
keeping the manure and the water separate, because you should not put the wet manure on your
plants.
Cover the container with a lid. Stir every few days.
After two weeks the mixture will be ready to be used. It should look like weak tea. Before using the
liquid, stir the mixture well.
This liquid will be very strong and
should be diluted:
Seedlings: 1 tin of liquid to 8 tons of
water (or buckets or bottles)
Bigger plants: 1 tin liquid to 4 tins of
water
If you make the mixture too strong it
can burn the leaves of plants.
Every two weeks pour the mixture on
the soil around your plants, after you
have watered them. Again, use at
least one big jam tin full for each
seedling or plant. Avoid applying
your mixture in the middle of the day
or on very hot days.
6.Good sources for animal liquid manures
Kraal manure (cattle)
Either use fresh manure or use manure that has been collected in a kraal. In this way you can ensure
that the manure contains as many nutrients as possible and that the nutrients have not been lost into
the air through baking in the sun and drying out. This is especially important if you need your liquid
manure to contain some Nitrogen.
Chicken manure
With chicken manure it is important to collect the droppings while
they are fresh. Again this keeps the nitrogen and other plant food
concentrated in the dry droppings. It is possible to collect the
droppings daily and keep them in a sack in a cool dark place, until
you have enough to make a brew.
Liquid manure made from chicken manure can burn plants, as it can
contain a high level of Nitrogen. It is important to dilute this brew properly before use. If you are
unsure, test the brew on a few plants only and come back the next day. If the edges of the leaves
have gone brown and crinkly overnight, the brew is too strong and has “burnt” your plants.
Goat manure
This is very mild manure and is well balanced. It is unlikely to “burn” plants, but may also be a little
low in phosphorus, depending on the diet of the goats.
Plastic cover
Stick to stir
Sack with ± 40 kg
manure and/or plants
200 litre drum
filled with water
Nutrients
dissolve into
water

46
Other manures
Manure from rabbits can also be safely used. It is suggested not to use the manure from pigs, due to
the possibility of carrying worm eggs that can infect people. Do not use manure from dogs and cats
for the same reason.
Urine
Human urine is an excellent garden tonic. Urine (from healthy people who are not on medication) is
collected, diluted and watered onto the soil around plants. Like plant based liquid manure, it should be
diluted to a weak tea colour. Avoid using it in the same place regularly.
Advantages and disadvantages of animal liquid manures
Advantages
Disadvantages
Liquid manures are easy to prepare and
use
If diluted properly, these liquid manures do
not harm plants
Liquid manures increase disease resistance
in crops
Liquid manures provide a quick and cheap
plant booster food
Liquid manures provide mainly potassium,
phosphorus and trace elements.
Nitrogen can be provided if the liquid
manure is used early in the fermentation
cycle (after 1 week) and care is taken to
avoid it’s evaporation by keeping the
containers closed and cool
The liquid manure is only as good as the manure of
origin. If the animals are suffering from deficiencies
these will be transferred into the manures. As an
example, there is likely to be a lack of phosphorus in
cattle manure, where cattle have only been grazed
on veld. This means the liquid manure made from
this source will also lack phosphorus.
Liquid manures are generally low in nitrogen. Using
chicken manure drastically increases the nitrogen
content.
The source manures have to be handled well to
retain their nutrients before using as liquid manures.
Effects of the liquid manures on plant growth are
only visible after 3-5 days.
It is not possible to know exactly which nutrients
these brews contain.
Some people do not like the smell of these liquid
manures, which can smell very rotten
Agroforestry Leaf tea Recipe
This is an excellent nitrogen boosting liquid manure.Collect fresh leaves from trees such as
Leucaena, thorn trees and wattle. Put about 30-40kg in a sack and tie securely. Suspend the sack
from a stick across the top of a 200l drum filled with water. Cover the drum with a lid. Stir every 2-3
days by moving the stick gently up and down. This will release the nutrients into the water. Soak the
leaves for about 2 weeks and be sure the sack is kept underwater the whole time. Remove the sack
of leaves (add the leaves to the compost or use as a mulch) then dilute the tea by mixing 4parts of
water with one part of the tea. It should look like weak tea. Apply by pouring it on to the soil around
the plants or sprinkling over the leaves of plants.
4.3 MANURE AS A NATURAL FERTILIZER
Manure is an excellent fertilizer containing nitrogen, phosphorus, potassium and other nutrients. It
also adds organic matter to the soil which may improve soil structure, aeration, soil moisture-holding
capacity, and water infiltration.
Nutrient content of manure varies depending on source, moisture content, storage, and handling
methods. The management of manure can also affect its value. For example; nitrogen is present in
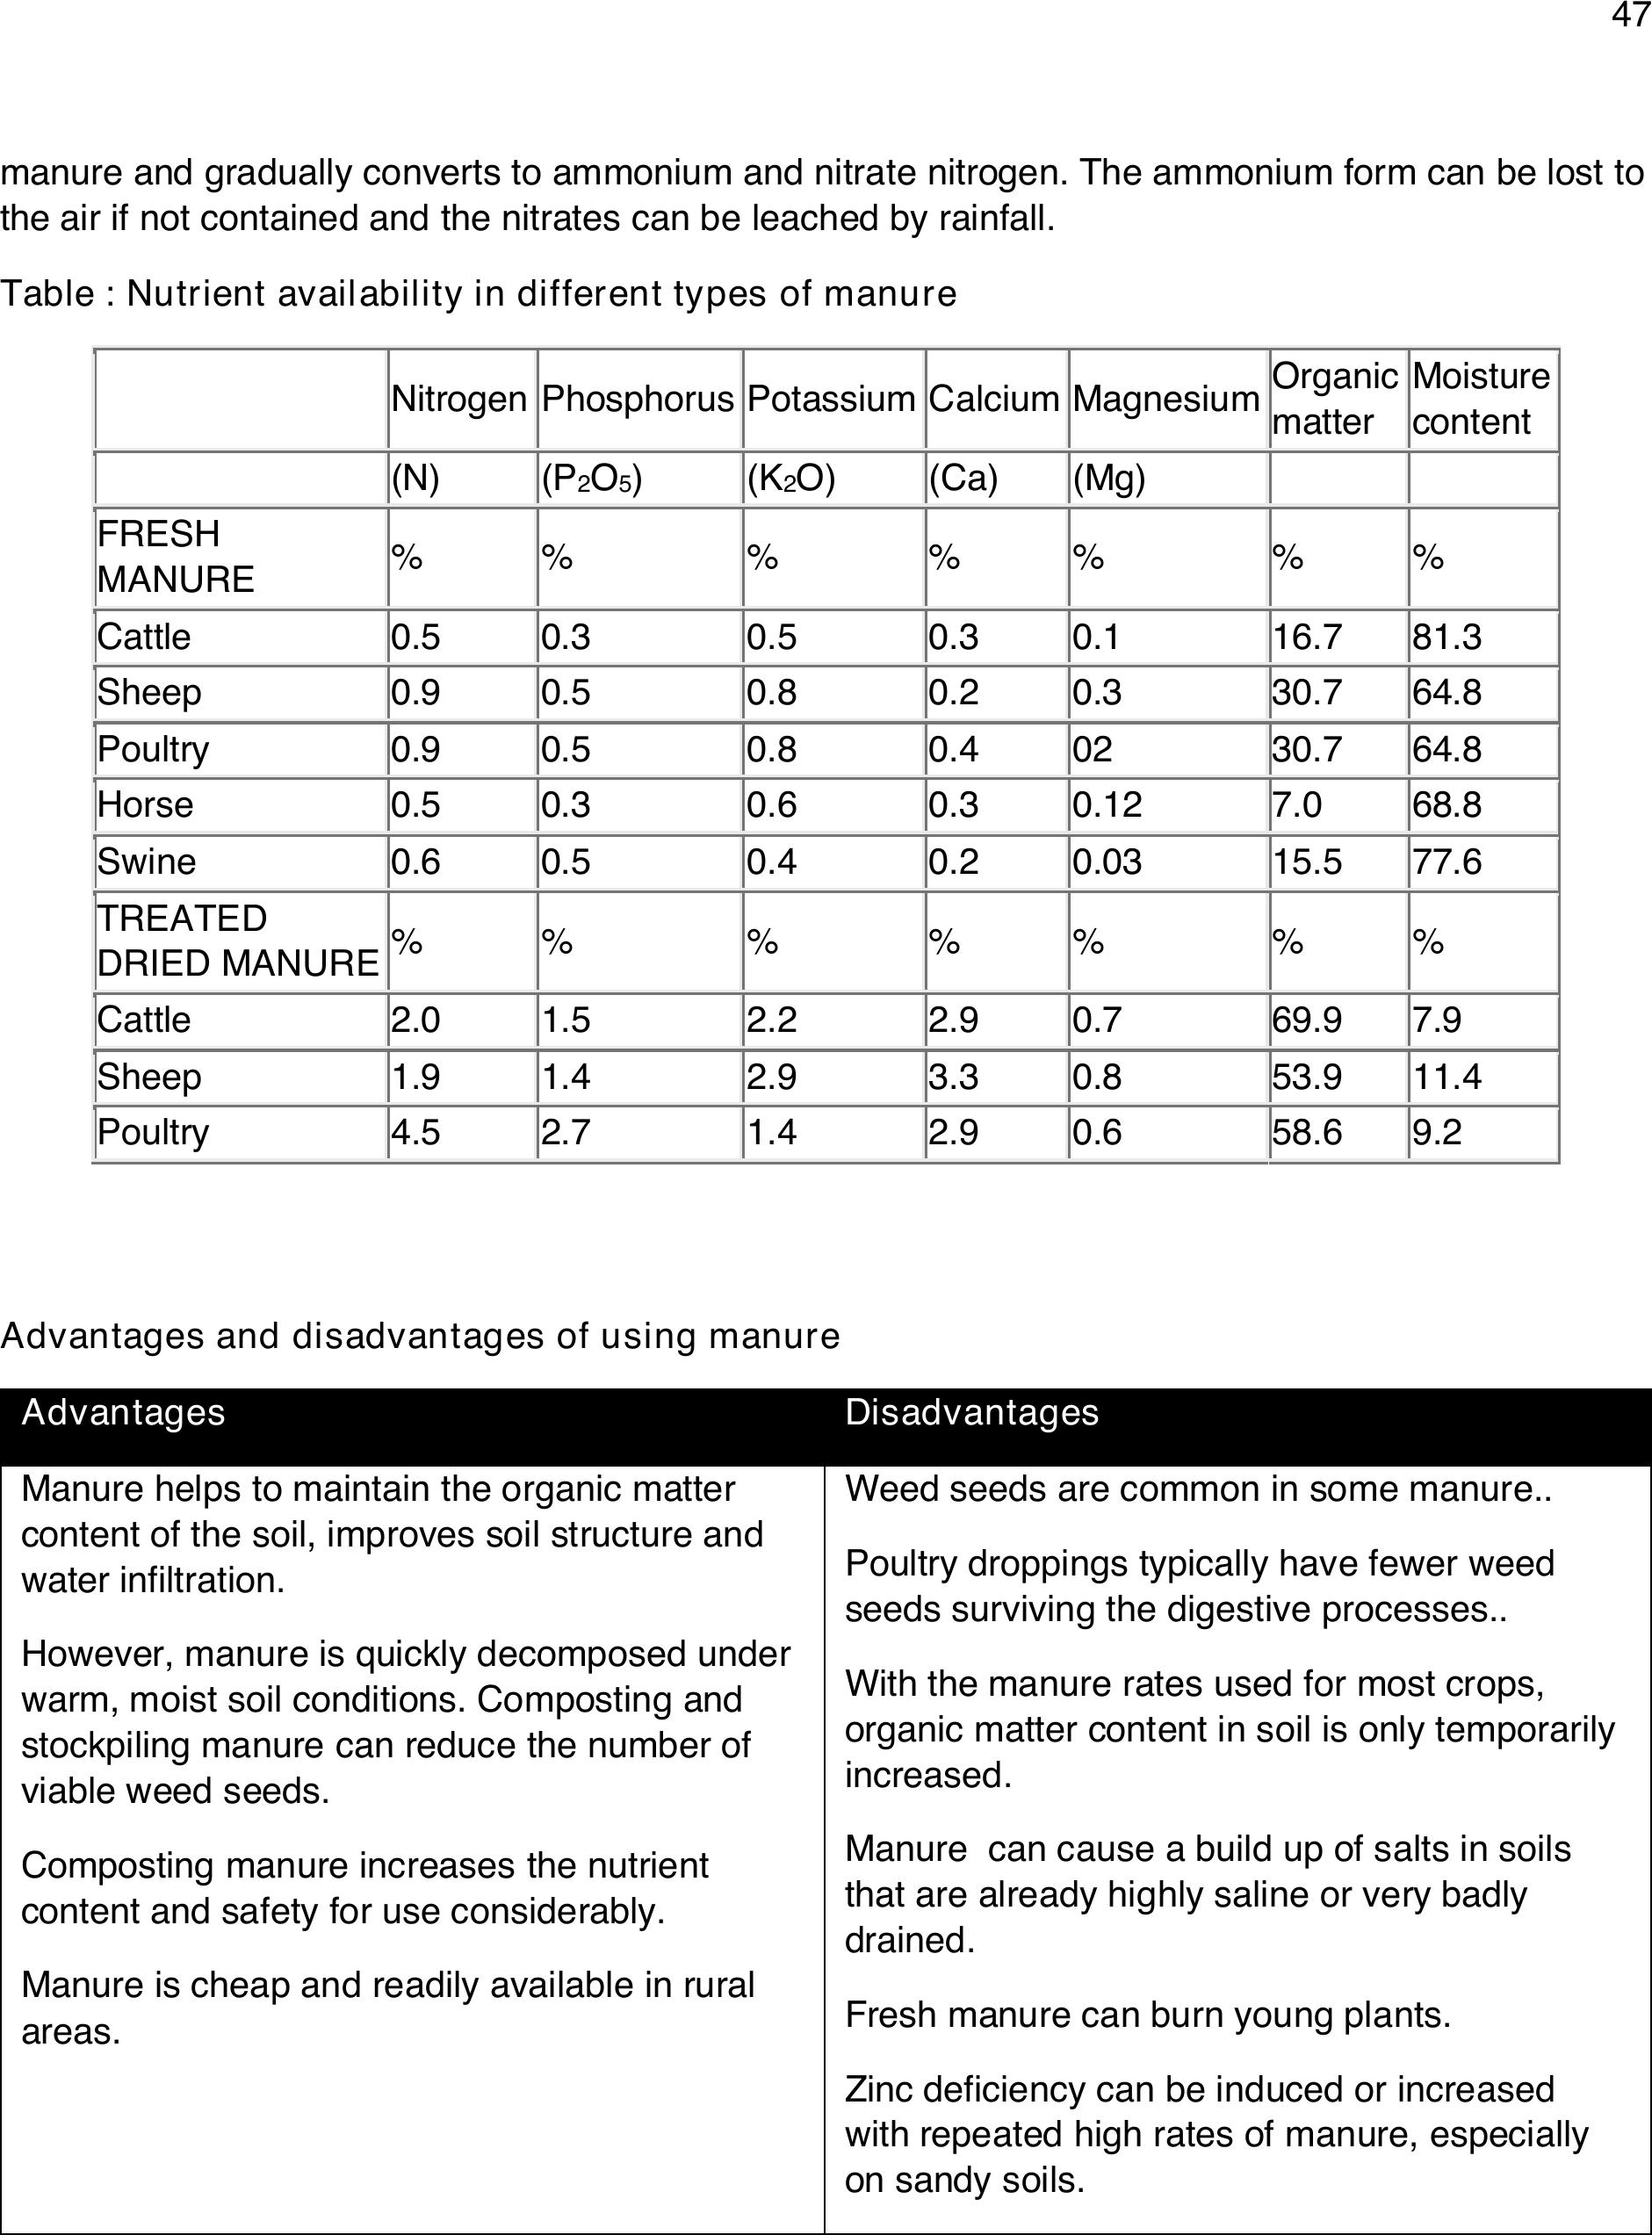
47
manure and gradually converts to ammonium and nitrate nitrogen. The ammonium form can be lost to
the air if not contained and the nitrates can be leached by rainfall.
Table : Nutrient availability in different types of manure
Nitrogen
Phosphorus
Potassium
Calcium
Magnesium
Organic
matter
Moisture
content
(N)
(P2O5)
(K2O)
(Ca)
(Mg)
FRESH
MANURE
%
%
%
%
%
%
%
Cattle
0.5
0.3
0.5
0.3
0.1
16.7
81.3
Sheep
0.9
0.5
0.8
0.2
0.3
30.7
64.8
Poultry
0.9
0.5
0.8
0.4
02
30.7
64.8
Horse
0.5
0.3
0.6
0.3
0.12
7.0
68.8
Swine
0.6
0.5
0.4
0.2
0.03
15.5
77.6
TREATED
DRIED MANURE
%
%
%
%
%
%
%
Cattle
2.0
1.5
2.2
2.9
0.7
69.9
7.9
Sheep
1.9
1.4
2.9
3.3
0.8
53.9
11.4
Poultry
4.5
2.7
1.4
2.9
0.6
58.6
9.2
Advantages and disadvantages of using manure
Advantages
Disadvantages
Manure helps to maintain the organic matter
content of the soil, improves soil structure and
water infiltration.
However, manure is quickly decomposed under
warm, moist soil conditions. Composting and
stockpiling manure can reduce the number of
viable weed seeds.
Composting manure increases the nutrient
content and safety for use considerably.
Manure is cheap and readily available in rural
areas.
Weed seeds are common in some manure..
Poultry droppings typically have fewer weed
seeds surviving the digestive processes..
With the manure rates used for most crops,
organic matter content in soil is only temporarily
increased.
Manure can cause a build up of salts in soils
that are already highly saline or very badly
drained.
Fresh manure can burn young plants.
Zinc deficiency can be induced or increased
with repeated high rates of manure, especially
on sandy soils.
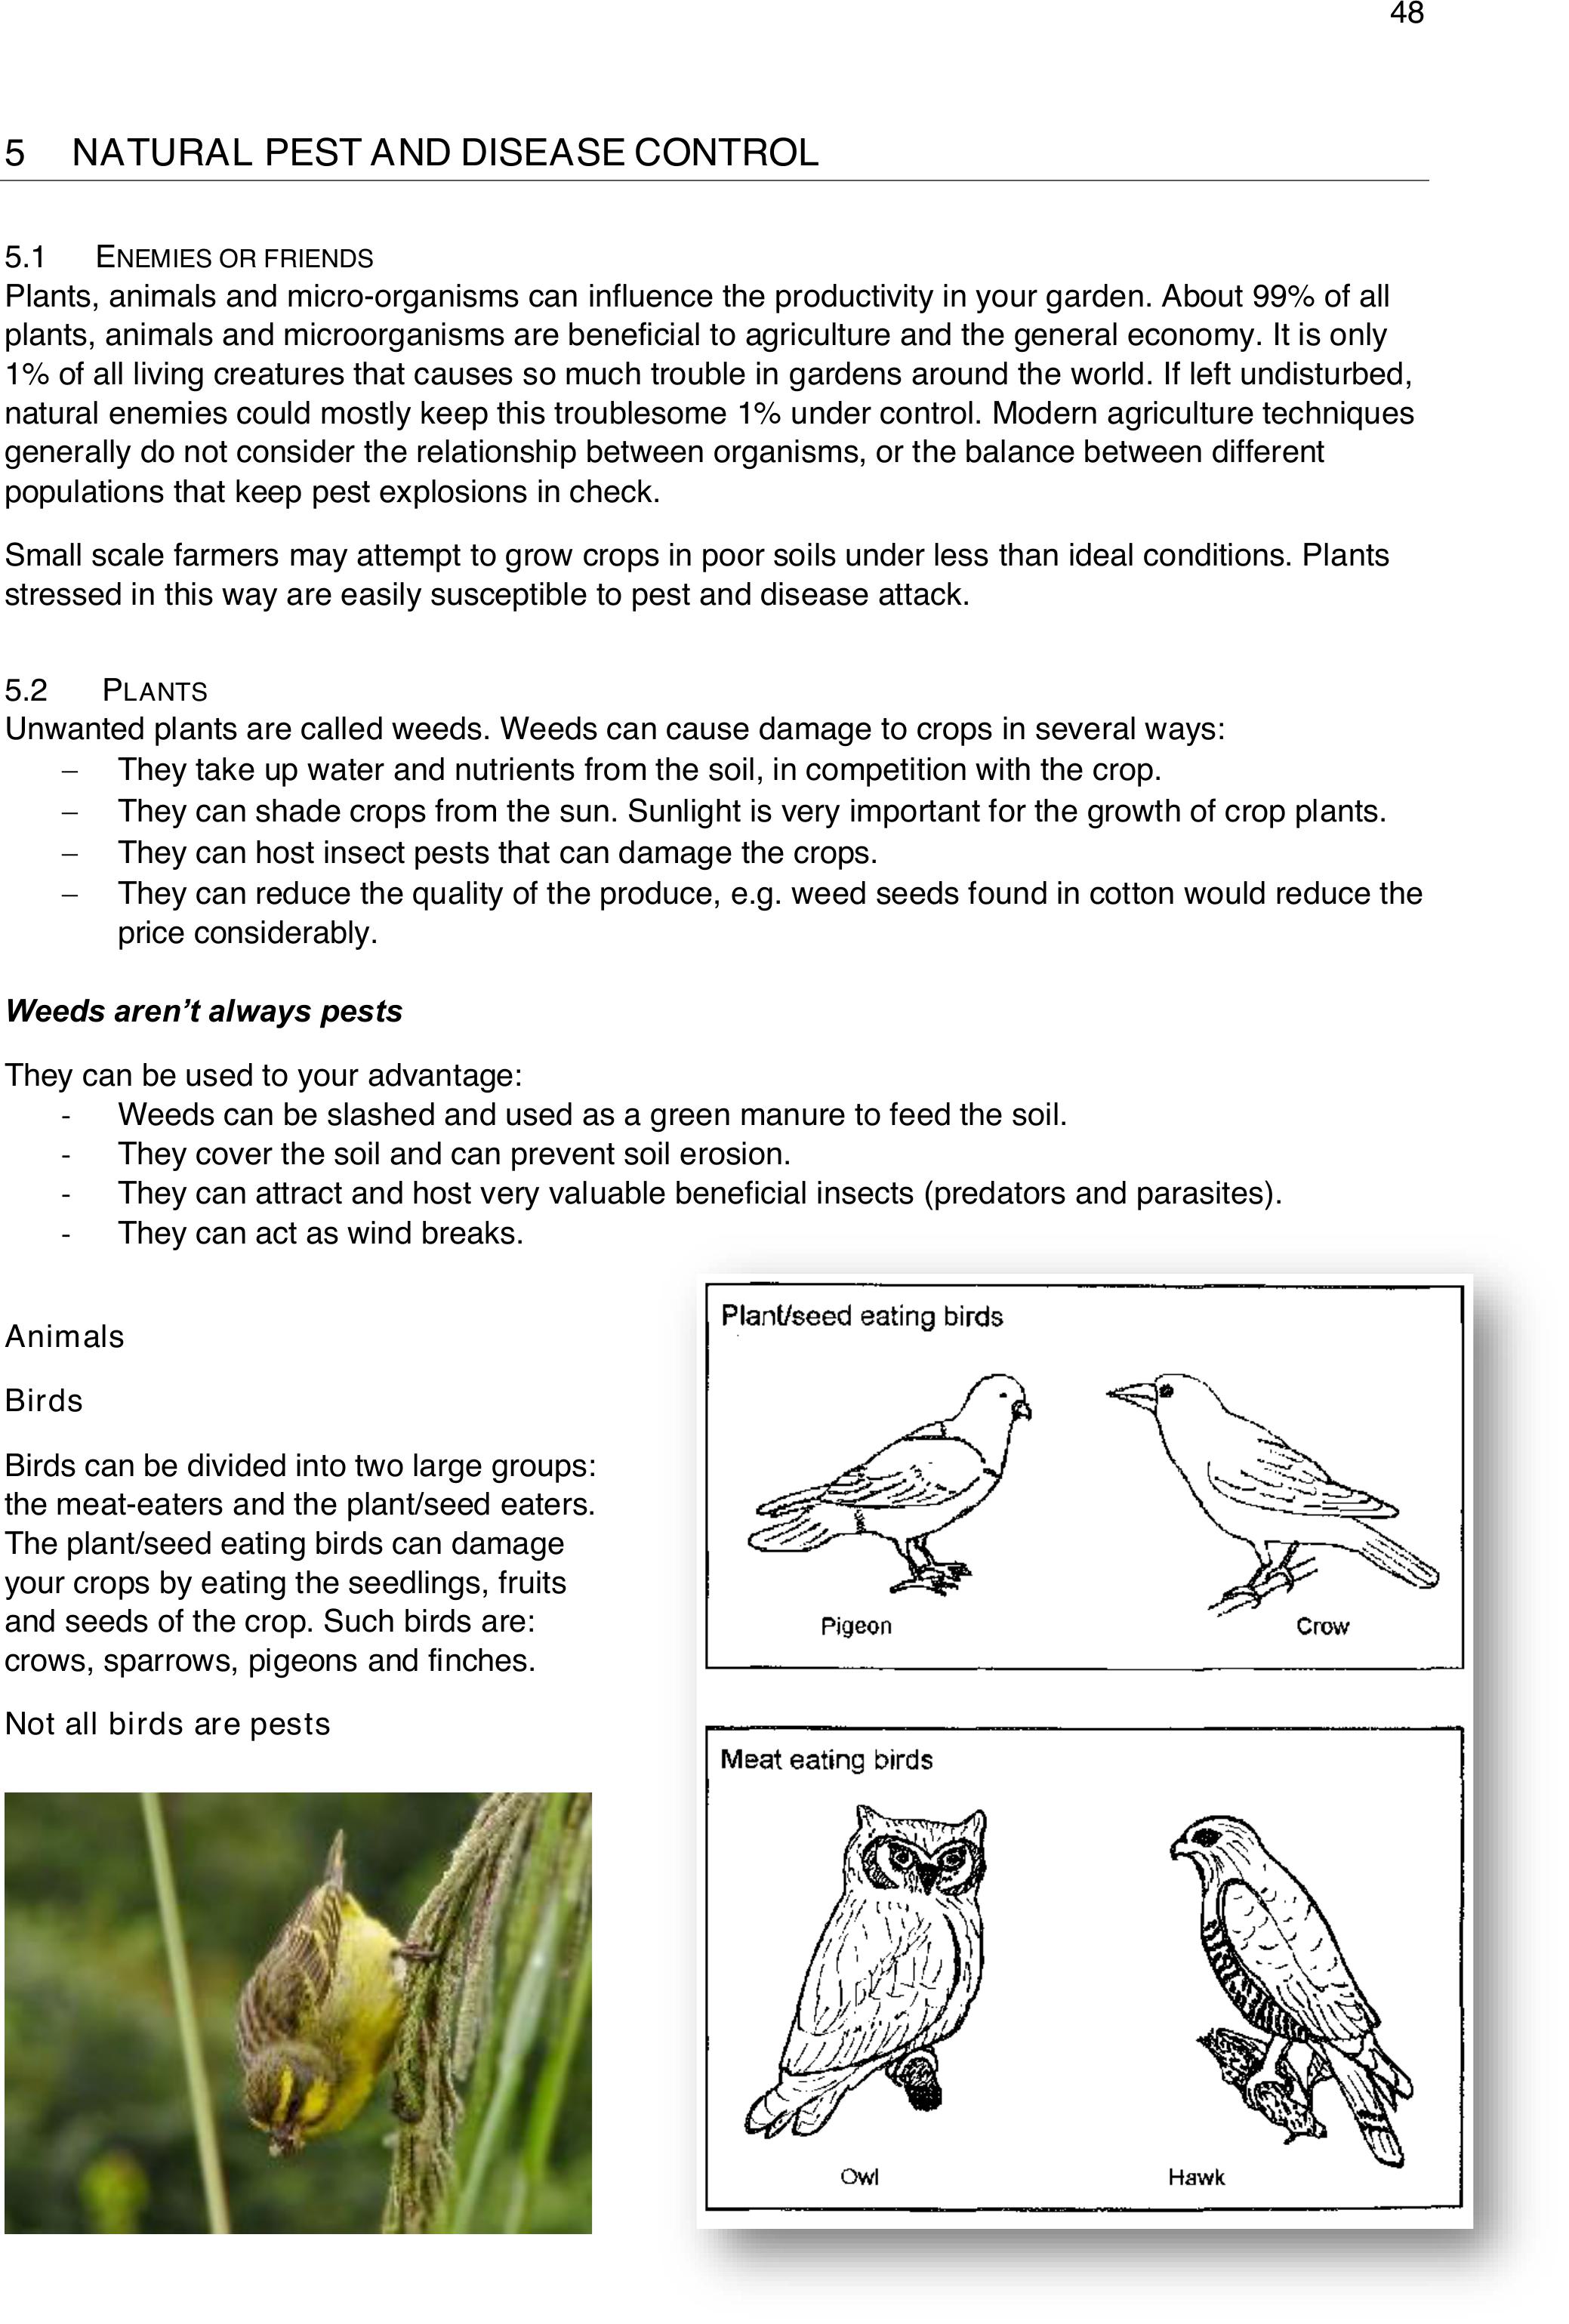
48
5 NATURALPESTANDDISEASECONTROL
5.1 ENEMIES OR FRIENDS
Plants, animals and micro-organisms can influence the productivity in your garden. About 99% of all
plants, animals and microorganisms are beneficial to agriculture and the general economy. It is only
1% of all living creatures that causes so much trouble in gardens around the world. If left undisturbed,
natural enemies could mostly keep this troublesome 1% under control. Modern agriculture techniques
generally do not consider the relationship between organisms, or the balance between different
populations that keep pest explosions in check.
Small scale farmers may attempt to grow crops in poor soils under less than ideal conditions. Plants
stressed in this way are easily susceptible to pest and disease attack.
5.2 PLANTS
Unwanted plants are called weeds. Weeds can cause damage to crops in several ways:
−They take up water and nutrients from the soil, in competition with the crop.
−They can shade crops from the sun. Sunlight is very important for the growth of crop plants.
−They can host insect pests that can damage the crops.
−They can reduce the quality of the produce, e.g. weed seeds found in cotton would reduce the
price considerably.
Weeds aren’t always pests
They can be used to your advantage:
-Weeds can be slashed and used as a green manure to feed the soil.
-They cover the soil and can prevent soil erosion.
-They can attract and host very valuable beneficial insects (predators and parasites).
-They can act as wind breaks.
Animals
Birds
Birds can be divided into two large groups:
the meat-eaters and the plant/seed eaters.
The plant/seed eating birds can damage
your crops by eating the seedlings, fruits
and seeds of the crop. Such birds are:
crows, sparrows, pigeons and finches.
Not all birds are pests
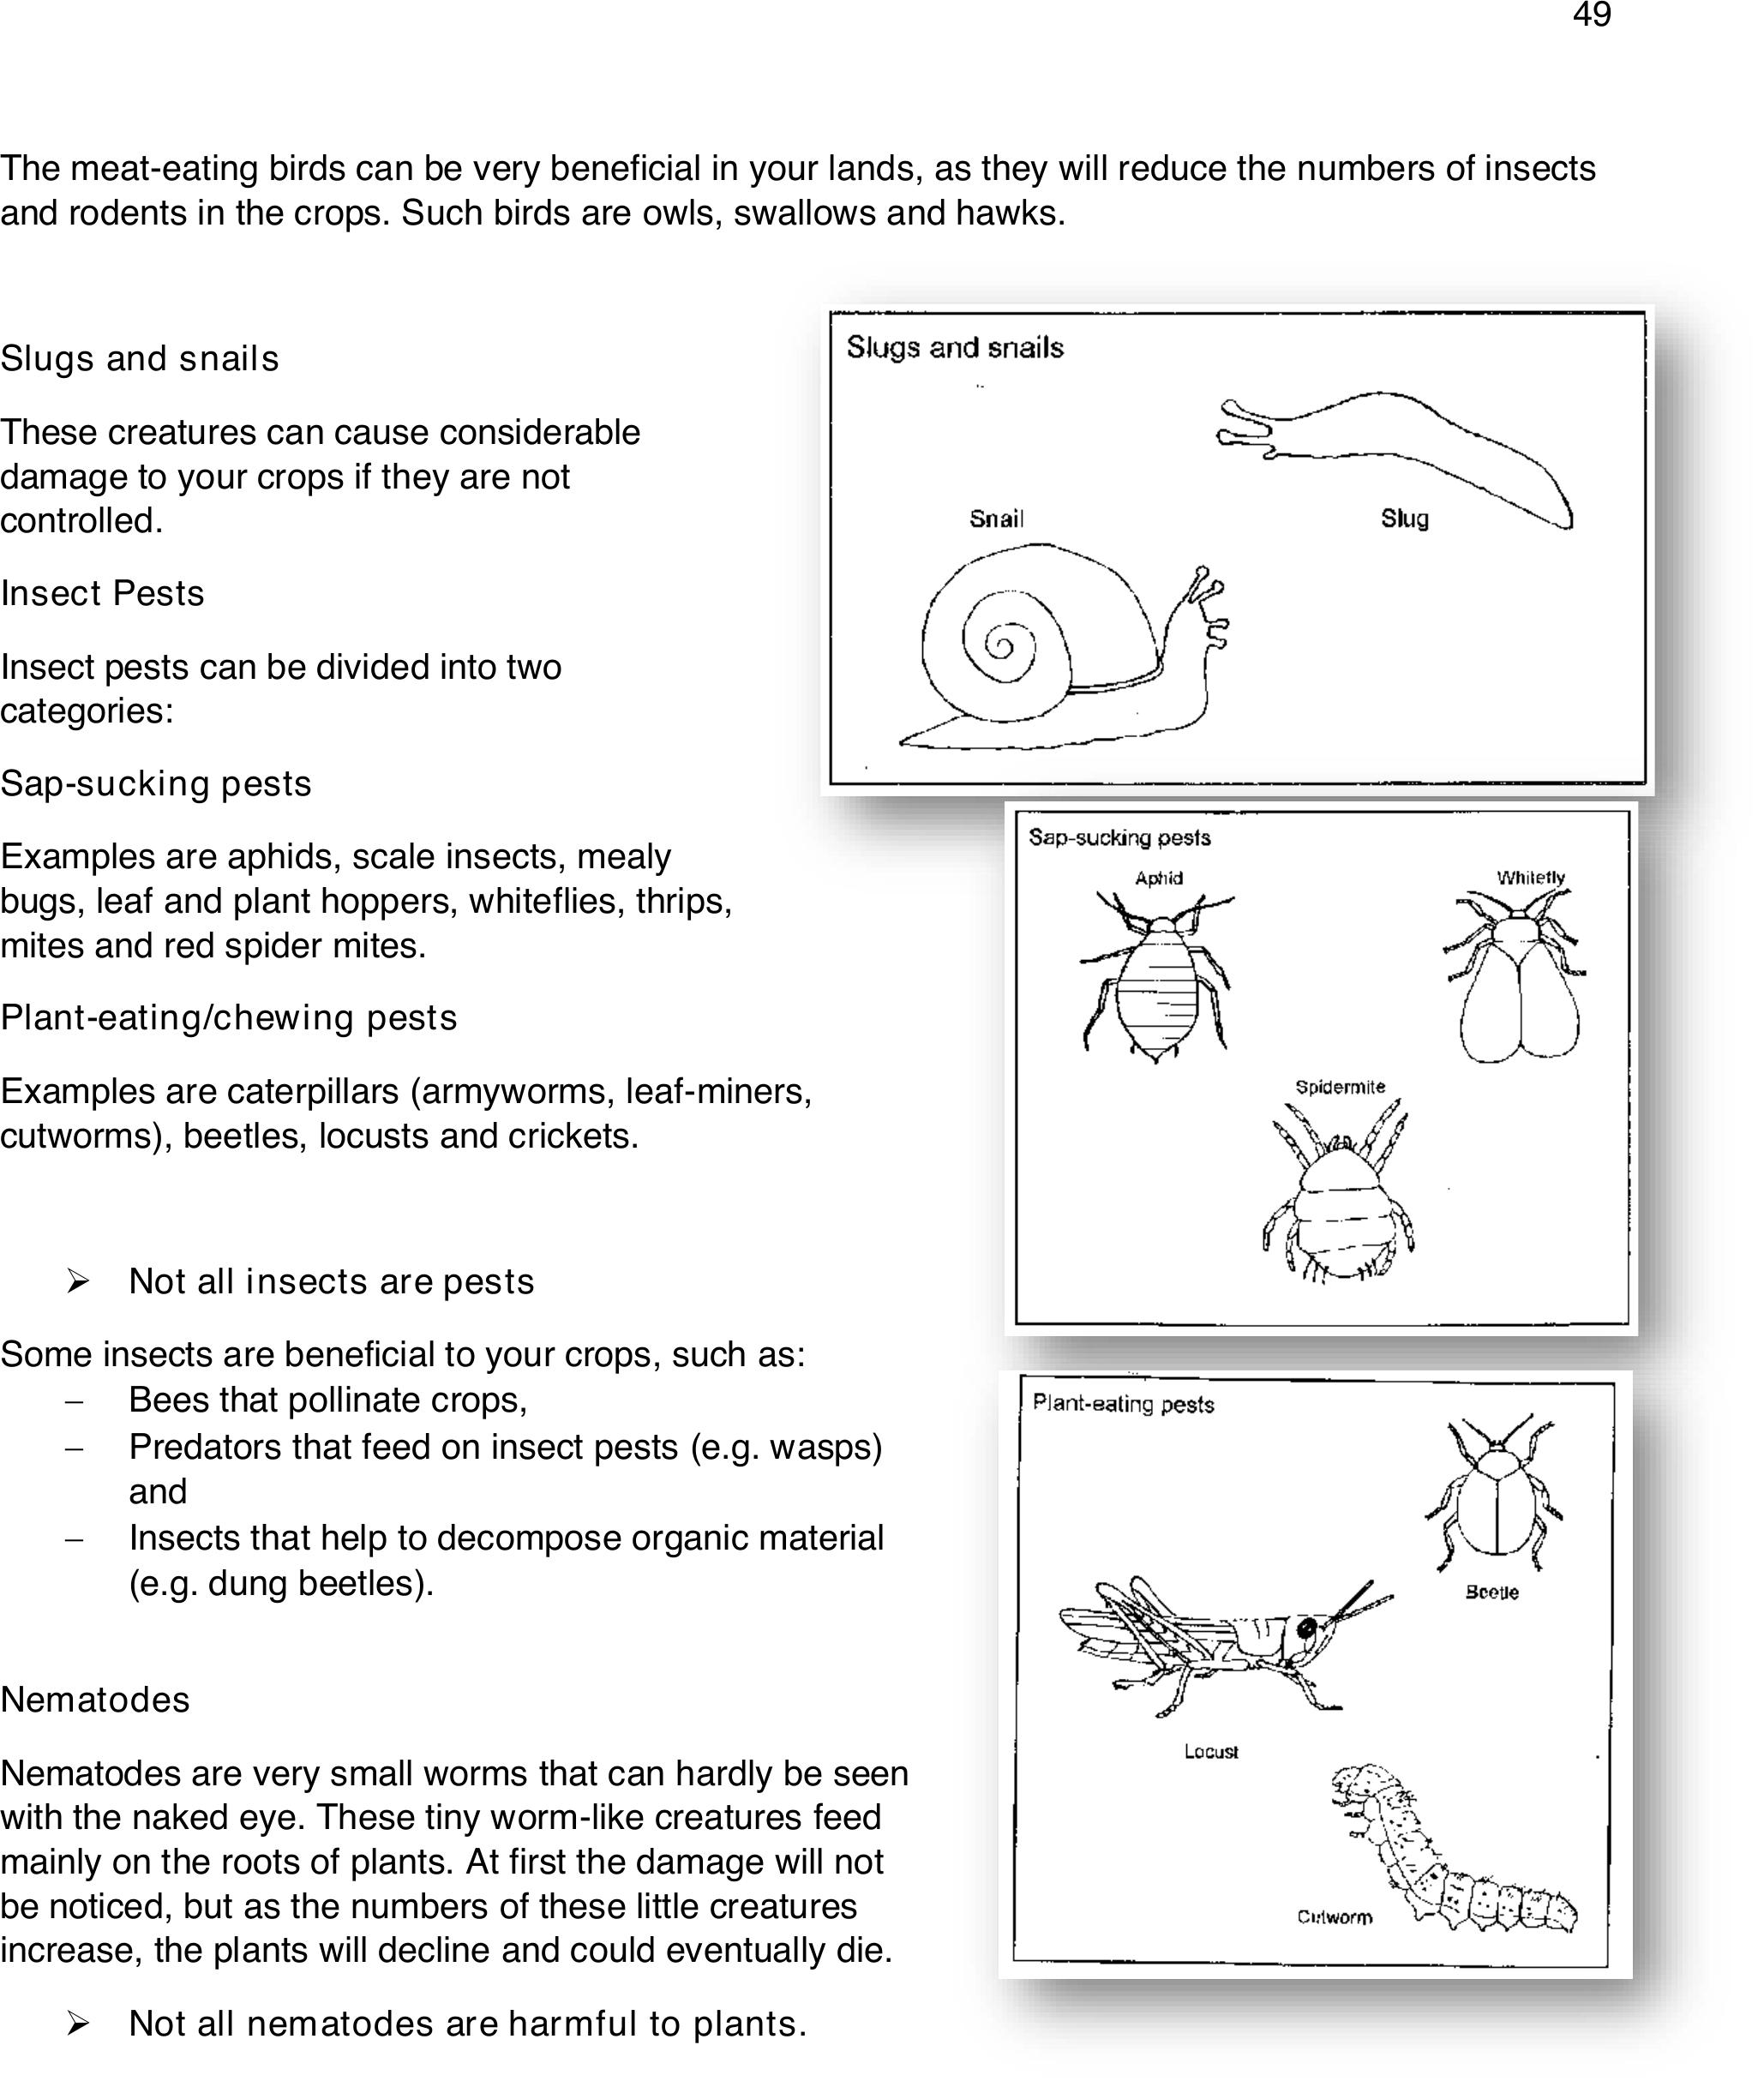
49
The meat-eating birds can be very beneficial in your lands, as they will reduce the numbers of insects
and rodents in the crops. Such birds are owls, swallows and hawks.
Slugs and snails
These creatures can cause considerable
damage to your crops if they are not
controlled.
Insect Pests
Insect pests can be divided into two
categories:
Sap-sucking pests
Examples are aphids, scale insects, mealy
bugs, leaf and plant hoppers, whiteflies, thrips,
mites and red spider mites.
Plant-eating/chewing pests
Examples are caterpillars (armyworms, leaf-miners,
cutworms), beetles, locusts and crickets.
➢Not all insects are pests
Some insects are beneficial to your crops, such as:
−Bees that pollinate crops,
−Predators that feed on insect pests (e.g. wasps)
and
−Insects that help to decompose organic material
(e.g. dung beetles).
Nematodes
Nematodes are very small worms that can hardly be seen
with the naked eye. These tiny worm-like creatures feed
mainly on the roots of plants. At first the damage will not
be noticed, but as the numbers of these little creatures
increase, the plants will decline and could eventually die.
➢Not all nematodes are harmful to plants.

50
Only a small percentage of nematodes are plant eaters, the
rest live on organic material in the soil or feed on small
animals in the soil.
5.Micro-organisms
Micro-organisms are tiny creatures that can usually not be
observed with the naked eye. They can, however, be seen
when they occur in large numbers. Micro-organisms are
responsible for diseases and can be classified as fungi,
bacteria and viruses.
Fungi
There are quite a variety of fungi that can influence
our lives. Fungi that cause plant diseases are
usually tiny parasitic organisms that grow on or
inside plants. A mass of these usually consists of
tiny threads (called hyphae), which infect the cells
of the plant. Fungal spores can disperse through
the air or with water or with the help of other
organisms and cause new infections. They can lie
dormant in the soil for several years, as sporing
structures. Most fungi prefer moist, warm weather.
Fungi can be devastating in a crop. Fungi cause
diseases such as blights, mildews, and certain root
rots.
Fungi are not always disease causing.
Some fungi are very useful and even crucial for life
on earth. Some of these fungi are bigger and can be
seen with the naked eye. For example the
mushrooms and bracket fungi that are found on
fallen trees. These fungi help with the decomposition
of the wood and the nutrients in the wood are made
available to other organisms. Other fungi are used by
ants and other small insects as a food source
Bacteria
Bacterial diseases are caused by minute
organisms that reproduce rapidly by
division. Bacterial diseases in plants are
difficult to cure. The best way to prevent
serious damage is to destroy affected
plants. Bacteria cause diseases such as
soft rots and some leaf spots.
Viruses
Viruses are amongst the smallest of all
living organisms. They cannot be seen with
the naked eye. Only the symptoms can be seen on the plants. Viruses cannot reproduce without the
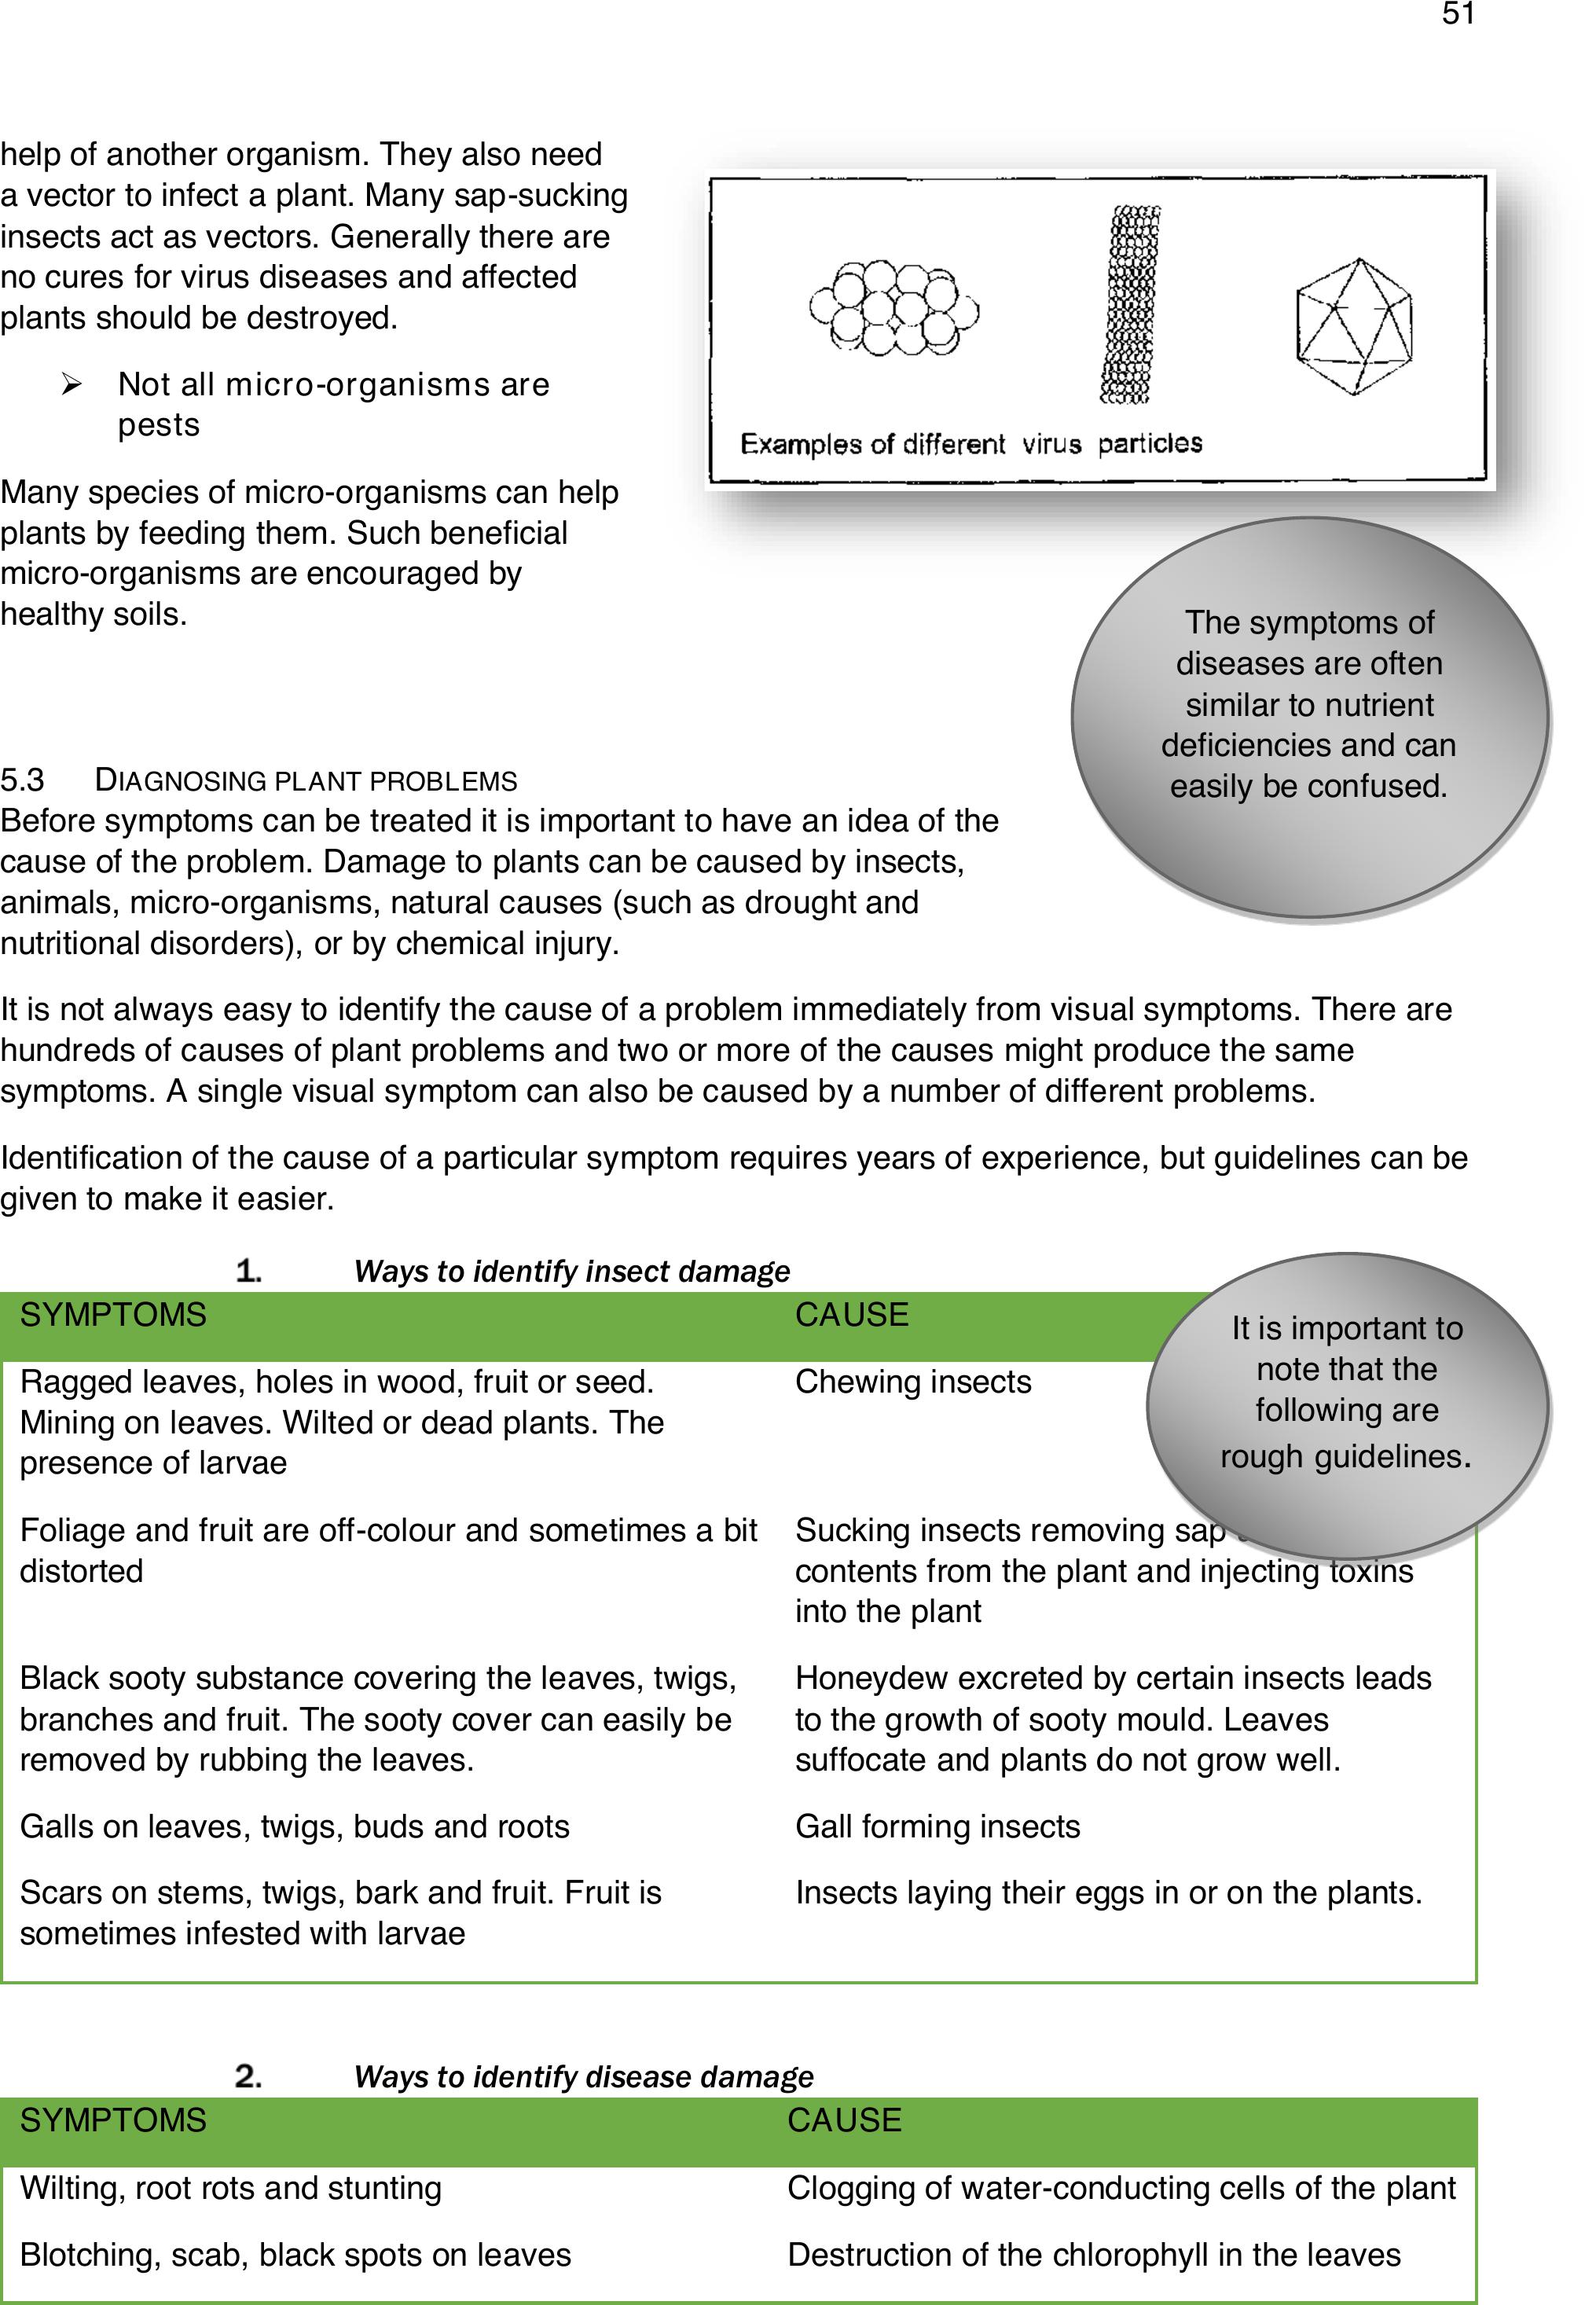
51
help of another organism. They also need
a vector to infect a plant. Many sap-sucking
insects act as vectors. Generally there are
no cures for virus diseases and affected
plants should be destroyed.
➢Not all micro-organisms are
pests
Many species of micro-organisms can help
plants by feeding them. Such beneficial
micro-organisms are encouraged by
healthy soils.
5.3 DIAGNOSING PLANT PROBLEMS
Before symptoms can be treated it is important to have an idea of the
cause of the problem. Damage to plants can be caused by insects,
animals, micro-organisms, natural causes (such as drought and
nutritional disorders), or by chemical injury.
It is not always easy to identify the cause of a problem immediately from visual symptoms. There are
hundreds of causes of plant problems and two or more of the causes might produce the same
symptoms. A single visual symptom can also be caused by a number of different problems.
Identification of the cause of a particular symptom requires years of experience, but guidelines can be
given to make it easier.
Ways to identify insect damage
SYMPTOMS
CAUSE
Ragged leaves, holes in wood, fruit or seed.
Mining on leaves. Wilted or dead plants. The
presence of larvae
Chewing insects
Foliage and fruit are off-colour and sometimes a bit
distorted
Sucking insects removing sap and cell
contents from the plant and injecting toxins
into the plant
Black sooty substance covering the leaves, twigs,
branches and fruit. The sooty cover can easily be
removed by rubbing the leaves.
Honeydew excreted by certain insects leads
to the growth of sooty mould. Leaves
suffocate and plants do not grow well.
Galls on leaves, twigs, buds and roots
Gall forming insects
Scars on stems, twigs, bark and fruit. Fruit is
sometimes infested with larvae
Insects laying their eggs in or on the plants.
Ways to identify disease damage
SYMPTOMS
CAUSE
Wilting, root rots and stunting
Clogging of water-conducting cells of the plant
Blotching, scab, black spots on leaves
Destruction of the chlorophyll in the leaves
The symptoms of
diseases are often
similar to nutrient
deficiencies and can
easily be confused.
It is important to
note that the
following are
rough
guidelines
.
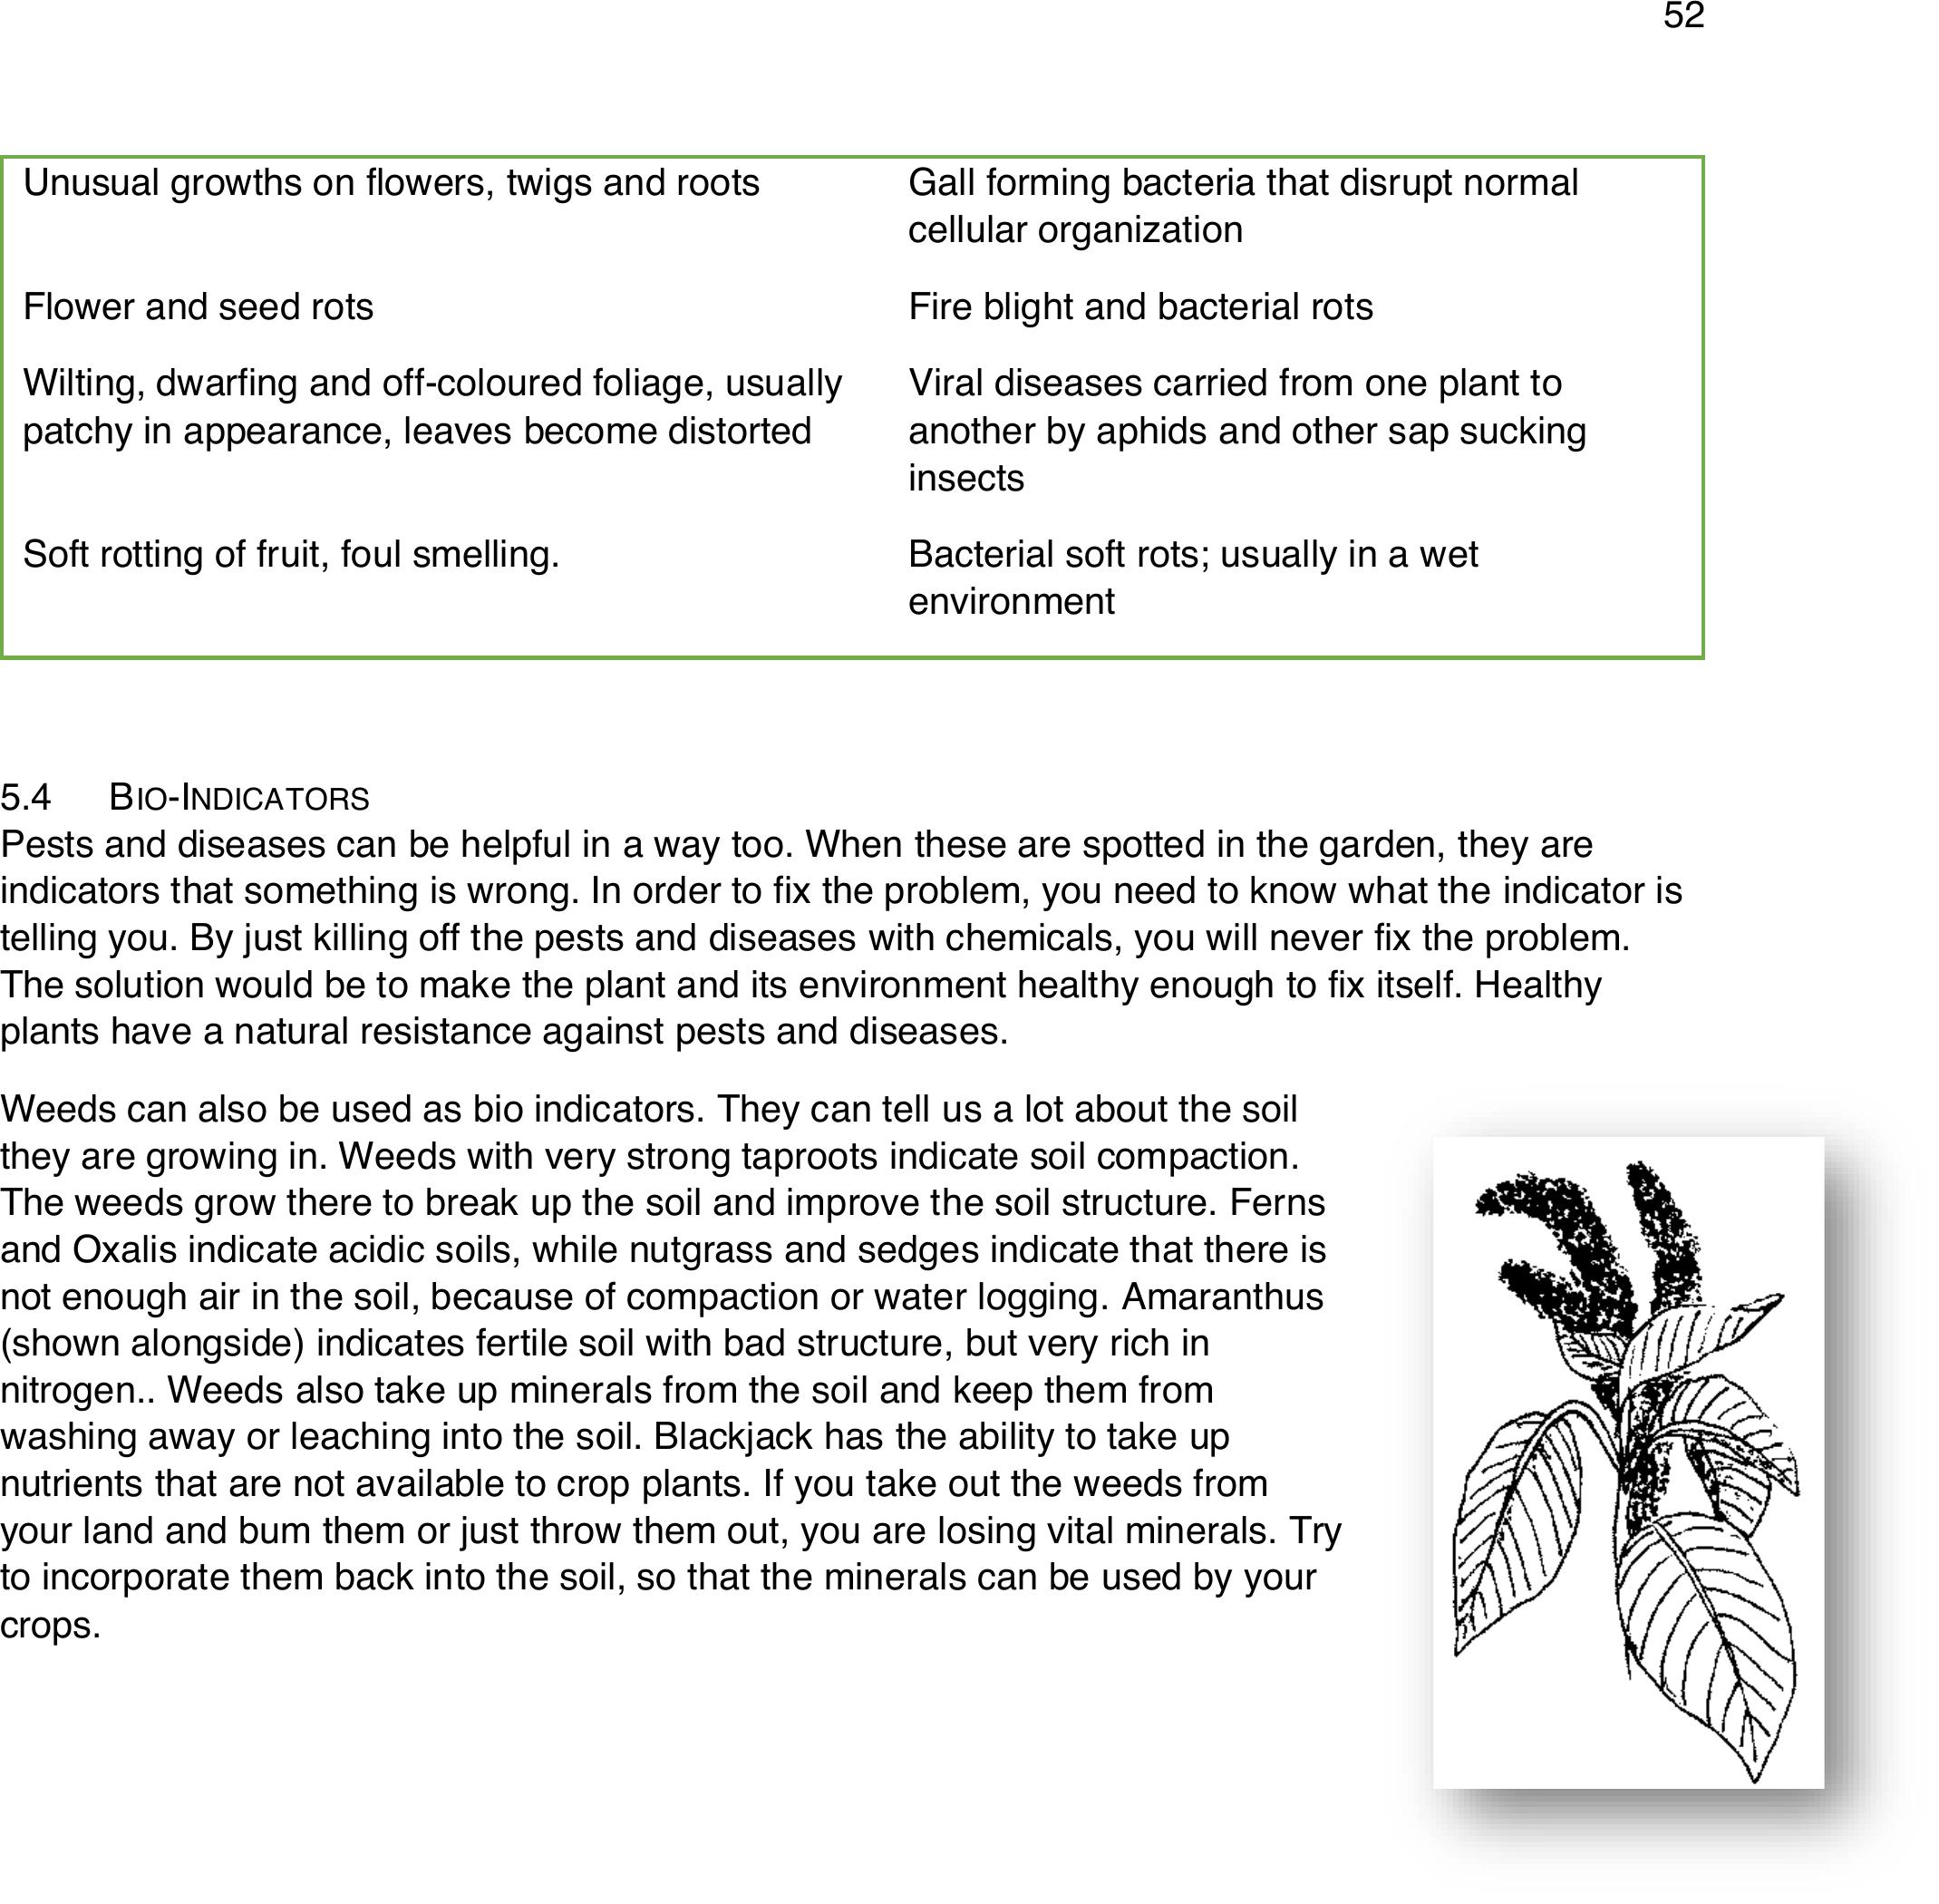
52
Unusual growths on flowers, twigs and roots
Gall forming bacteria that disrupt normal
cellular organization
Flower and seed rots
Fire blight and bacterial rots
Wilting, dwarfing and off-coloured foliage, usually
patchy in appearance, leaves become distorted
Viral diseases carried from one plant to
another by aphids and other sap sucking
insects
Soft rotting of fruit, foul smelling.
Bacterial soft rots; usually in a wet
environment
5.4 BIO-INDICATORS
Pests and diseases can be helpful in a way too. When these are spotted in the garden, they are
indicators that something is wrong. In order to fix the problem, you need to know what the indicator is
telling you. By just killing off the pests and diseases with chemicals, you will never fix the problem.
The solution would be to make the plant and its environment healthy enough to fix itself. Healthy
plants have a natural resistance against pests and diseases.
Weeds can also be used as bio indicators. They can tell us a lot about the soil
they are growing in. Weeds with very strong taproots indicate soil compaction.
The weeds grow there to break up the soil and improve the soil structure. Ferns
and Oxalis indicate acidic soils, while nutgrass and sedges indicate that there is
not enough air in the soil, because of compaction or water logging. Amaranthus
(shown alongside) indicates fertile soil with bad structure, but very rich in
nitrogen.. Weeds also take up minerals from the soil and keep them from
washing away or leaching into the soil. Blackjack has the ability to take up
nutrients that are not available to crop plants. If you take out the weeds from
your land and bum them or just throw them out, you are losing vital minerals. Try
to incorporate them back into the soil, so that the minerals can be used by your
crops.
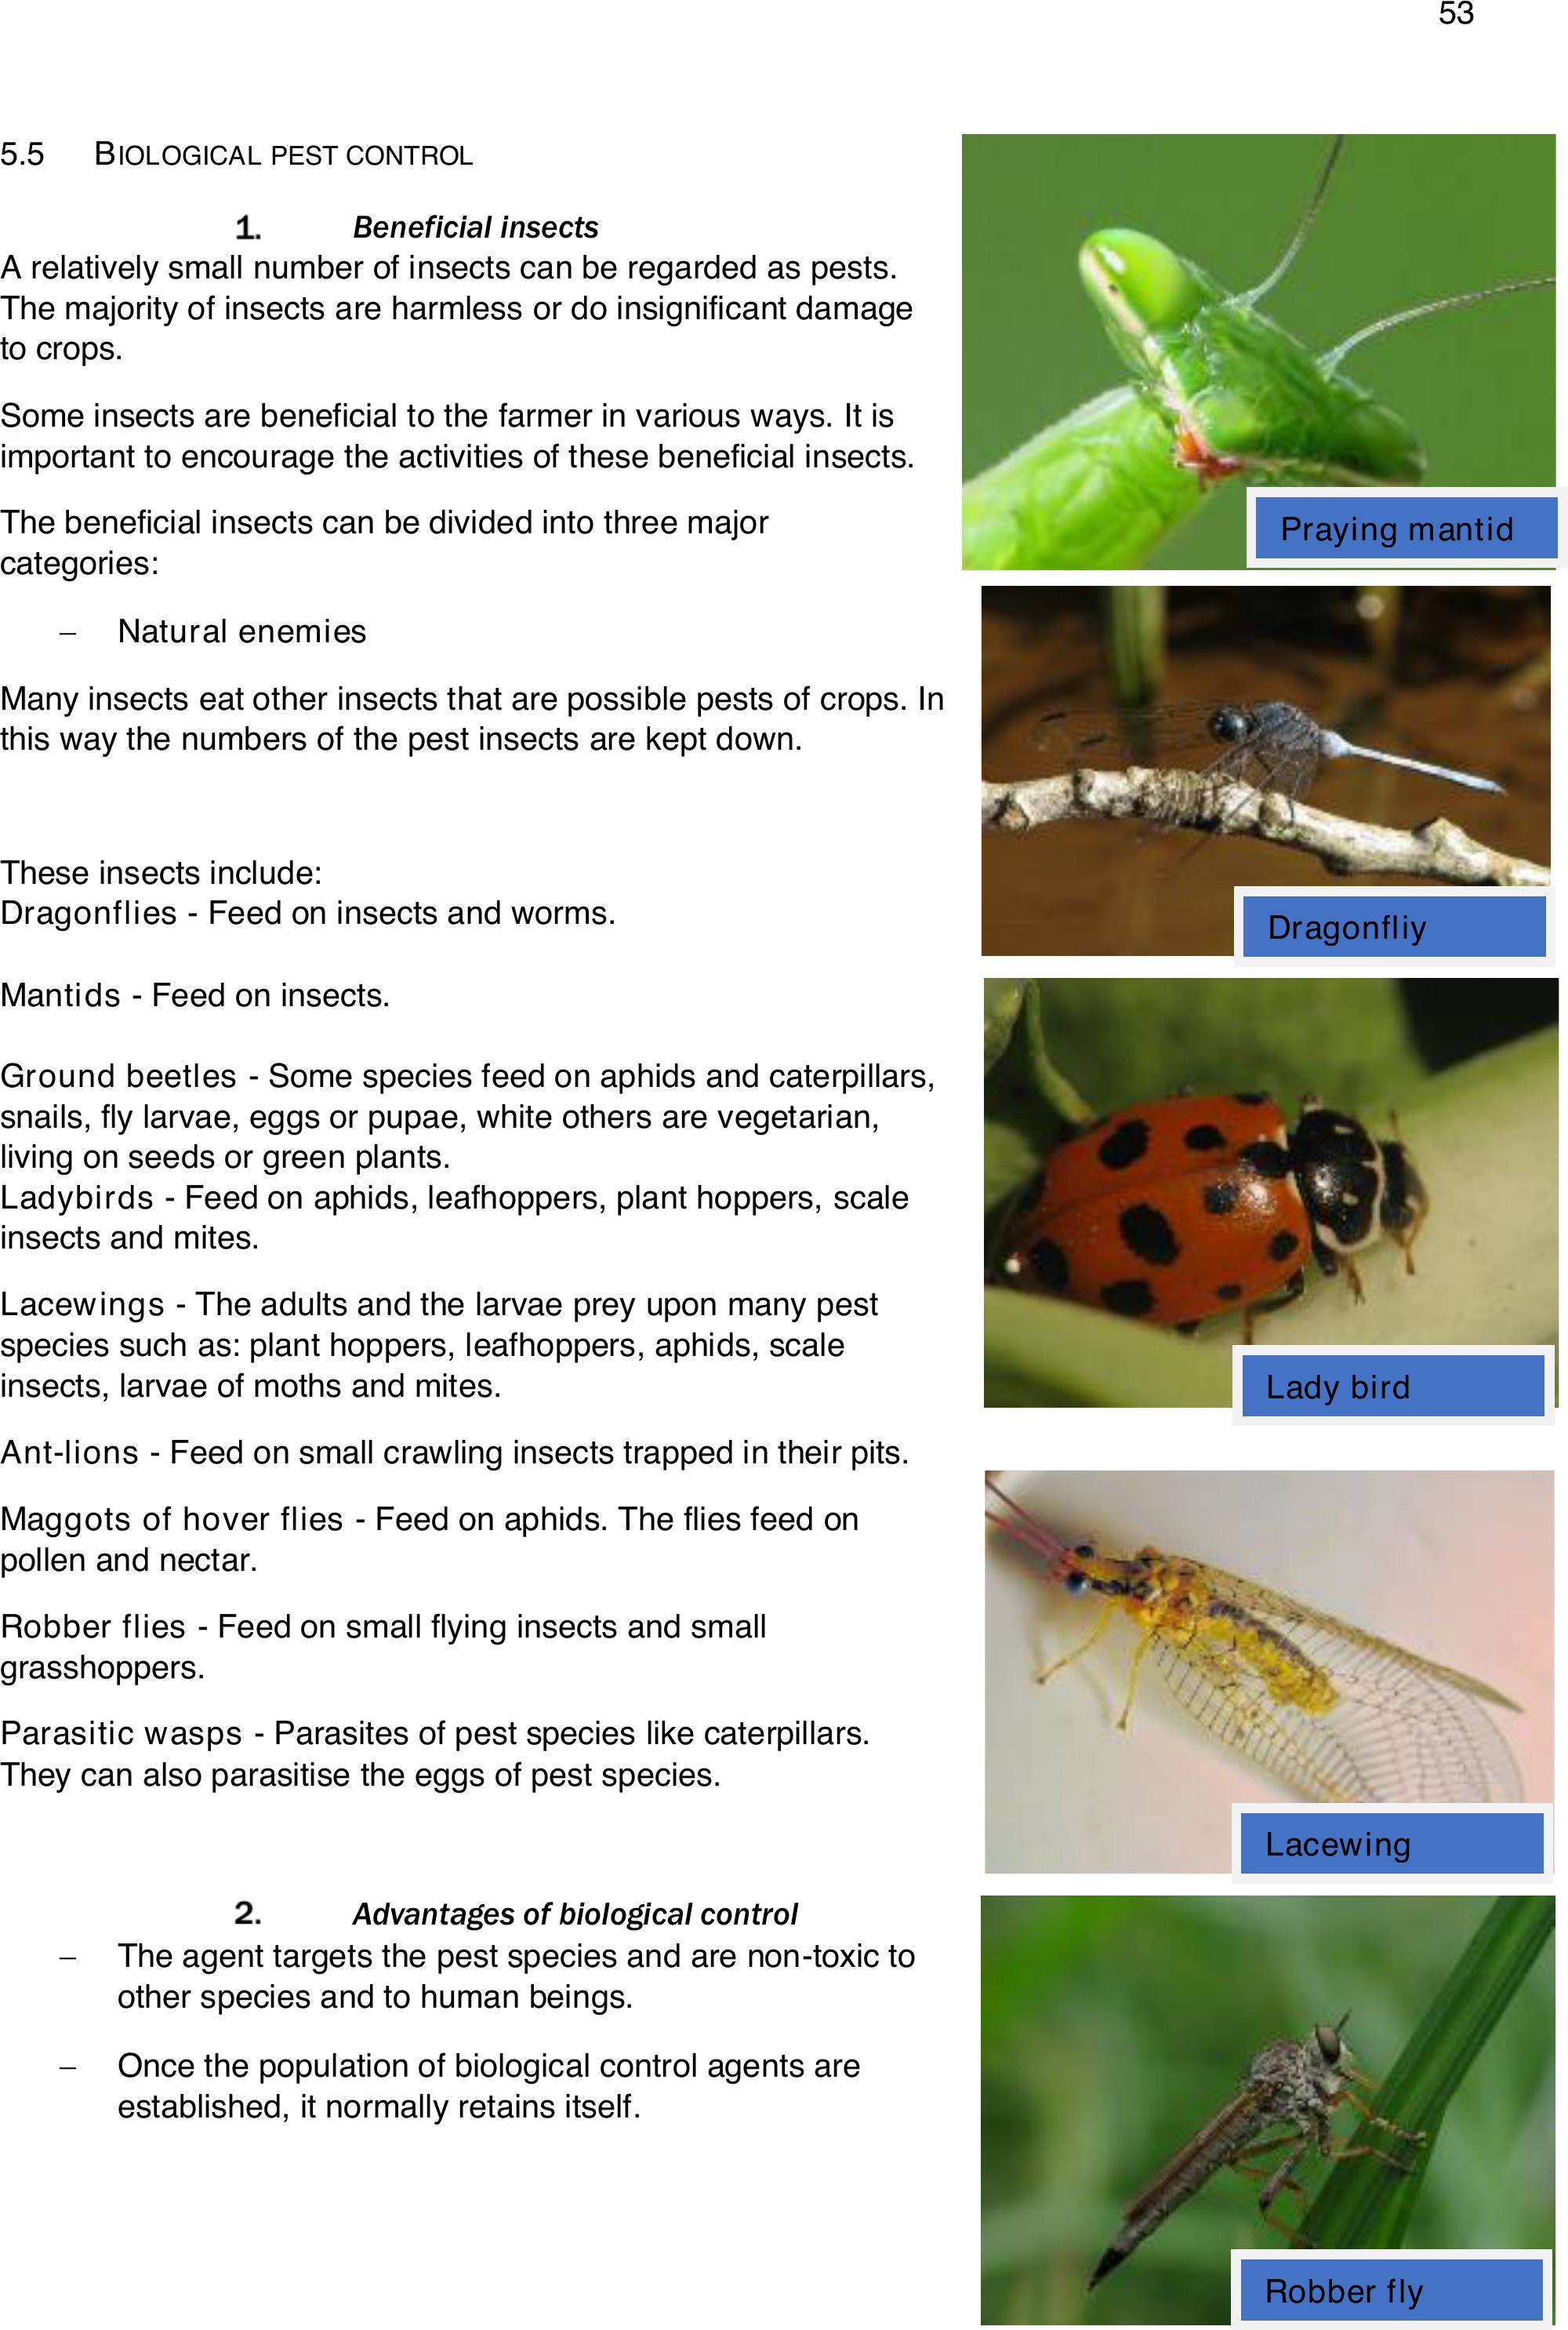
53
5.5 BIOLOGICAL PEST CONTROL
Beneficial insects
A relatively small number of insects can be regarded as pests.
The majority of insects are harmless or do insignificant damage
to crops.
Some insects are beneficial to the farmer in various ways. It is
important to encourage the activities of these beneficial insects.
The beneficial insects can be divided into three major
categories:
−Natural enemies
Many insects eat other insects that are possible pests of crops. In
this way the numbers of the pest insects are kept down.
These insects include:
Dragonflies - Feed on insects and worms.
Mantids- Feed on insects.
Ground beetles - Some species feed on aphids and caterpillars,
snails, fly larvae, eggs or pupae, white others are vegetarian,
living on seeds or green plants.
Ladybirds - Feed on aphids, leafhoppers, plant hoppers, scale
insects and mites.
Lacewings - The adults and the larvae prey upon many pest
species such as: plant hoppers, leafhoppers, aphids, scale
insects, larvae of moths and mites.
Ant-lions - Feed on small crawling insects trapped in their pits.
Maggots of hover flies - Feed on aphids. The flies feed on
pollen and nectar.
Robber flies - Feed on small flying insects and small
grasshoppers.
Parasitic wasps- Parasites of pest species like caterpillars.
They can also parasitise the eggs of pest species.
Advantages of biological control
−The agent targets the pest species and are non-toxic to
other species and to human beings.
−Once the population of biological control agents are
established, it normally retains itself.
Robber fly
Lady bird
Dragonfliy
Praying mantid
Lacewing

54
−The development of genetic resistance is minimised,
because the pest and the predator develops together.
Disadvantages of biological control
−Biological agents are slow to react. You will not get
immediate protection from pests.
−Predators will have to be protected from pesticides
sprayed elsewhere, because most pesticides kill all
insects.
Pollinators
Bees are the main pollinators, but insects like butterflies, moths,
several fly species and some wasps can also assist in the
pollination process.
Scavengers
Some insects live on dead organic material and help in the
breakdown of plant debris in compost heaps and in gardens.
Animal wastes and dead animal tissue are also broken down in
this manner, e.g. dung beetles.
6.Encouraging predators
It is important to recognize other predators of insects as well.
The encouragement of predators can help control pests and
diseases. A soil with a good structure can host a number of
beneficial soil organisms.
Birds - Some birds feed on insects and can help in protecting
your crop. Seed-eating birds will damage your crop.
Chickens feed on insects, but can damage seedlings.
Geese are used for weeding of orchards. They will eat fruit that
has dropped from the trees, preventing them from rotting and
contaminating other fruit.
Hover fly
Parasitic wasp
Bee
Diadem butterfly
Chameleon

55
Chameleons - Feed on insects that can damage your crops.
Lizards - Predators of insects.
Frogs are good for controlling insect pests.
Snakes eat rodents and insects.
Spiders eat insects. The majority of spiders are harmless to
human beings and they can be very helpful in keeping pests
away.
Physical control methods
This is the use of physical methods to prevent
or control the outbreak of pests or diseases.
Physical control methods include barriers,
traps and artificial guards. Some physical
crop protection methods are still in use, but
are mostly not regarded as important. Fly
traps and sticky yellow insect traps are
commonly used and very effective.
Right: A home made fly and fruit fly trap and
Far right; a sticky yellow insect trap.
Protective borders and barriers
Set up boards about 10cm high around your crop and paint them with fuel or oil, or
use bands made of cloth or board on larger stems or trees. These boards or
bands will discourage crawling insects from getting into the crop.
A tin can open at bothends, or toilet roll centers, can be placed over seedlings as
collars to keep cutworms away from the seedlings. They should be pushed firmly
into the soil (Shown alongside).
Traps
−Snail and slug traps
−Stale beer in a shallow plate or container, dug into the
ground. The slug or snail will crawl into the liquid and
drown. Other liquids containing yeast will also act as
baits.
Spider
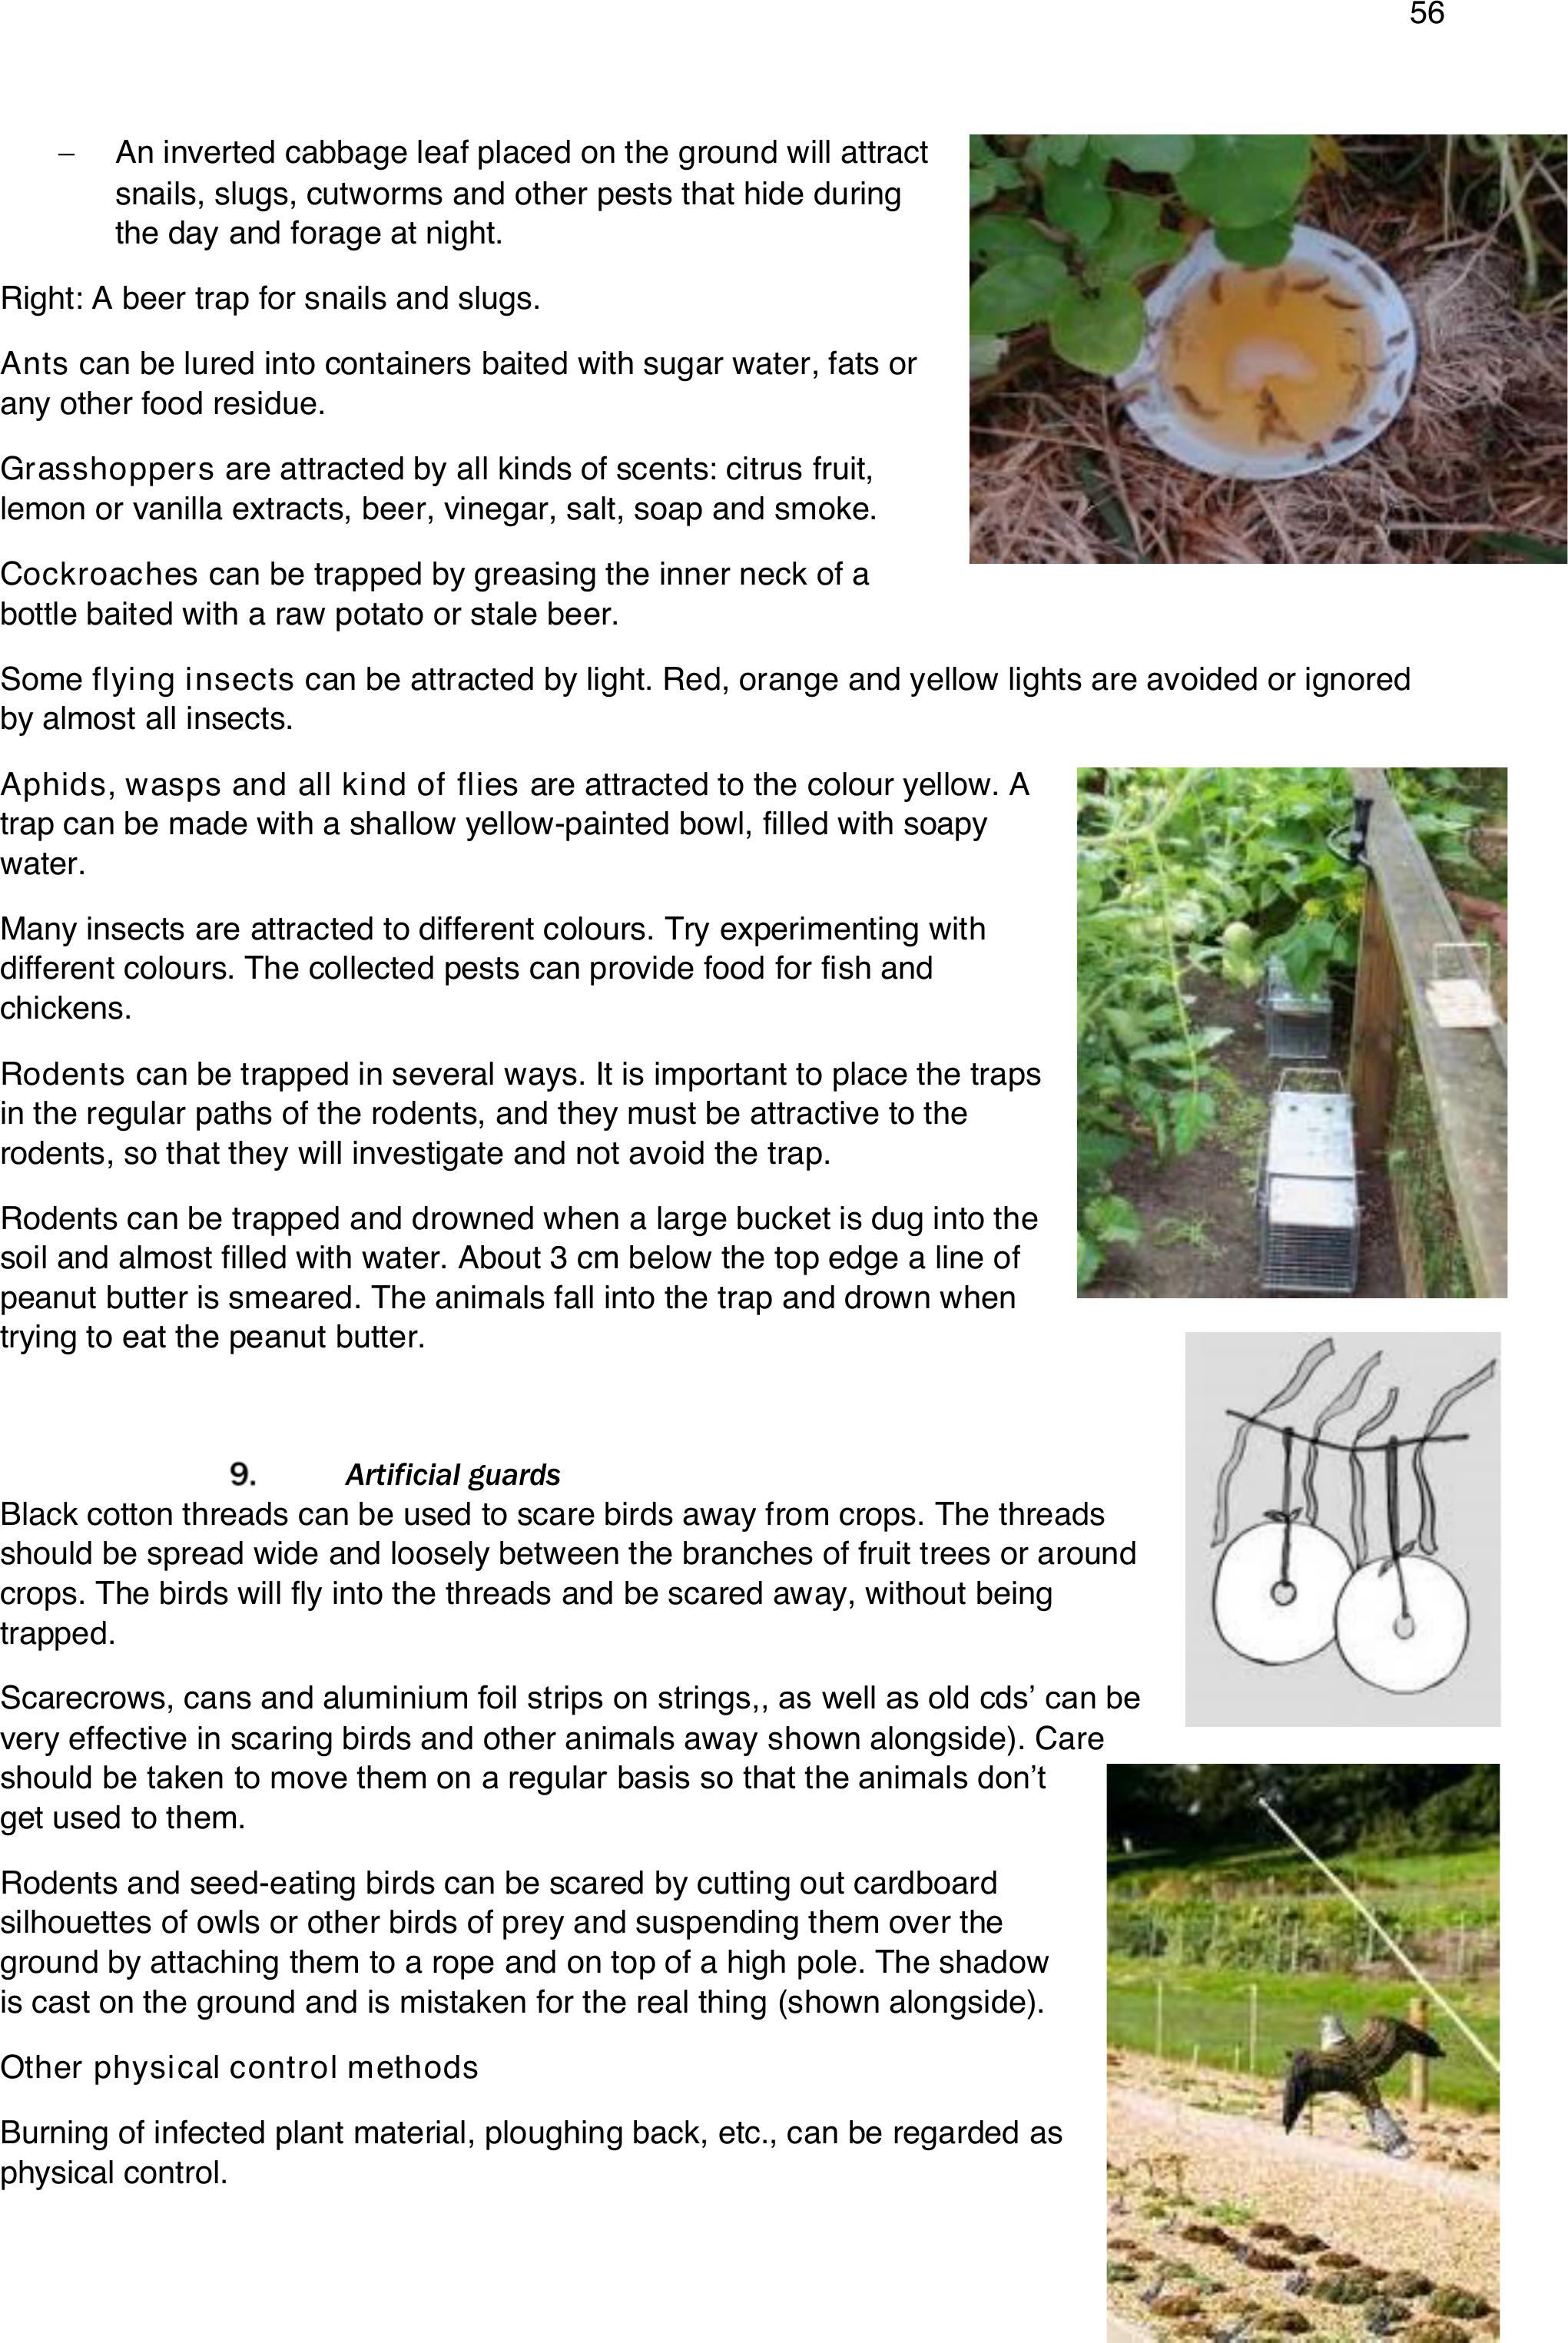
56
−An inverted cabbage leaf placed on the ground will attract
snails, slugs, cutworms and other pests that hide during
the day and forage at night.
Right: A beer trap for snails and slugs.
Ants can be lured into containers baited with sugar water, fats or
any other food residue.
Grasshoppers are attracted by all kinds of scents: citrus fruit,
lemon or vanilla extracts, beer, vinegar, salt, soap and smoke.
Cockroaches can be trapped by greasing the inner neck of a
bottle baited with a raw potato or stale beer.
Some flying insects can be attracted by light. Red, orange and yellow lights are avoided or ignored
by almost all insects.
Aphids, wasps and all kind of flies are attracted to the colour yellow. A
trap can be made with a shallow yellow-painted bowl, filled with soapy
water.
Many insects are attracted to different colours. Try experimenting with
different colours. The collected pests can provide food for fish and
chickens.
Rodents can be trapped in several ways. It is important to place the traps
in the regular paths of the rodents, and they must be attractive to the
rodents, so that they will investigate and not avoid the trap.
Rodents can be trapped and drowned when a large bucket is dug into the
soil and almost filled with water. About 3 cm below the top edge a line of
peanut butter is smeared. The animals fall into the trap and drown when
trying to eat the peanut butter.
Artificial guards
Black cotton threads can be used to scare birds away from crops. The threads
should be spread wide and loosely between the branches of fruit trees or around
crops. The birds will fly into the threads and be scared away, without being
trapped.
Scarecrows, cans and aluminium foil strips on strings,, as well as old cds’ can be
very effective in scaring birds and other animals away shown alongside). Care
should be taken to move them on a regular basis so that the animals don’t
get used to them.
Rodents and seed-eating birds can be scared by cutting out cardboard
silhouettes of owls or other birds of prey and suspending them over the
ground by attaching them to a rope and on top of a high pole. The shadow
is cast on the ground and is mistaken for the real thing (shown alongside).
Other physical control methods
Burning of infected plant material, ploughing back, etc., can be regarded as
physical control.
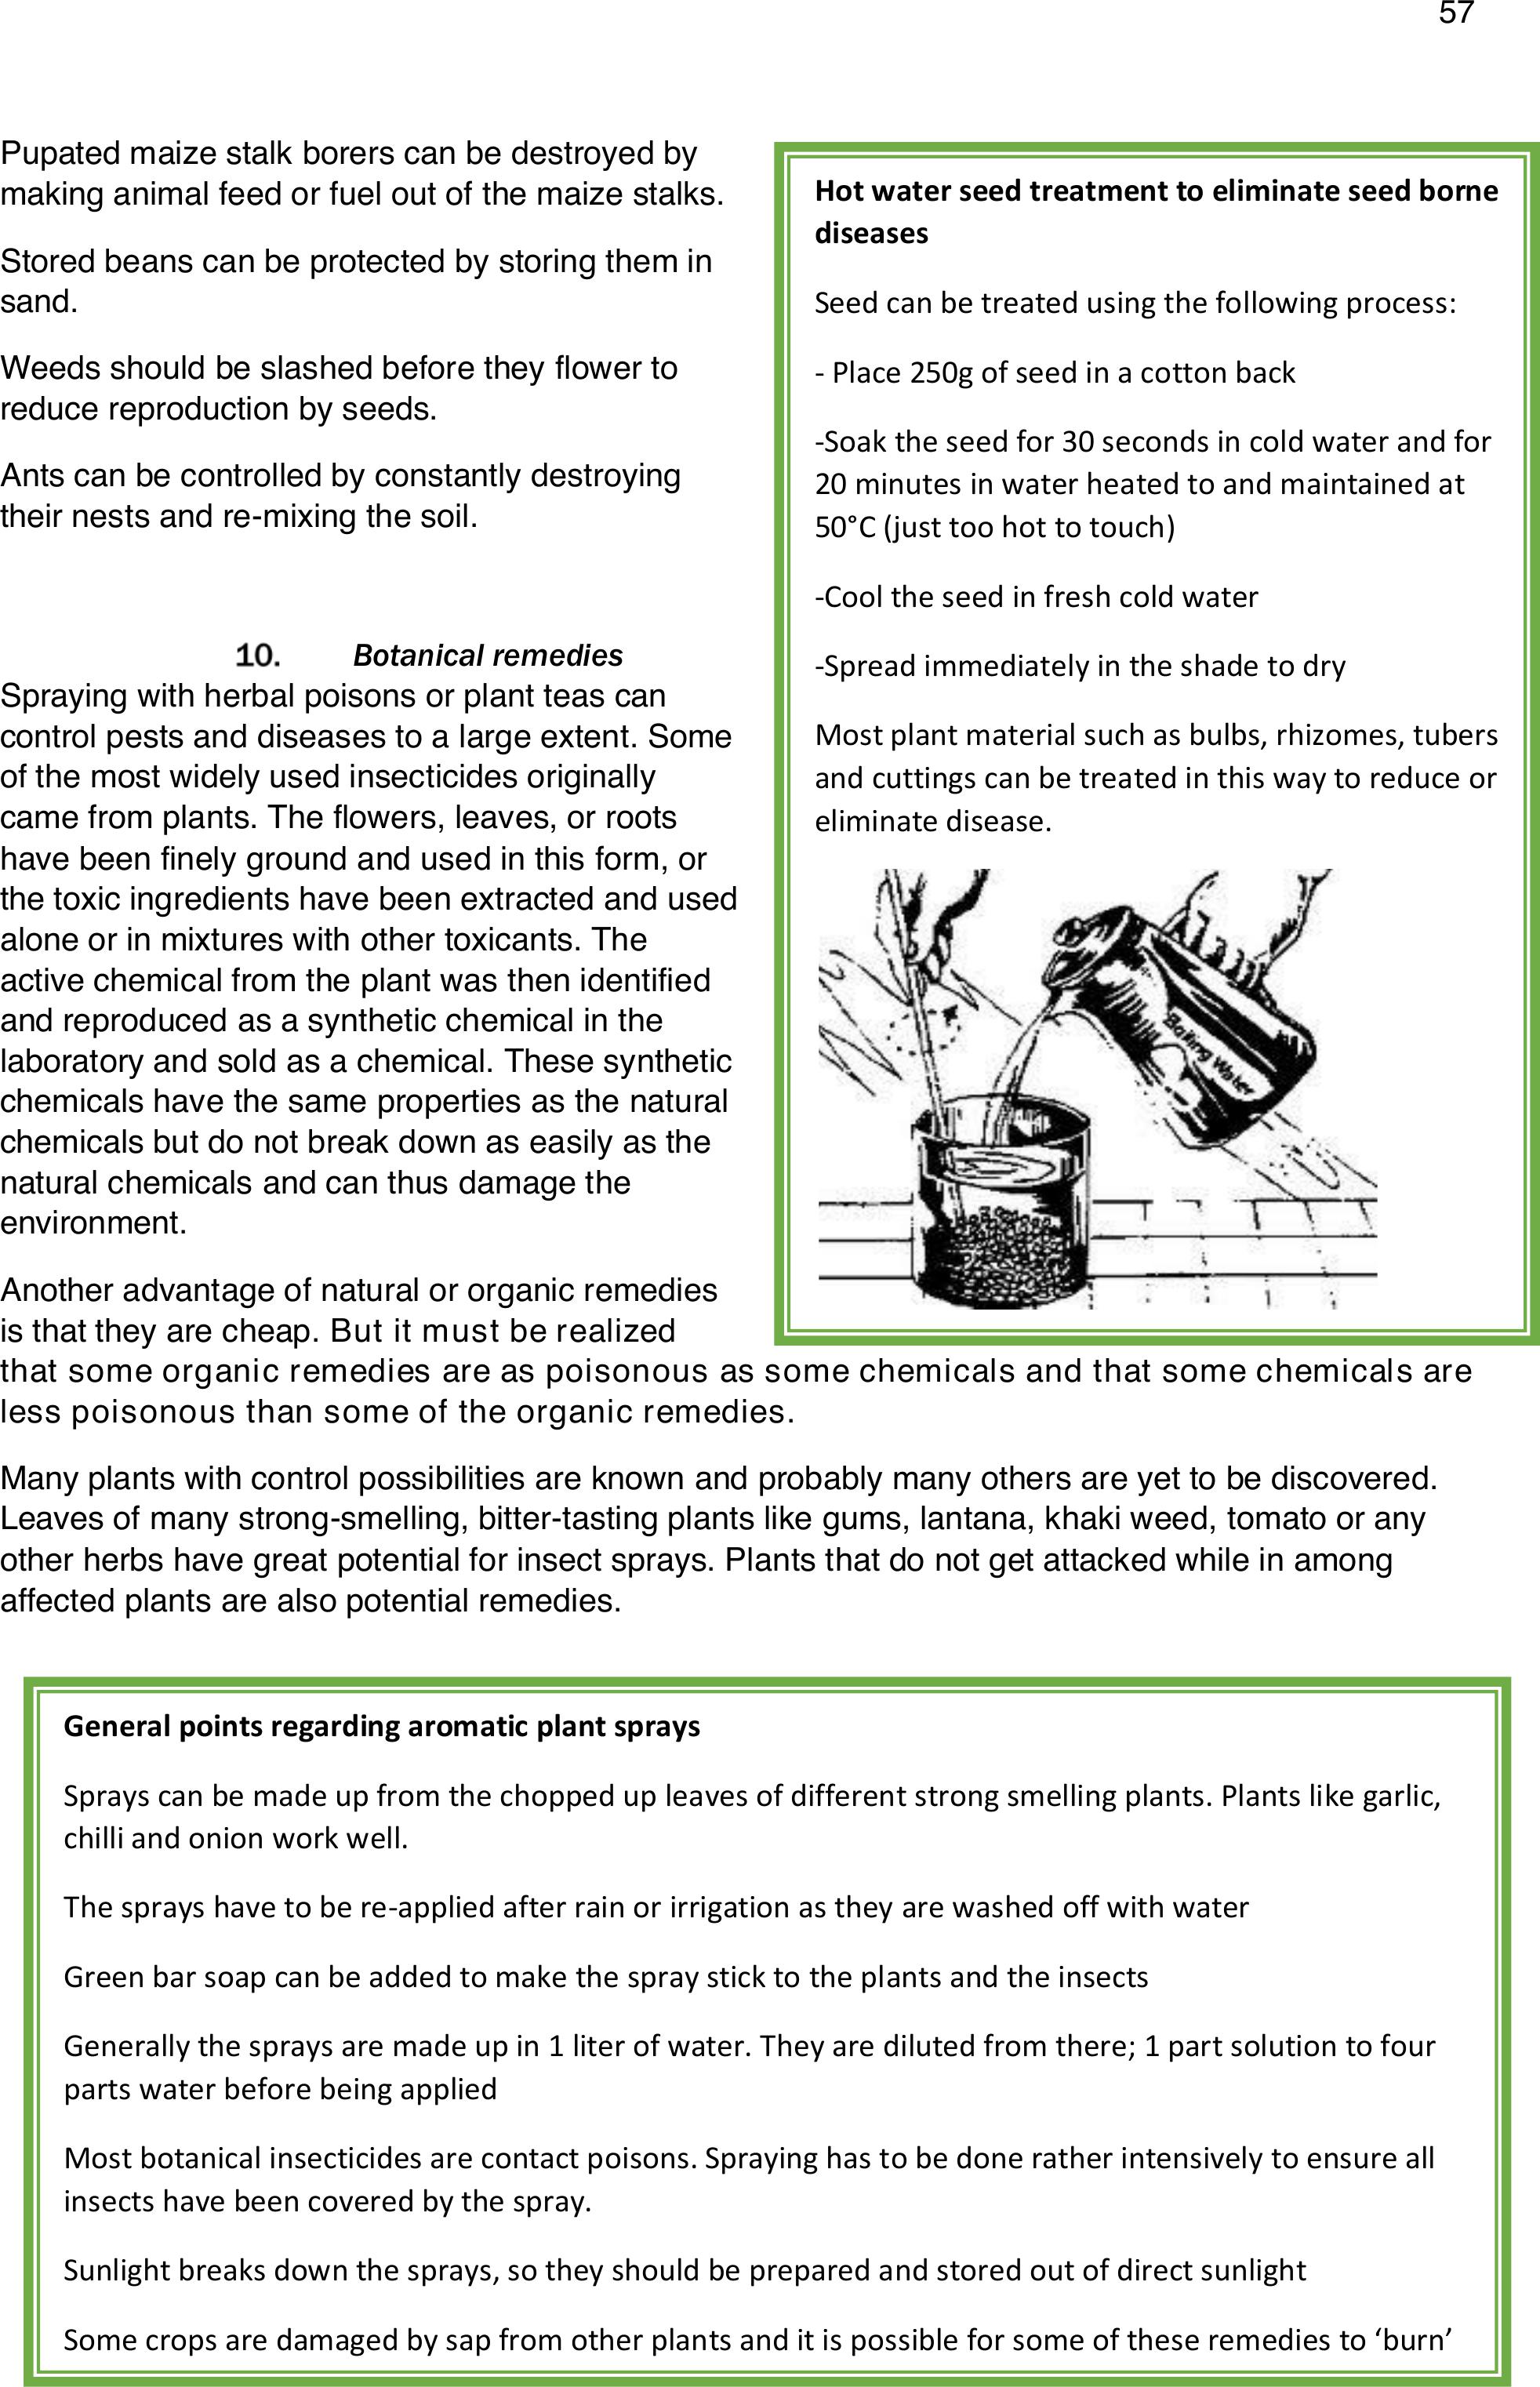
57
Pupated maize stalk borers can be destroyed by
making animal feed or fuel out of the maize stalks.
Stored beans can be protected by storing them in
sand.
Weeds should be slashed before they flower to
reduce reproduction by seeds.
Ants can be controlled by constantly destroying
their nests and re-mixing the soil.
Botanical remedies
Spraying with herbal poisons or plant teas can
control pests and diseases to a large extent. Some
of the most widely used insecticides originally
came from plants. The flowers, leaves, or roots
have been finely ground and used in this form, or
the toxic ingredients have been extracted and used
alone or in mixtures with other toxicants. The
active chemical from the plant was then identified
and reproduced as a synthetic chemical in the
laboratory and sold as a chemical. These synthetic
chemicals have the same properties as the natural
chemicals but do not break down as easily as the
natural chemicals and can thus damage the
environment.
Another advantage of natural or organic remedies
is that they are cheap. But it must be realized
that some organic remedies are as poisonous as some chemicals and that some chemicals are
less poisonous than some of the organic remedies.
Many plants with control possibilities are known and probably many others are yet to be discovered.
Leaves of many strong-smelling, bitter-tasting plants like gums, lantana, khaki weed, tomato or any
other herbs have great potential for insect sprays. Plants that do not get attacked while in among
affected plants are also potential remedies.
Hot water seed treatment to eliminate seed borne
diseases
Seed can be treated using the following process:
- Place 250g of seed in a cotton back
-Soak the seed for 30 seconds in cold water and for
20 minutes in water heated to and maintained at
50°C (just too hot to touch)
-Cool the seed in fresh cold water
-Spread immediately in the shade to dry
Most plant material such as bulbs, rhizomes, tubers
and cuttings can be treated in this way to reduce or
eliminate disease.
General points regarding aromatic plant sprays
Sprays can be made up from the chopped up leaves of different strong smelling plants. Plants like garlic,
chilli and onion work well.
The sprays have to be re-applied after rain or irrigation as they are washed off with water
Green bar soap can be added to make the spray stick to the plants and the insects
Generally the sprays are made up in 1 liter of water. They are diluted from there; 1 part solution to four
parts water before being applied
Most botanical insecticides are contact poisons. Spraying has to be done rather intensively to ensure all
insects have been covered by the spray.
Sunlight breaks down the sprays, so they should be prepared and stored out of direct sunlight
Some crops are damaged by sap from other plants and it is possible for some of these remedies to ‘burn’
the leaves of plants they are applied to. Always test a new remedy on a small number of plants first
For most applications against insects the best time of day to spray is in the late afternoon
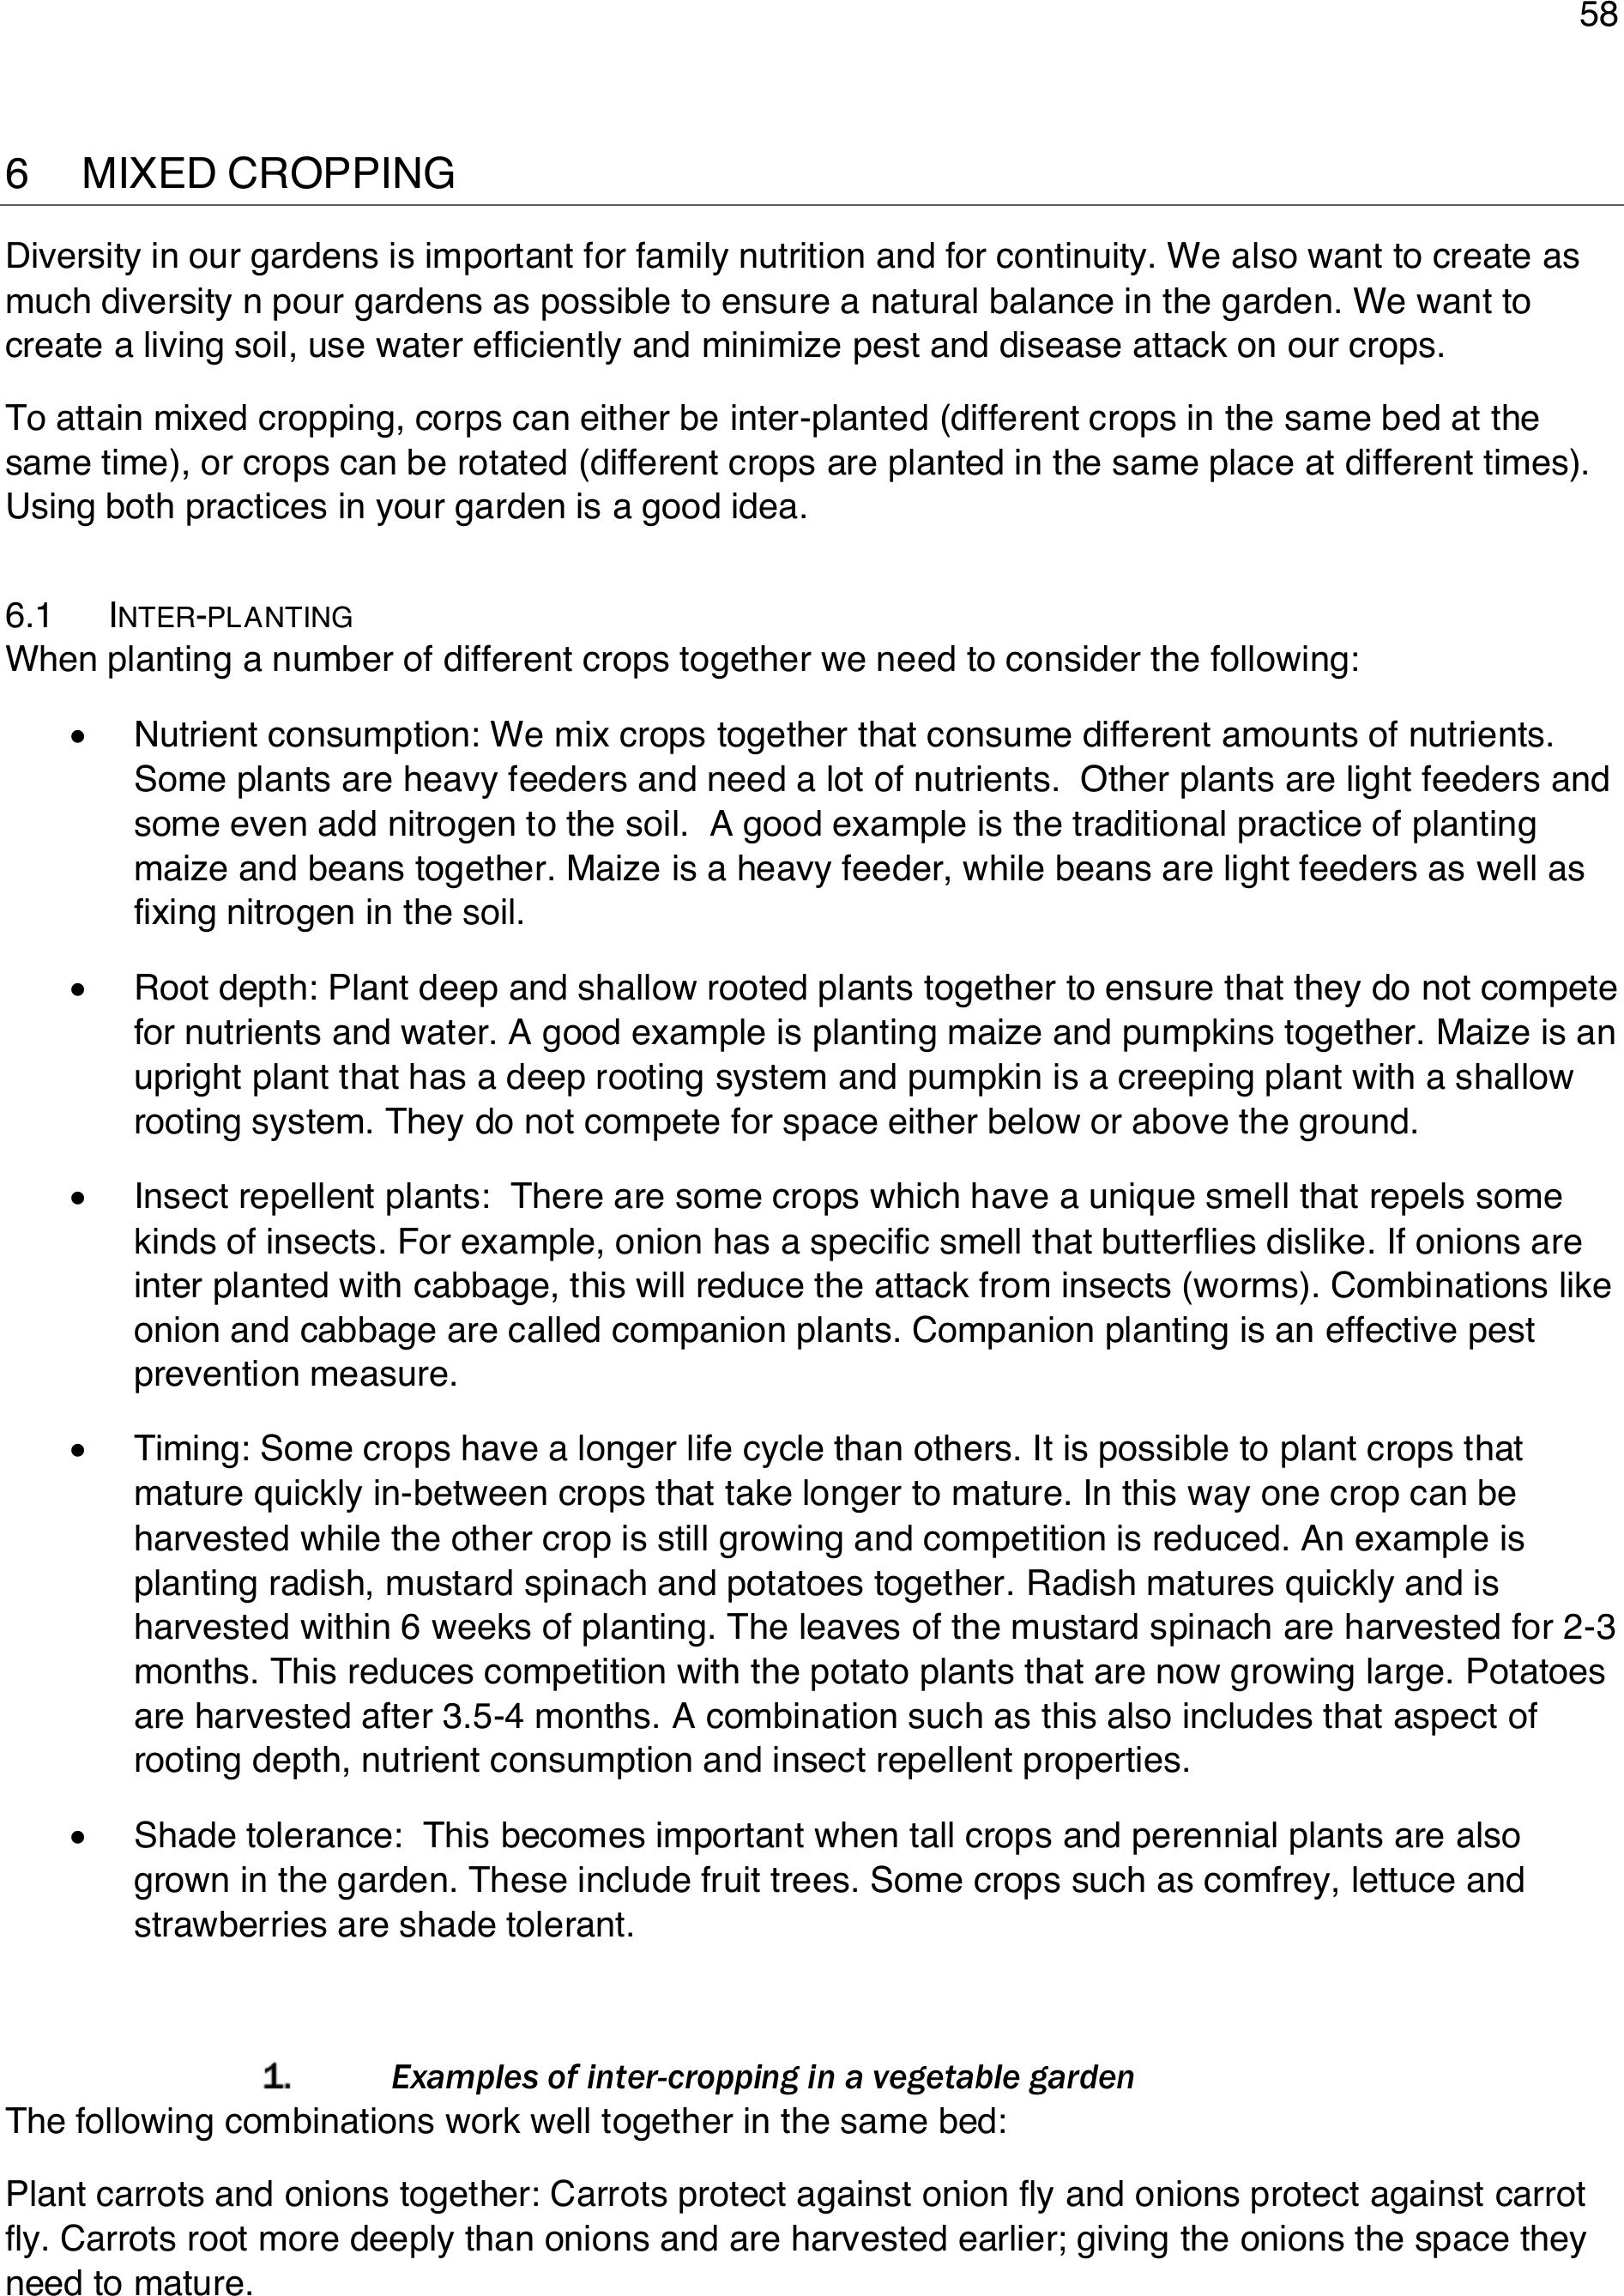
58
6 MIXEDCROPPING
Diversity in our gardens is important for family nutrition and for continuity. We also want to create as
much diversity n pour gardens as possible to ensure a natural balance in the garden. We want to
create a living soil, use water efficiently and minimize pest and disease attack on our crops.
To attain mixed cropping, corps can either be inter-planted (different crops in the same bed at the
same time), or crops can be rotated (different crops are planted in the same place at different times).
Using both practices in your garden is a good idea.
6.1 INTER-PLANTING
When planting a number of different crops together we need to consider the following:
•Nutrient consumption: We mix crops together that consume different amounts of nutrients.
Some plants are heavy feeders and need a lot of nutrients. Other plants are light feeders and
some even add nitrogen to the soil. A good example is the traditional practice of planting
maize and beans together. Maize is a heavy feeder, while beans are light feeders as well as
fixing nitrogen in the soil.
•Root depth: Plant deep and shallow rooted plants together to ensure that they do not compete
for nutrients and water. A good example is planting maize and pumpkins together. Maize is an
upright plant that has a deep rooting system and pumpkin is a creeping plant with a shallow
rooting system. They do not compete for space either below or above the ground.
•Insect repellent plants: There are some crops which have a unique smell that repels some
kinds of insects. For example, onion has a specific smell that butterflies dislike. If onions are
inter planted with cabbage, this will reduce the attack from insects (worms). Combinations like
onion and cabbage are called companion plants. Companion planting is an effective pest
prevention measure.
•Timing: Some crops have a longer life cycle than others. It is possible to plant crops that
mature quickly in-between crops that take longer to mature. In this way one crop can be
harvested while the other crop is still growing and competition is reduced. An example is
planting radish, mustard spinach and potatoes together. Radish matures quickly and is
harvested within 6 weeks of planting. The leaves of the mustard spinach are harvested for 2-3
months. This reduces competition with the potato plants that are now growing large. Potatoes
are harvested after 3.5-4 months. A combination such as this also includes that aspect of
rooting depth, nutrient consumption and insect repellent properties.
•Shade tolerance: This becomes important when tall crops and perennial plants are also
grown in the garden. These include fruit trees. Some crops such as comfrey, lettuce and
strawberries are shade tolerant.
Examples of inter-cropping in a vegetable garden
The following combinations work well together in the same bed:
Plant carrots and onions together: Carrots protect against onion fly and onions protect against carrot
fly. Carrots root more deeply than onions and are harvested earlier; giving the onions the space they
need to mature.
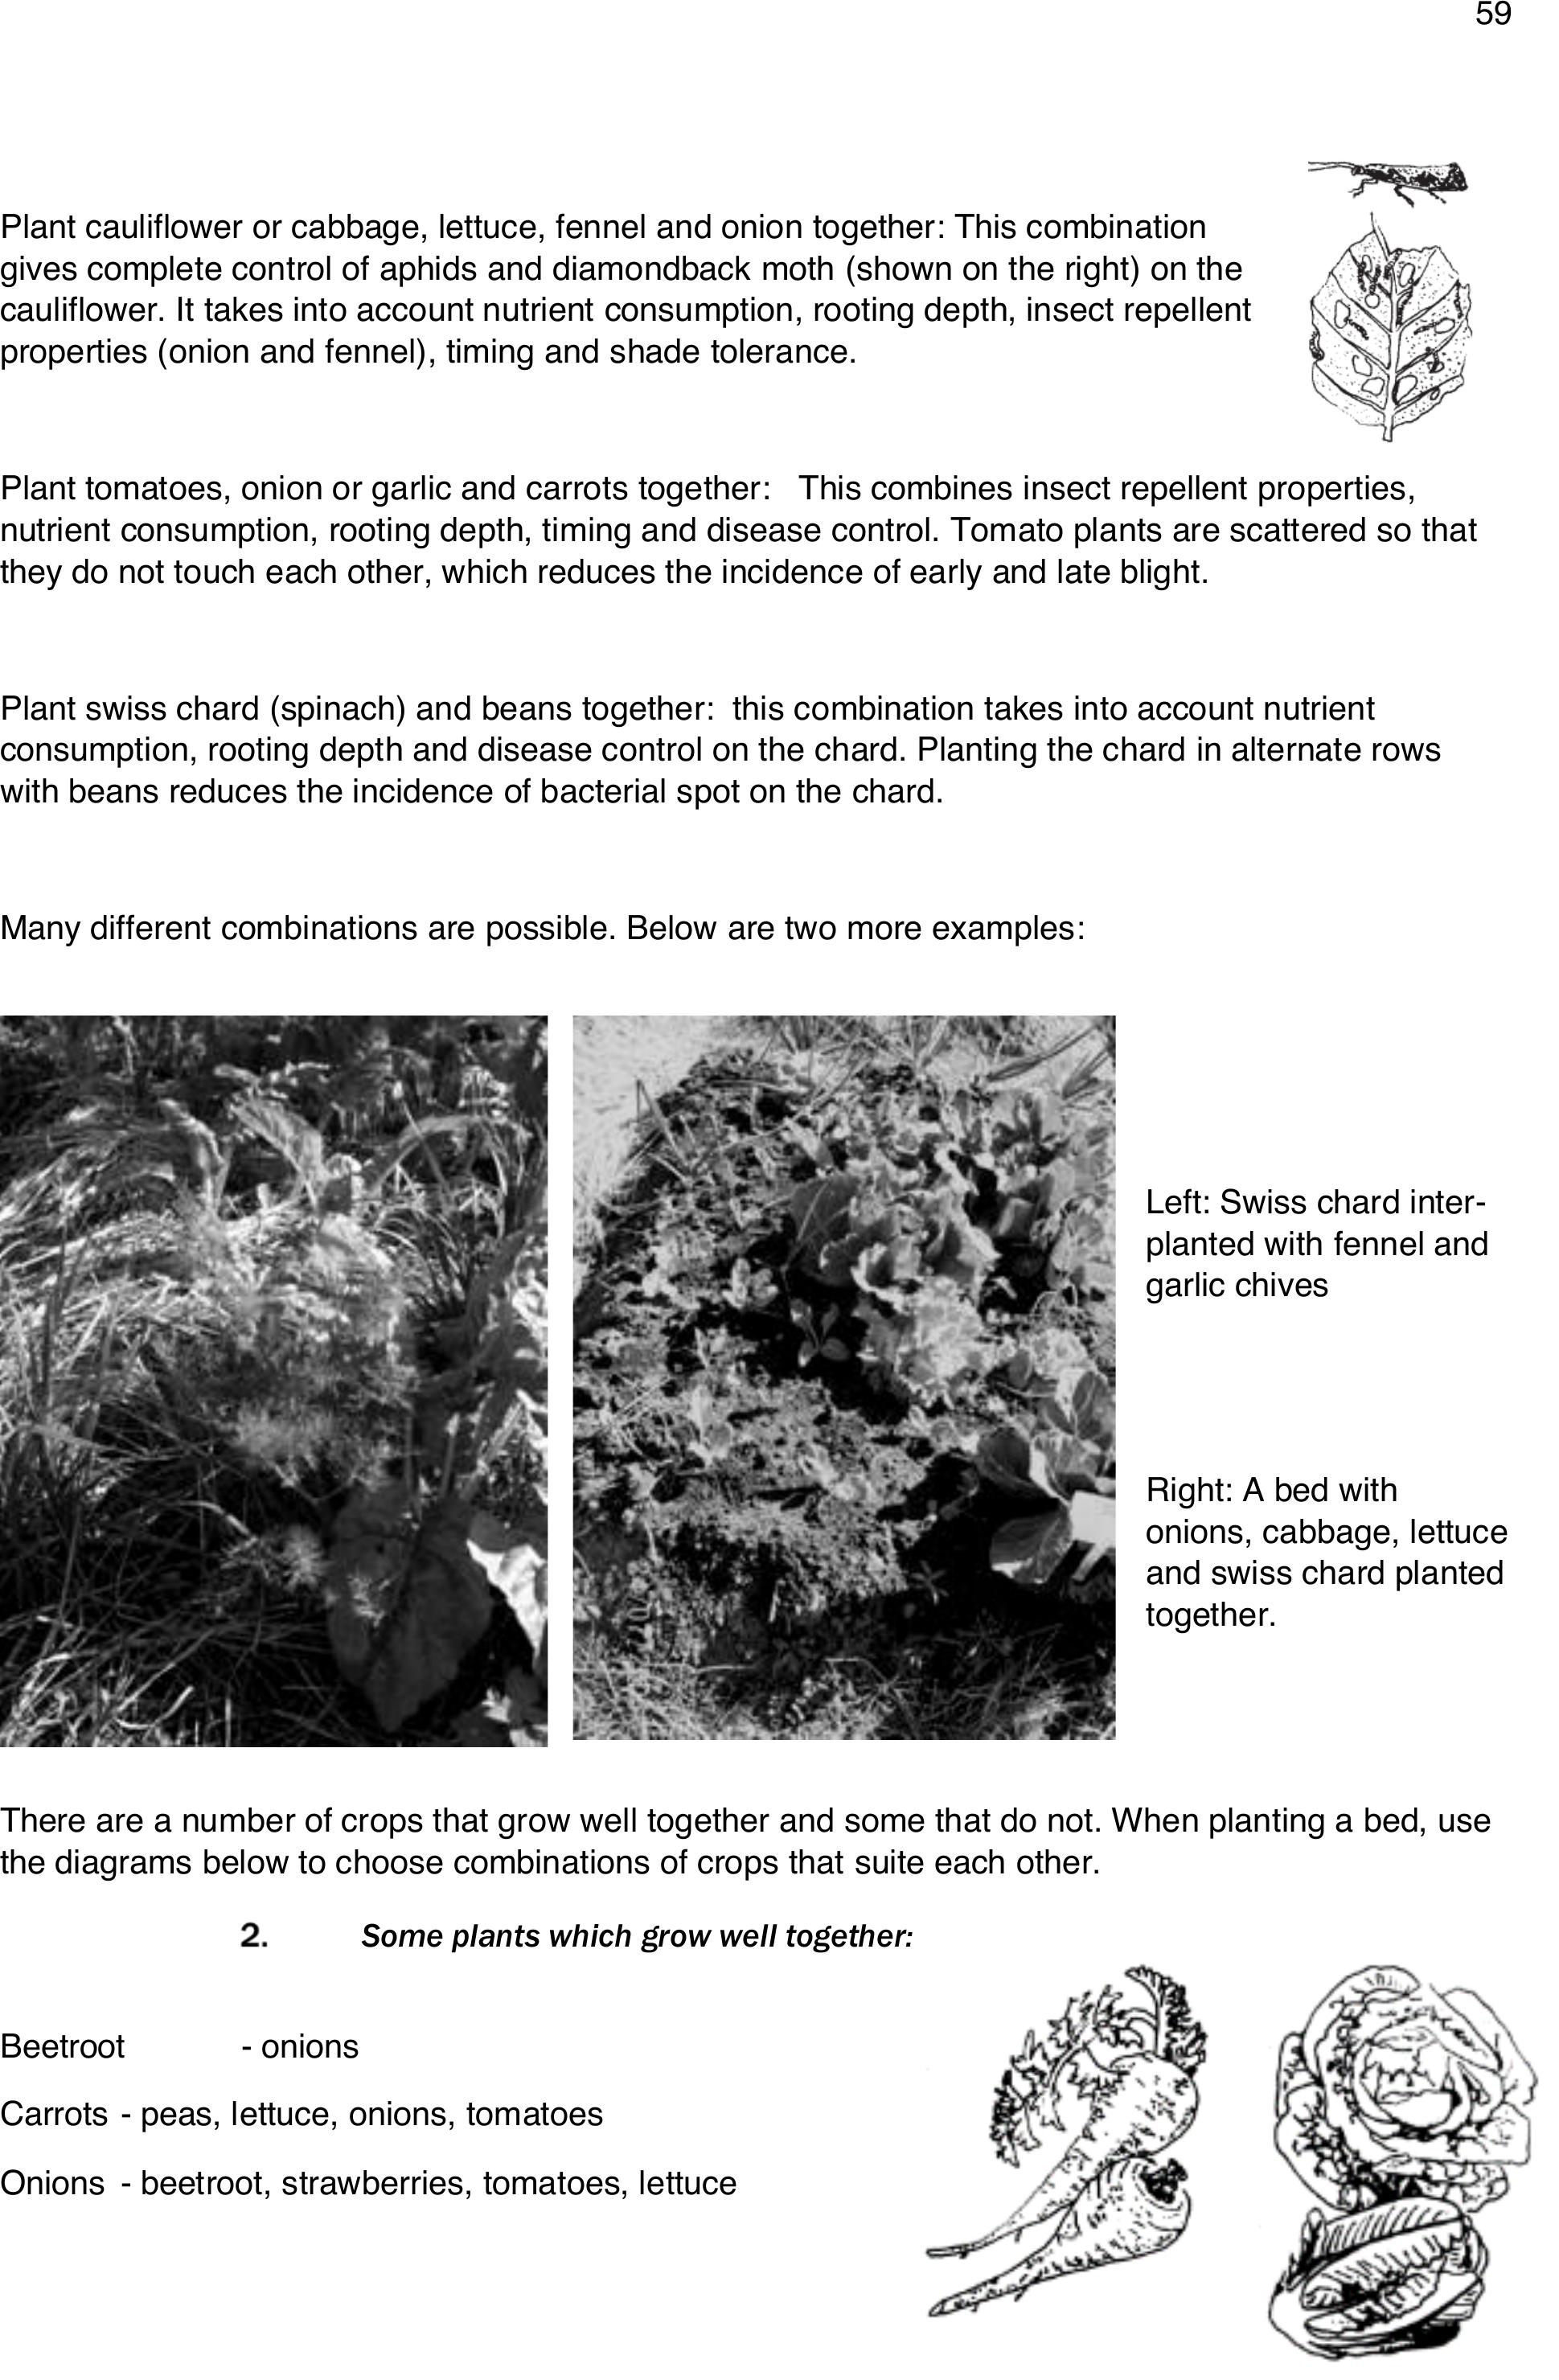
59
Plant cauliflower or cabbage, lettuce, fennel and onion together: This combination
gives complete control of aphids and diamondback moth (shown on the right) on the
cauliflower. It takes into account nutrient consumption, rooting depth, insect repellent
properties (onion and fennel), timing and shade tolerance.
Plant tomatoes, onion or garlic and carrots together: This combines insect repellent properties,
nutrient consumption, rooting depth, timing and disease control. Tomato plants are scattered so that
they do not touch each other, which reduces the incidence of early and late blight.
Plant swiss chard (spinach) and beans together: this combination takes into account nutrient
consumption, rooting depth and disease control on the chard. Planting the chard in alternate rows
with beans reduces the incidence of bacterial spot on the chard.
Many different combinations are possible. Below are two more examples:
Left: Swiss chard inter-
planted with fennel and
garlic chives
Right: A bed with
onions, cabbage, lettuce
and swiss chard planted
together.
There are a number of crops that grow well together and some that do not. When planting a bed, use
the diagrams below to choose combinations of crops that suite each other.
Some plants which grow well together:
Beetroot- onions
Carrots- peas, lettuce, onions, tomatoes
Onions - beetroot, strawberries, tomatoes, lettuce

60
Eggplant - beans
Cabbage - potatoes, beetroot, onions
Green Pepper- all vegetables
Lettuce - carrots, radishes, strawberries, cucumbers
Pumpkin - mealies
Swiss Chard - strawberries
Tomatoes- onions, carrots
Mealies - peanuts, peas, beans, cucumber, pumpkins, potatoes
Sunflowers - cucumbers
Beans - potatoes, carrots, cabbage, most other vegetables
Plants that do not grow well together:
There are some plants which do not grow well together. Try to avoid putting them in the same beds.
Try and experiment for yourself.
Beetroot- pole beans
Onion - peas and beans
Cabbage - strawberries
Pumpkin - potatoes
Tomatoes- potatoes and cabbage
Beans - onions
Sunflowers - potatoes
Advantages and disadvantages of inter-planting
Advantages
Disadvantages
Efficient use of space below and above ground
Looks “untidy”
Reduces and avoids pest and disease build-up
in the soil and in the garden
Can make harvesting of crops more time-
consuming
Reduces weeds. Covers the soil and uses
nutrients in an effective manner. Building of a
healthy, living soil is possible.
Weeding can be more time consuming initially,
as crops may be scattered, rather than being
planted in rows
61
Plants support each other in a synergistic
relationship that protects against pest and
disease attack and increases vigour and growth
Some shading may occur if plants are not
spaced well
Efficient use of water
Some plants may be over or under watered
depending on their life cycle. For example, some
plants may be seeding while others are still
growing.
6.2 CROP ROTATION
The same crops are not planted in the same areas, fields or beds season after season. Different
crops are planted in a 2-4 year rotation. These crops are chosen to have a mutually beneficial effect.
Effects of crop rotation
It prevents or stops the accumulation of insects and diseases. If the same crop is planted some
insects and diseases will become more every year!
•Different crops use different nutrients or plant food stored in the soil. In this way you do not
overuse some of the plant foods, while not using others.
•The soil can be covered all year round.
•Some crops add nutrients or nitrogen to the soil. Examples are beans, peas, broad beans,
soya beans, peanuts, cowpeas, lucerne and clover.
•It prevents the soil from building up bad or negative
reactions to specific plants. An example here is
nematodes on tomatoes and swiss chard.
Nematodes are very small worms that we cannot
see with our eyes. They live in the soil and feed on
the roots of your plants.
•There is no buildup of specific weeds.
There are a number of different crop rotation systems that
can be used. Below is an example of a system that is easy
to use and remember.
A 3 year rotation for vegetable and field crops:In the first
season after applying compost and or manure heavy
feeders or nitrogen consumers are planted.
In the second season light feeders are planted and
In the third season legumes are planted. This is followed by
another application of compost or manure and the cycle is repeated.
In trench beds, where the organic matter is decaying slowly in the soil, you may want to start with
legumes, move on to heavy feeders or nitrogen consumers and then move on to light feeders. This is
because during the decaying process plant nutrients will take a while to become available for use by
plants. The legumes can fix most of their own nitrogen and are thus a better starting point.
Preparing the bed well:
This would mean trenching, or
double digging or addition of a lot
of compost/manure forked into the
top 40cm of soil. You will need at
least 4 full spades for every
square meter.
A general recommendation is to
place 30 tons of compost to a
hectare of land. This comes to
about one half of a wheelbarrow
load for every square meter (which
is about the same as 4 full
spades!)
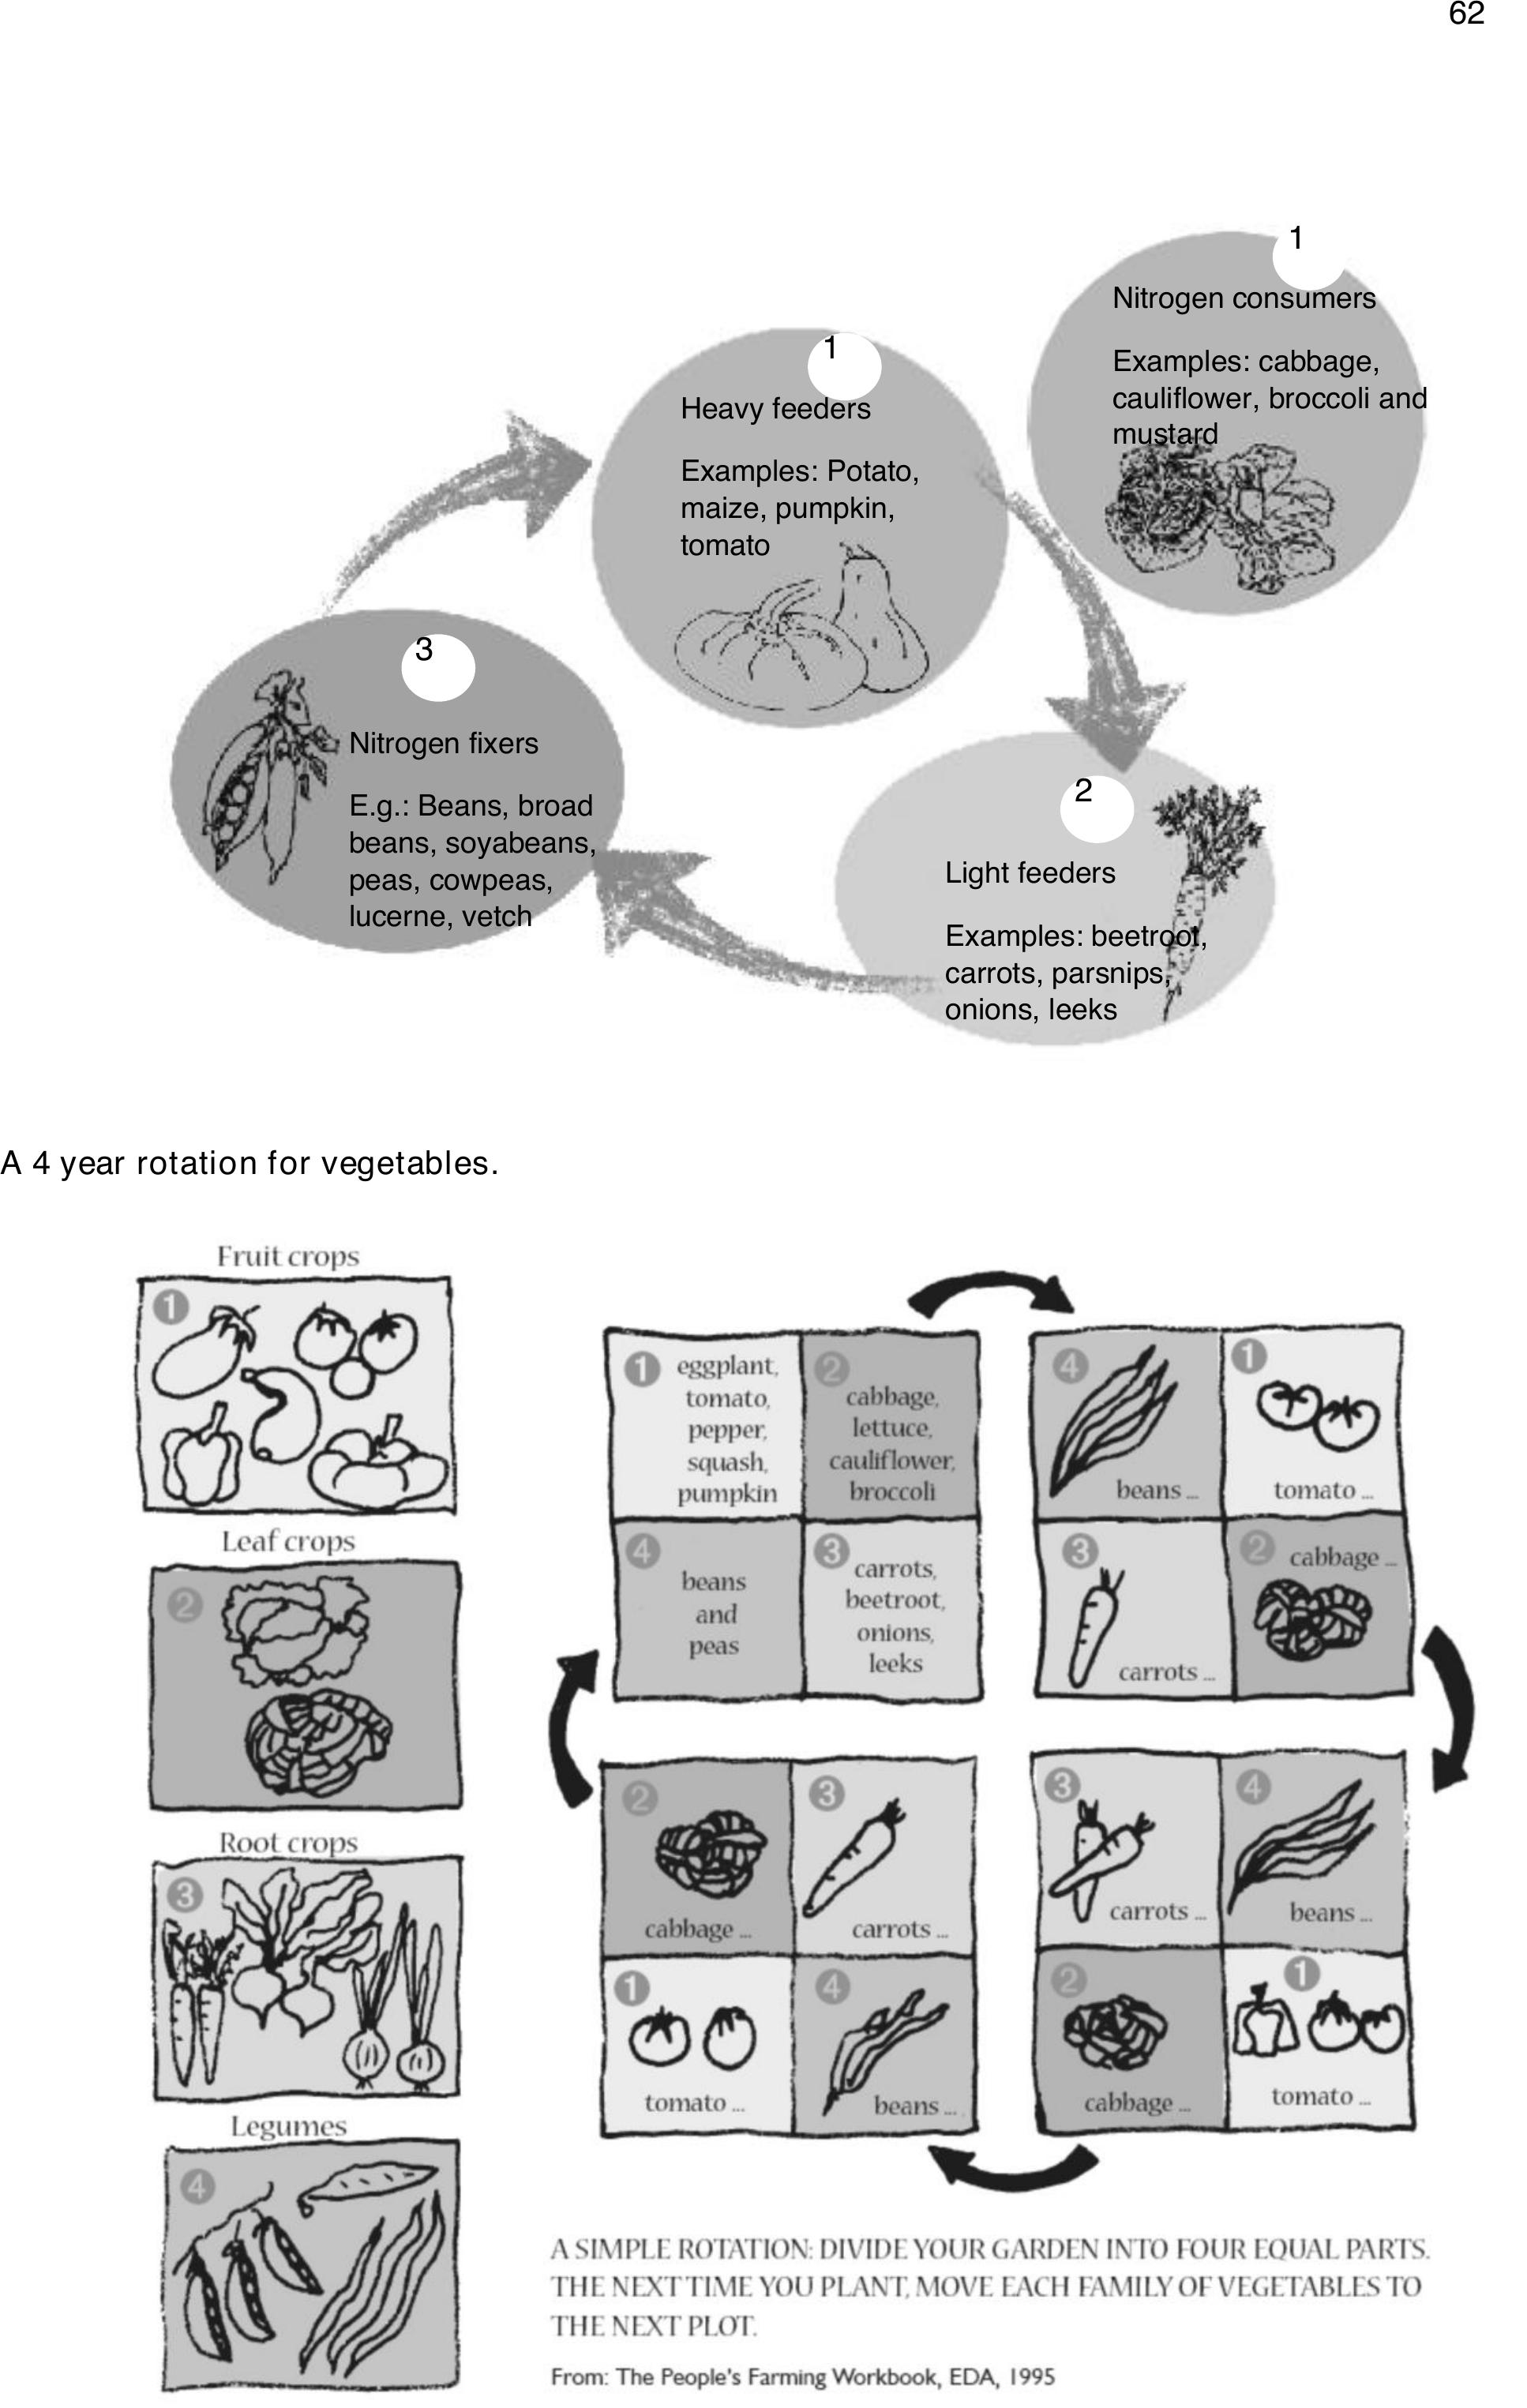
62
A 4 year rotation for vegetables.
Nitrogen fixers
E.g.: Beans, broad
beans, soyabeans,
peas, cowpeas,
lucerne, vetch
Light feeders
Examples: beetroot,
carrots, parsnips,
onions, leeks
Heavy feeders
Examples: Potato,
maize, pumpkin,
tomato
Nitrogen consumers
Examples: cabbage,
cauliflower, broccoli and
mustard
1
1
3
2
63
Prepare the land or bed well. Put a lot of compost or manure in your bed (4 full spades/ square
meter). Then:
Start by planting a fruiting crop. These plants need the most food.
Leaf crops need less and can follow fruit crops.
Then root crops can follow leaf crops without much addition of plant food. Root crops like fertile soil,
but do not like fresh manure or compost. It has to be well rotted.
Then, nitrogen fixers can follow, with addition of little or no plant food. Then you need to prepare the
land well again. Start once more with fruiting crops.
Advantages and disadvantages of crop rotation
Advantages
Disadvantages
No build up of pest and diseases
Soil nutrients are used effectively
Soil moisture is used effectively
A healthy living soil can be built up over time
Without a plan, either drawn or written on paper,
it is difficult to remember which crop is to follow
It can be tricky to decide which rotation to follow
when inter-planting is also used